How to Deploy the Privilege Management Agent Using Group Policy Objects (GPO)?
Group policy objects can be used to deploy agents on multiple Windows machines at the same time. GPOs can be associated at the Group level or at the OU level.
Pre-requisites: Download the agent installation MSI package, and the installation VB script from the Securden Endpoint Privilege Manager web interface.
How to Deploy the Privilege Management Agent Using Group Policy Objects and Associate with Groups?
The steps to create a group policy object for deploying the Securden Agent on Windows endpoints and associated with the GPO with groups have been explained below.
Step 1: Open the Group Policy Management Console (GPMC)
-
Open the Group Policy Management Console (GPMC) on the domain controller, or any system with Remote Server Administration Tools (RSAT) installed.
-
You can launch the console from the Start menu or by running
gpmc.mscfrom the Run dialog.
Step 2: Creating a GPO
-
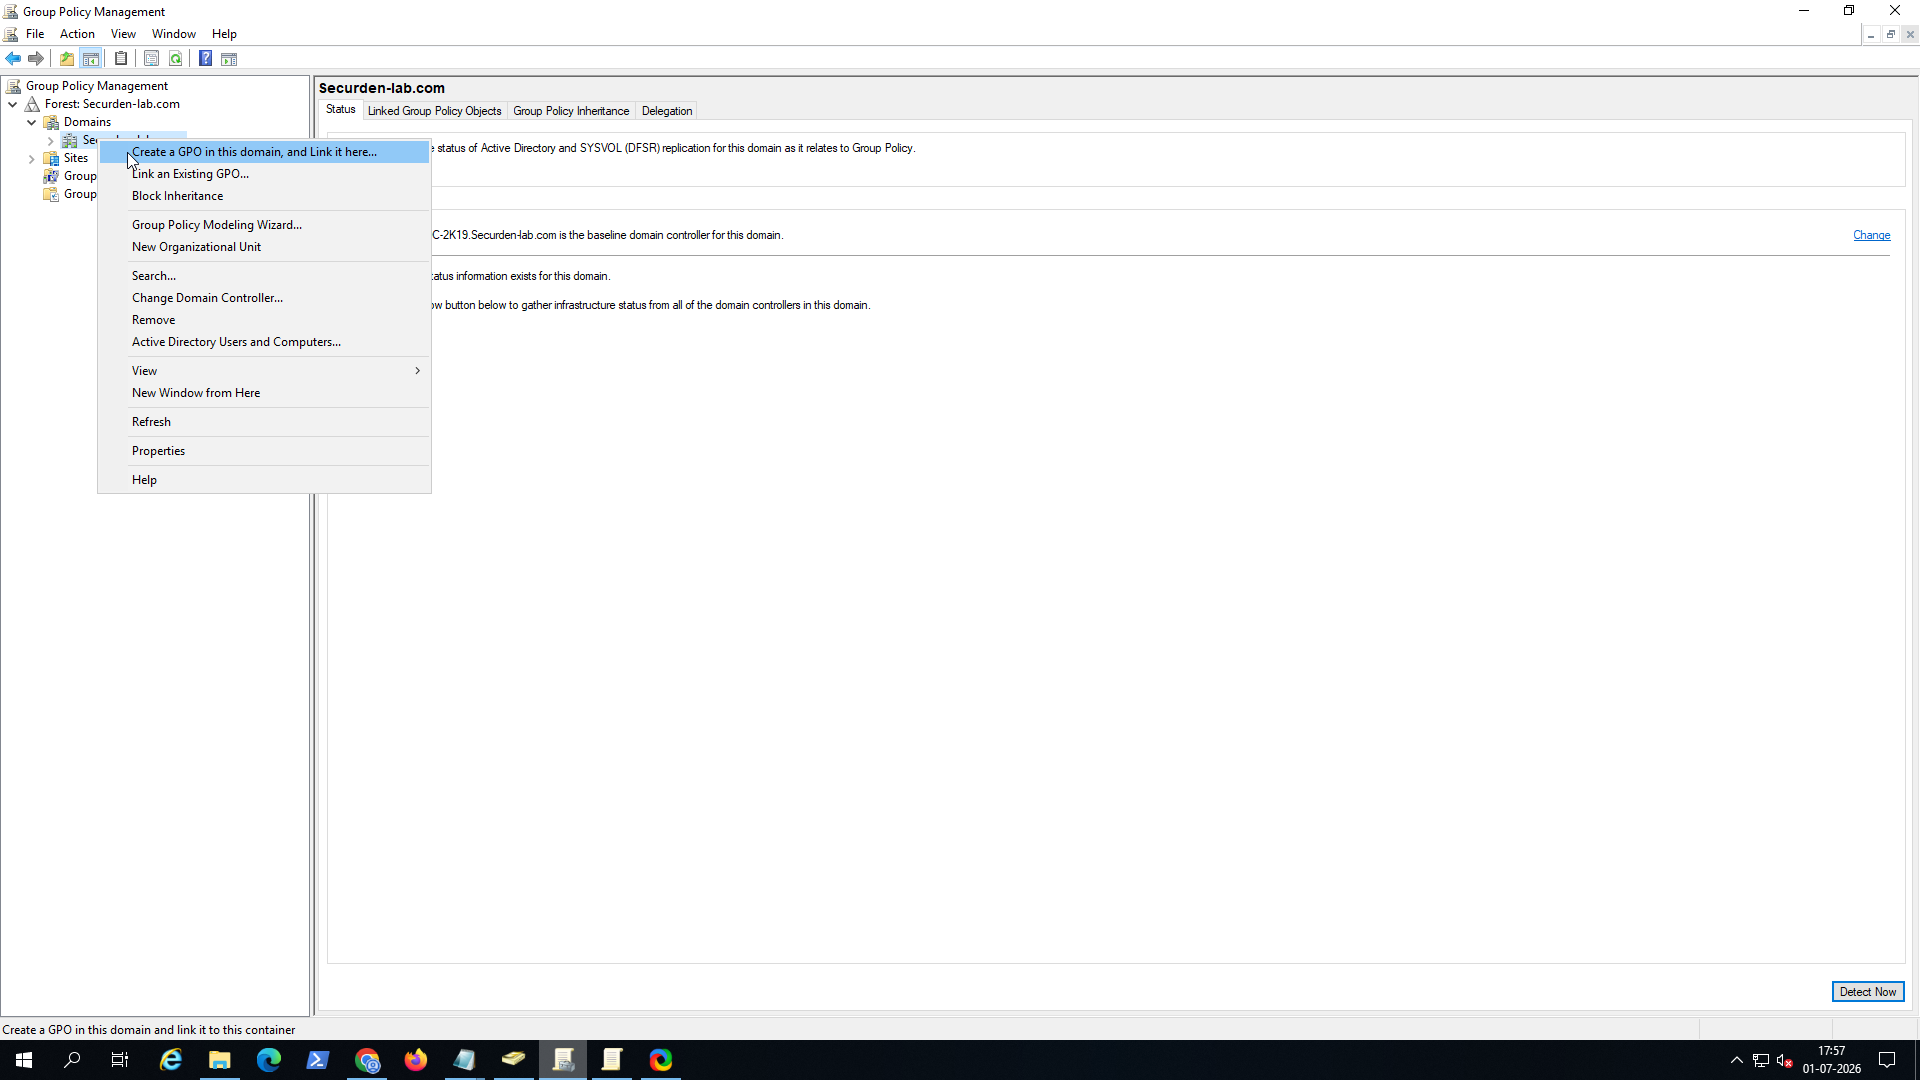
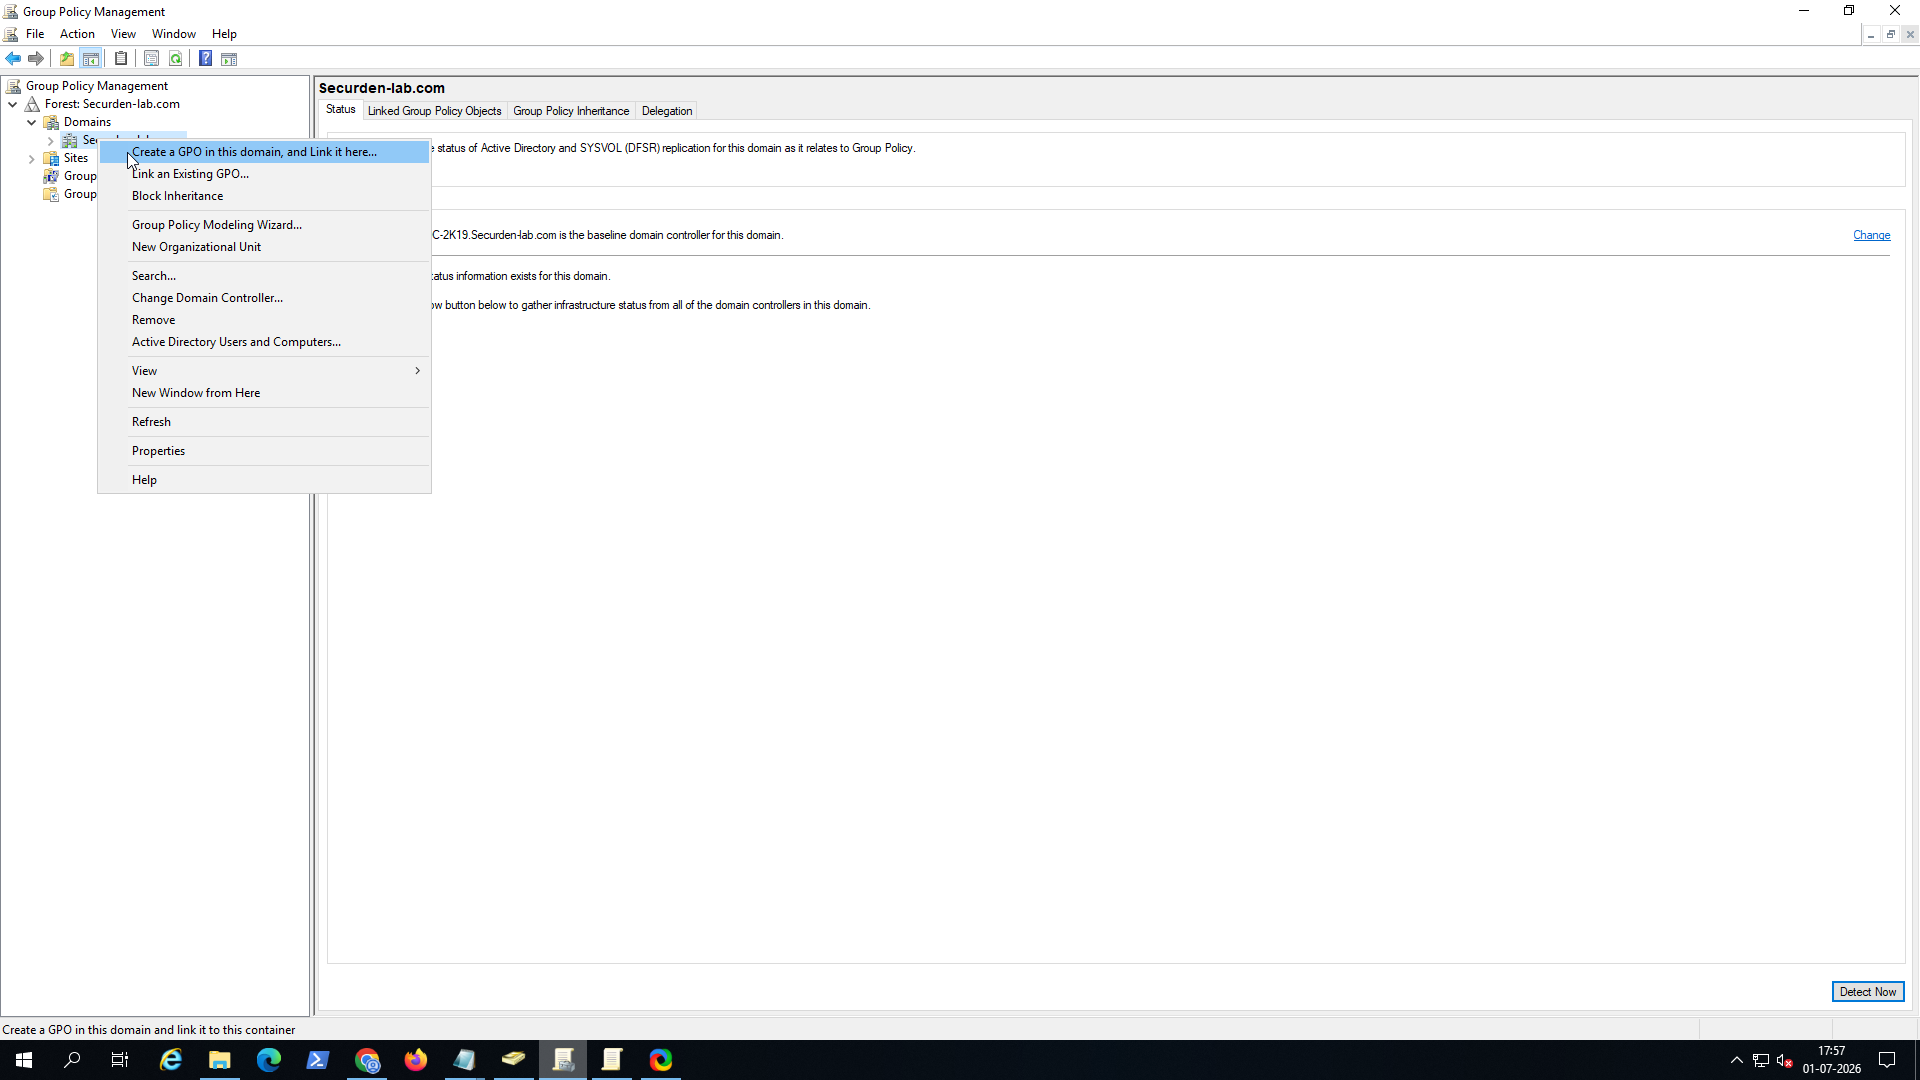
To create a new GPO in the GPMC, right-click the target domain (for example, SECURDEN.AWS.COM) and select Create a GPO in this domain, and Link it here...
-
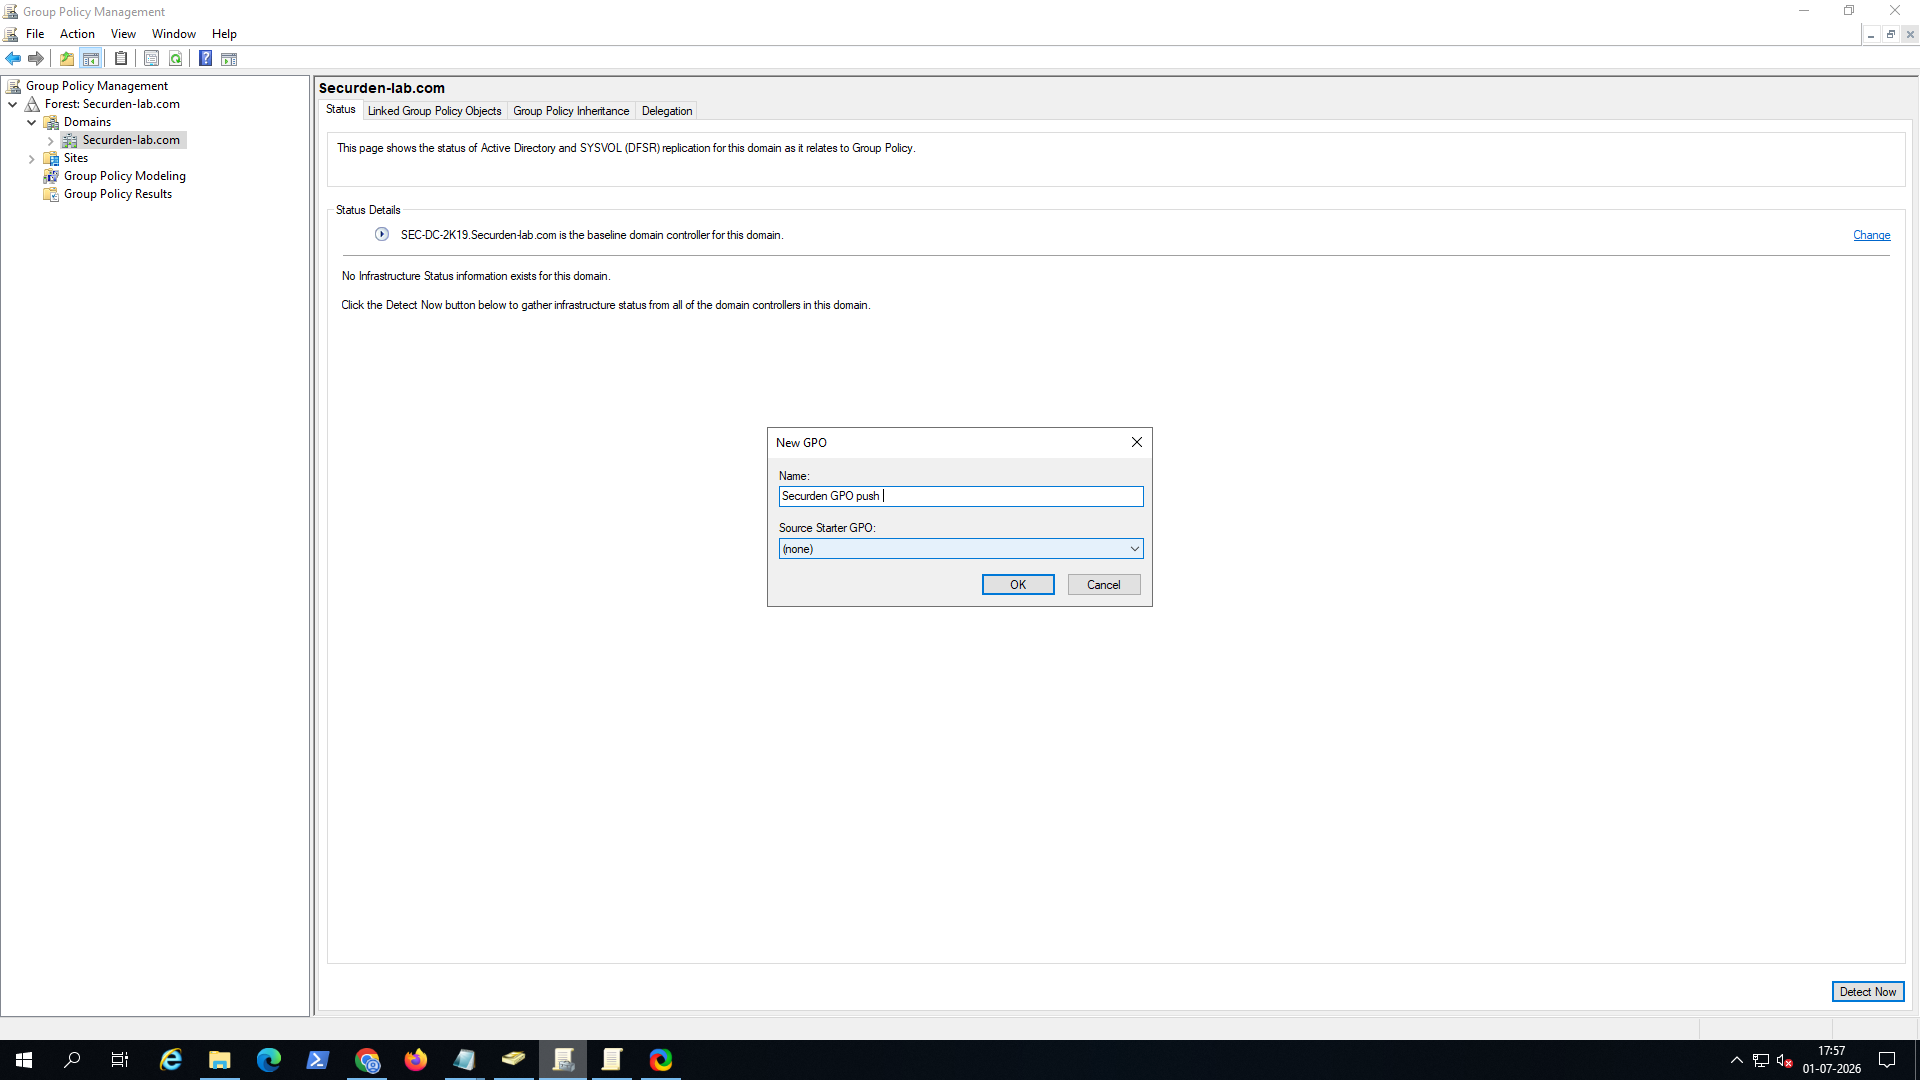
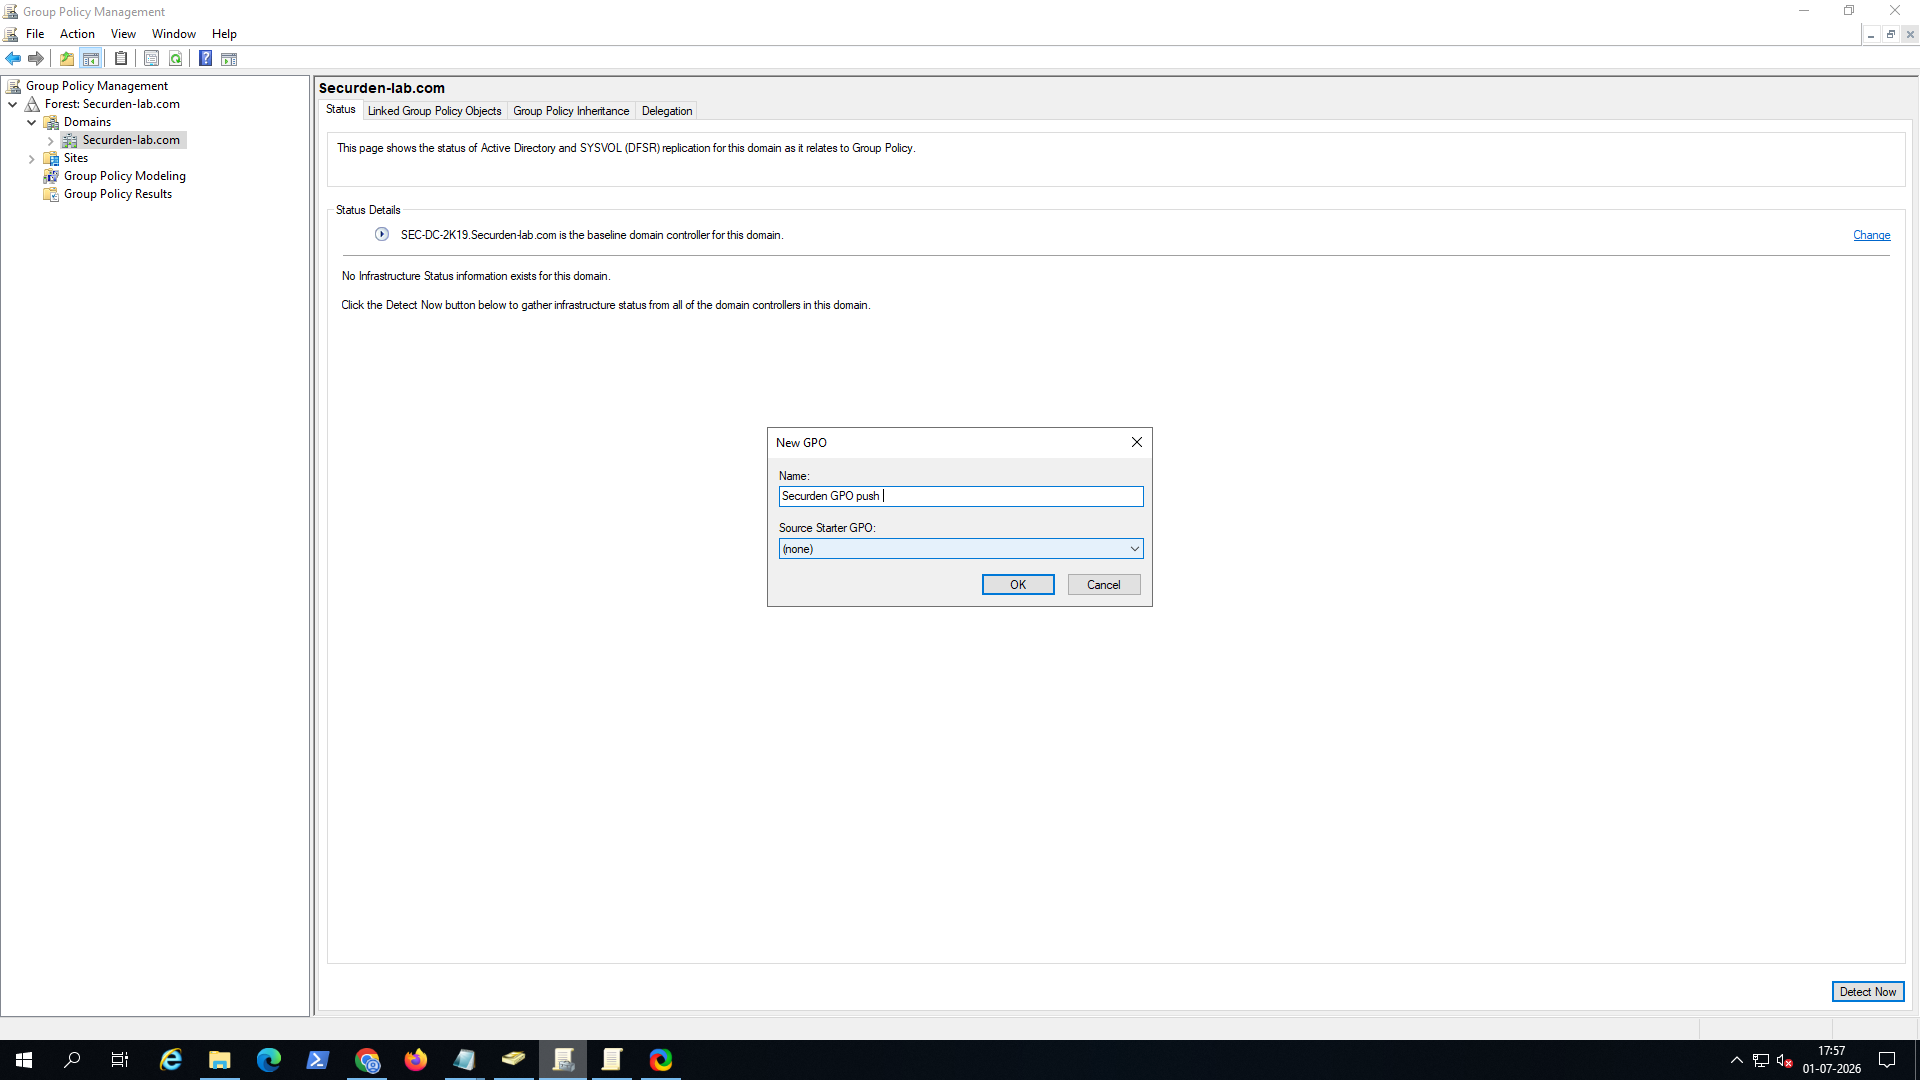
Enter a descriptive name for the policy, such as Securden Agent Push GPO, and click OK.
-
In the left navigation pane, select the newly created GPO.
-
Verify that the Scope, Details, Settings, and Delegation tabs are displayed and confirm that the GPO is linked to the intended domain.
Step 3: Configuring Security Filtering
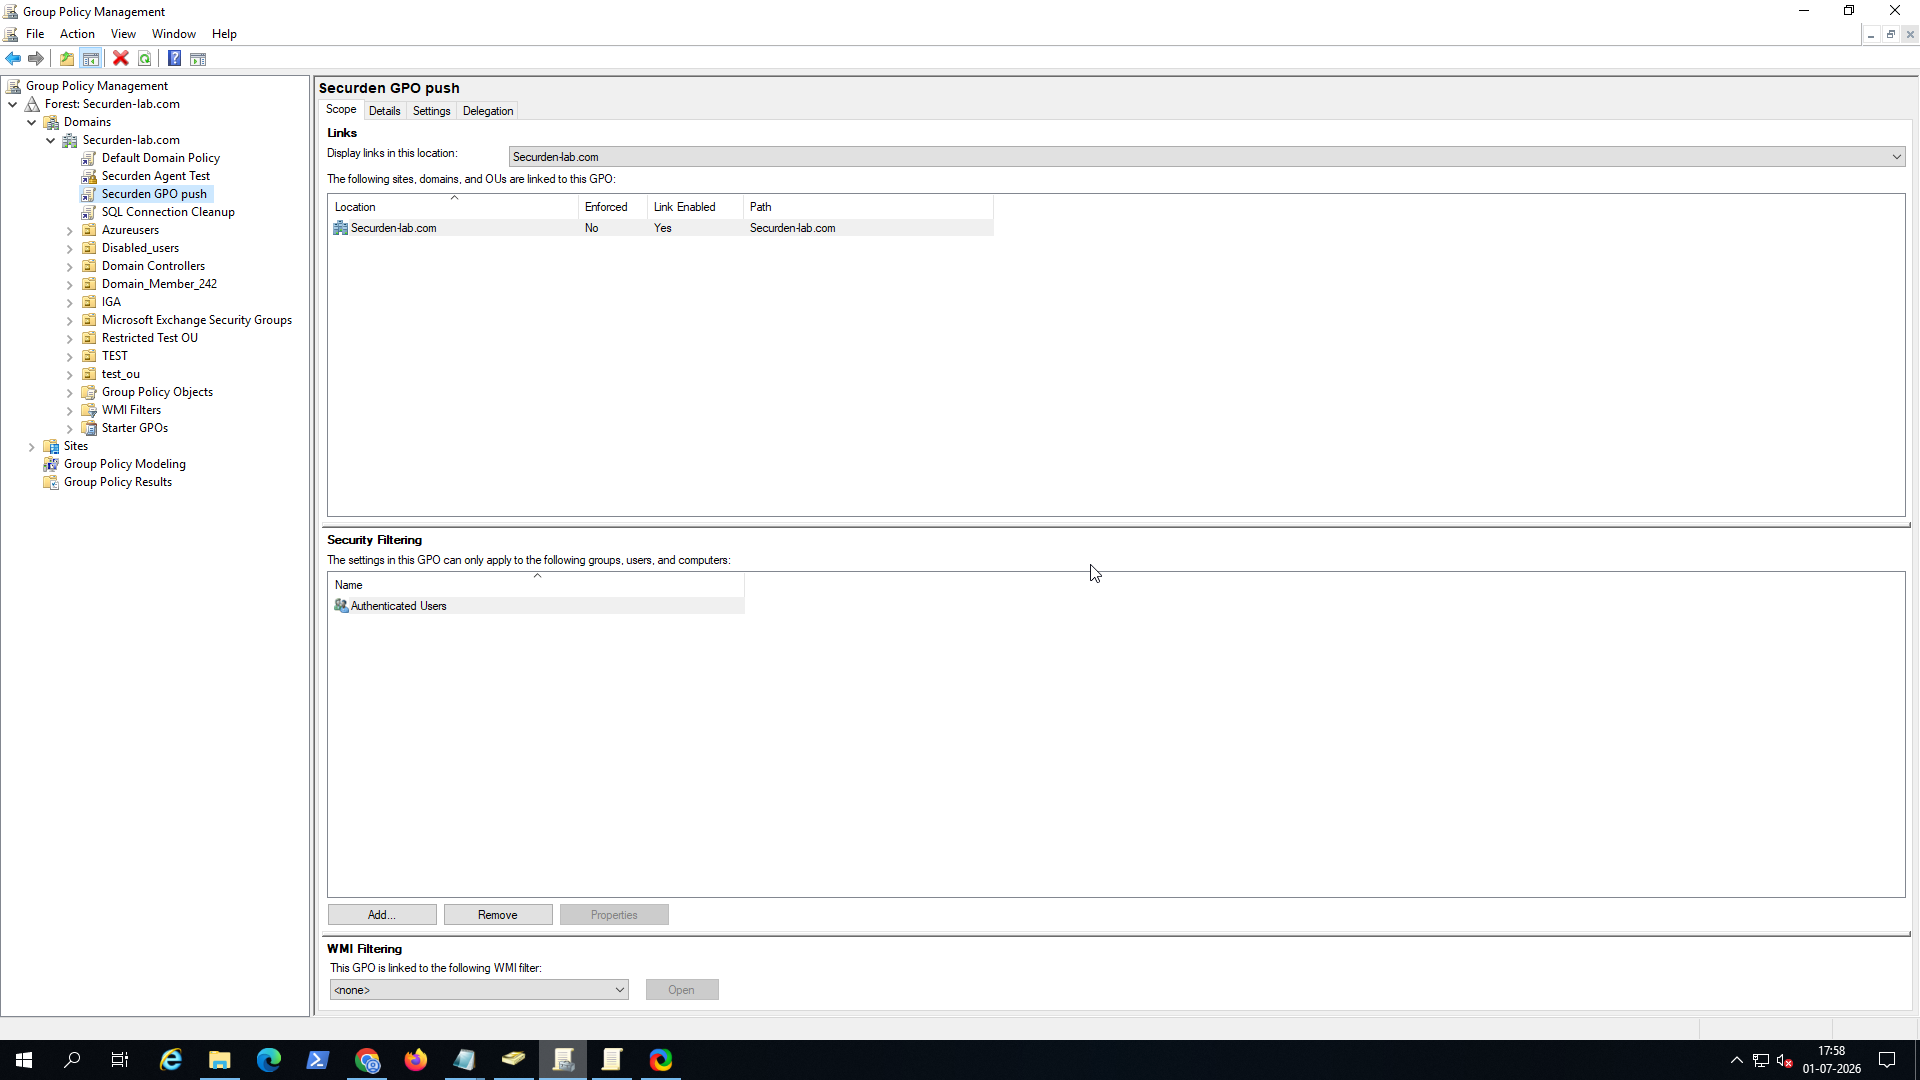
- Under the Scope tab, navigate to the Security Filtering section.
-
Remove Authenticated Users from the list by selecting it and clicking Remove.
-
Click Add, specify the computer groups on which the Securden agent must be installed (for example, All Domain Member Computers), and click OK.
Note
Limiting the GPO to a specific computer group ensures that the agent is deployed only to the intended devices.
Step 4: Open Startup Scripts
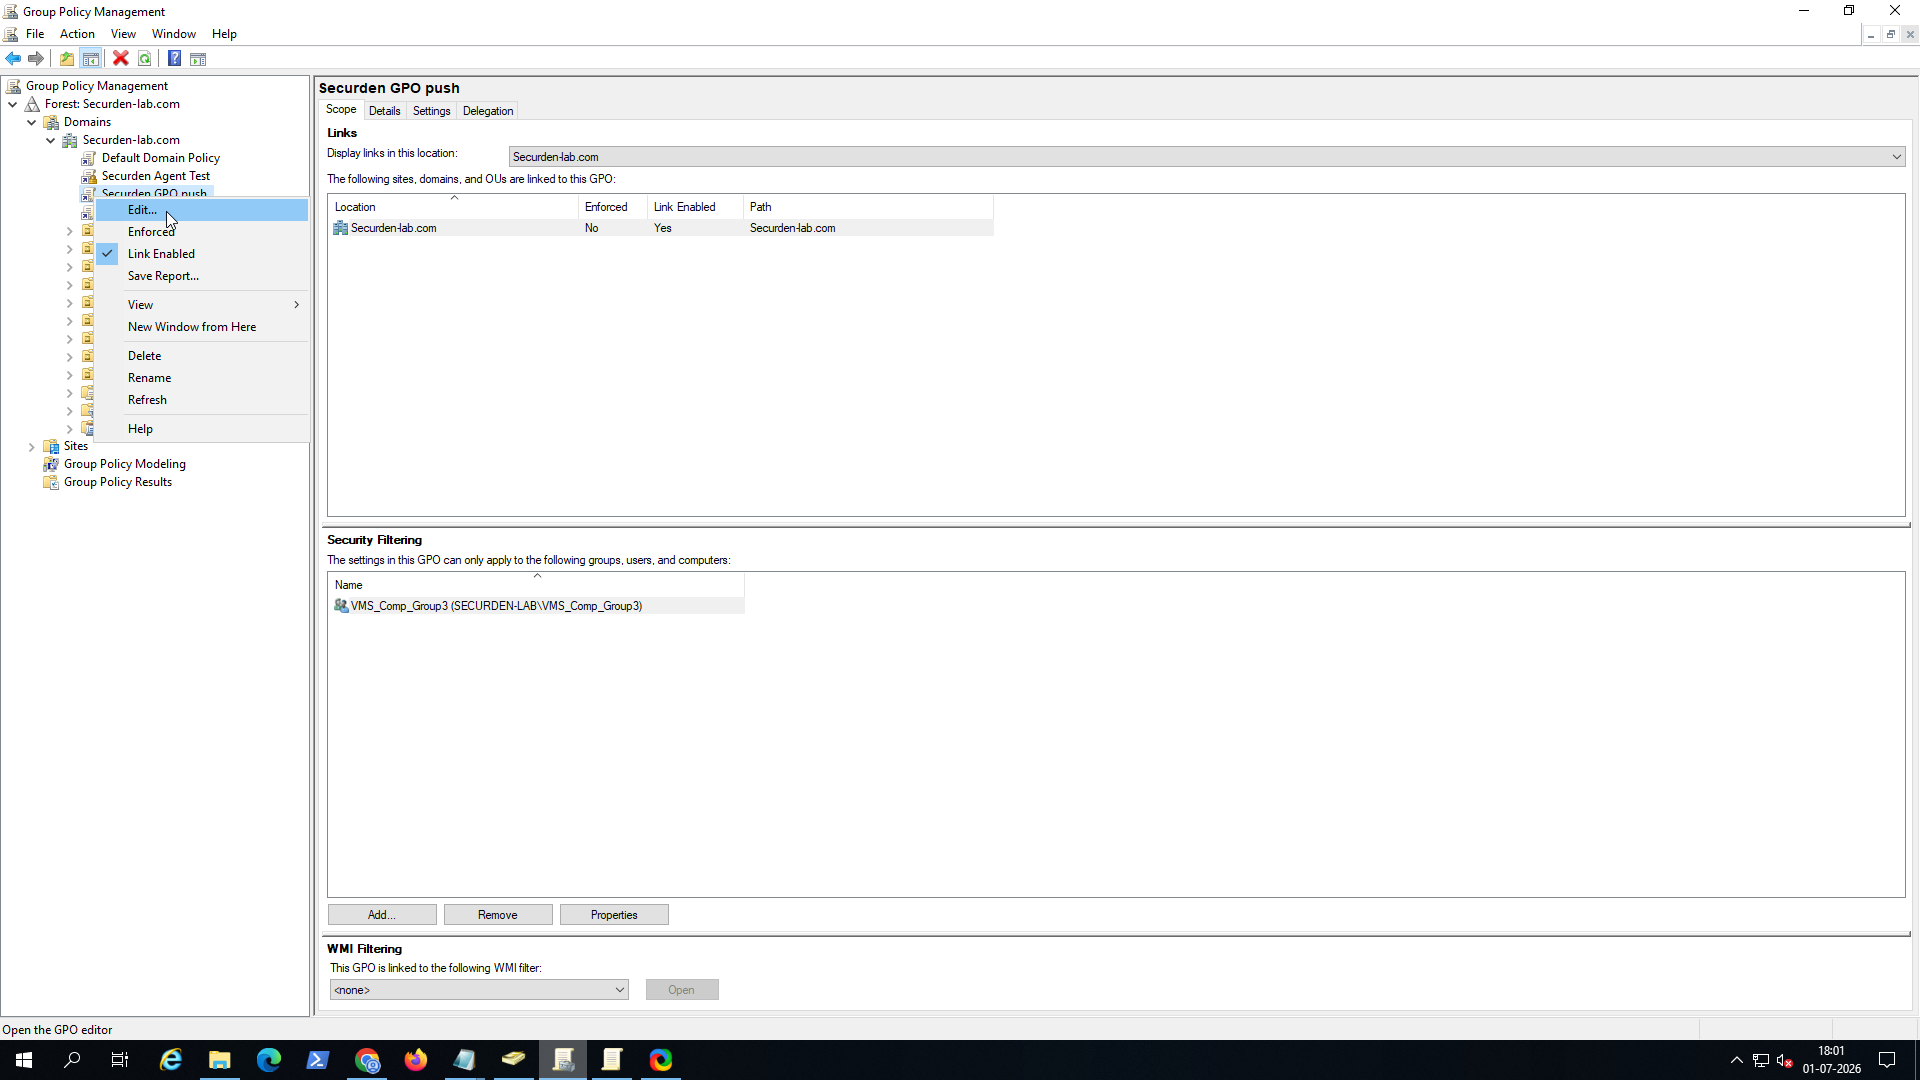
- Right-click the GPO and select Edit to open the Group Policy Management Editor.
-
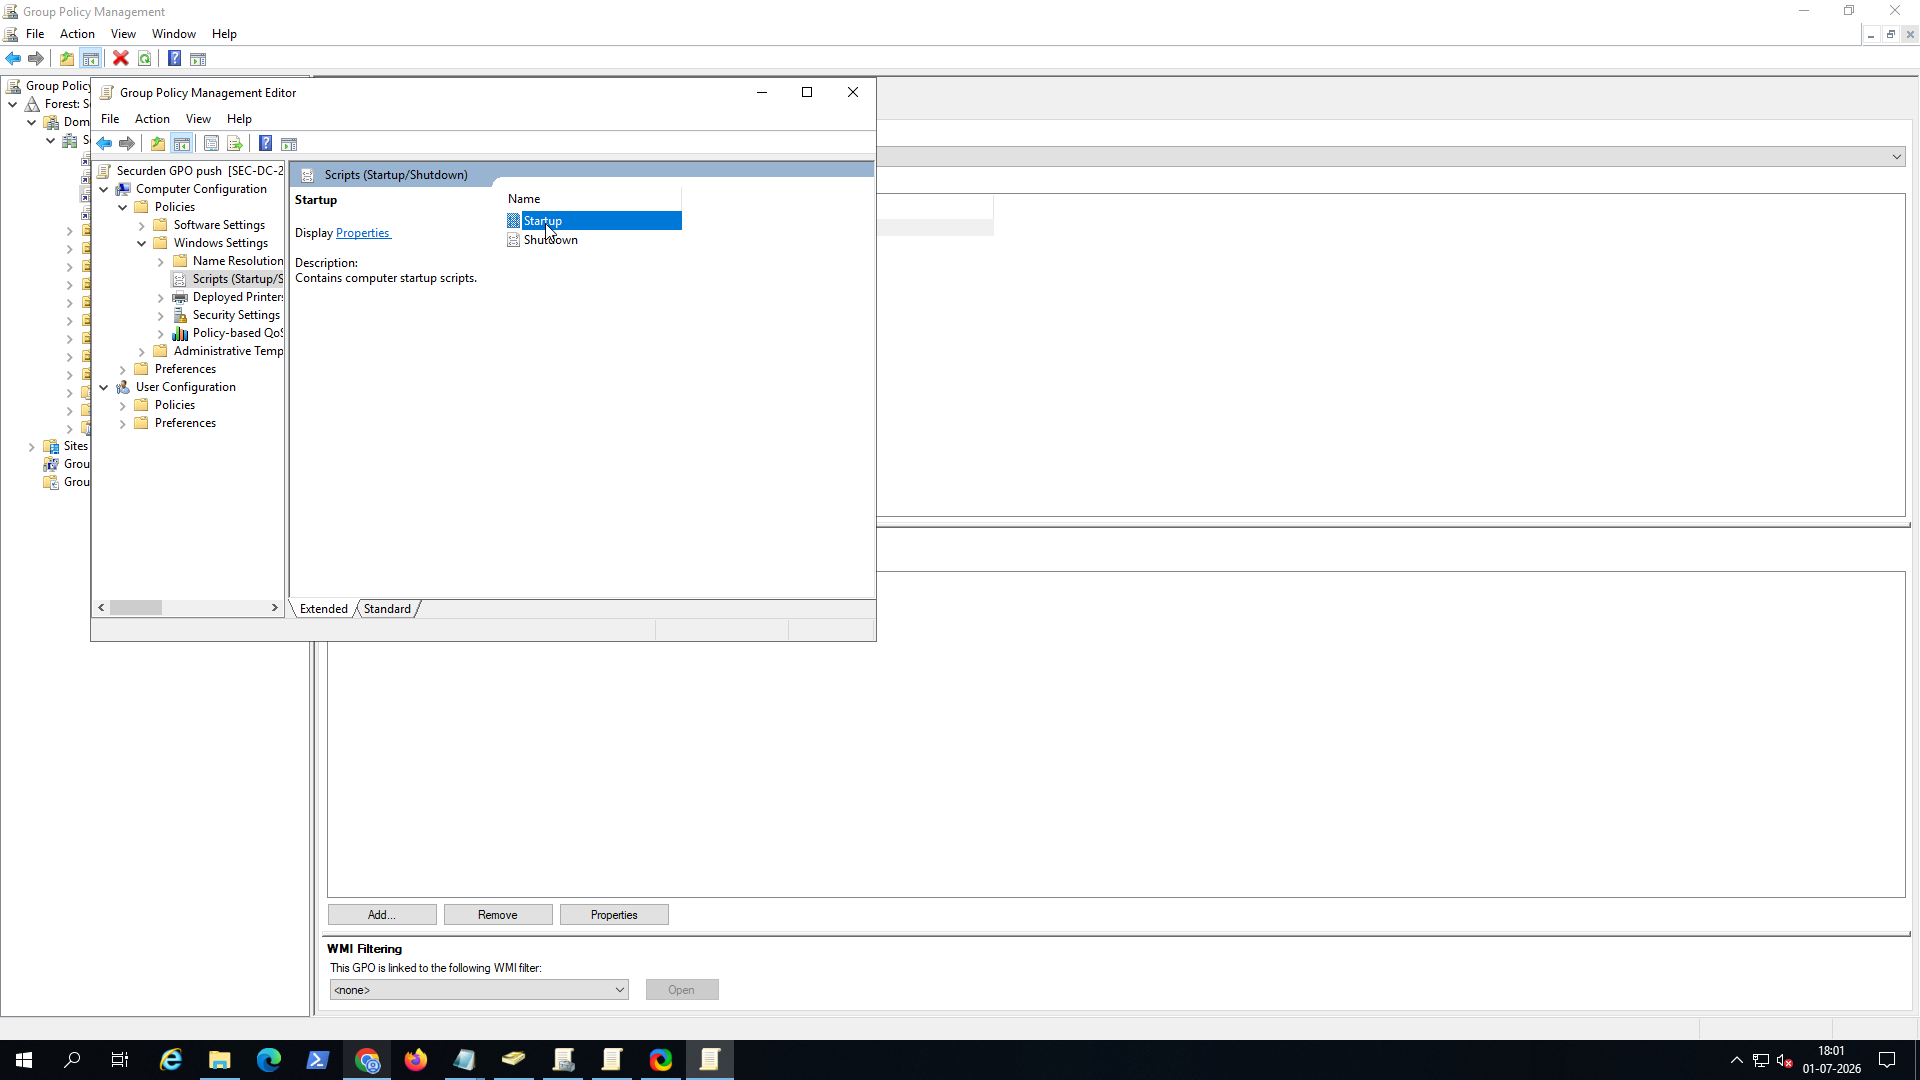
In the Group Policy Management Editor, browse to: Computer Configuration → Policies → Windows Settings → Scripts (Startup/Shutdown)
-
Select Scripts (Startup/Shutdown) and verify that the Startup and Shutdown options appear in the right pane.
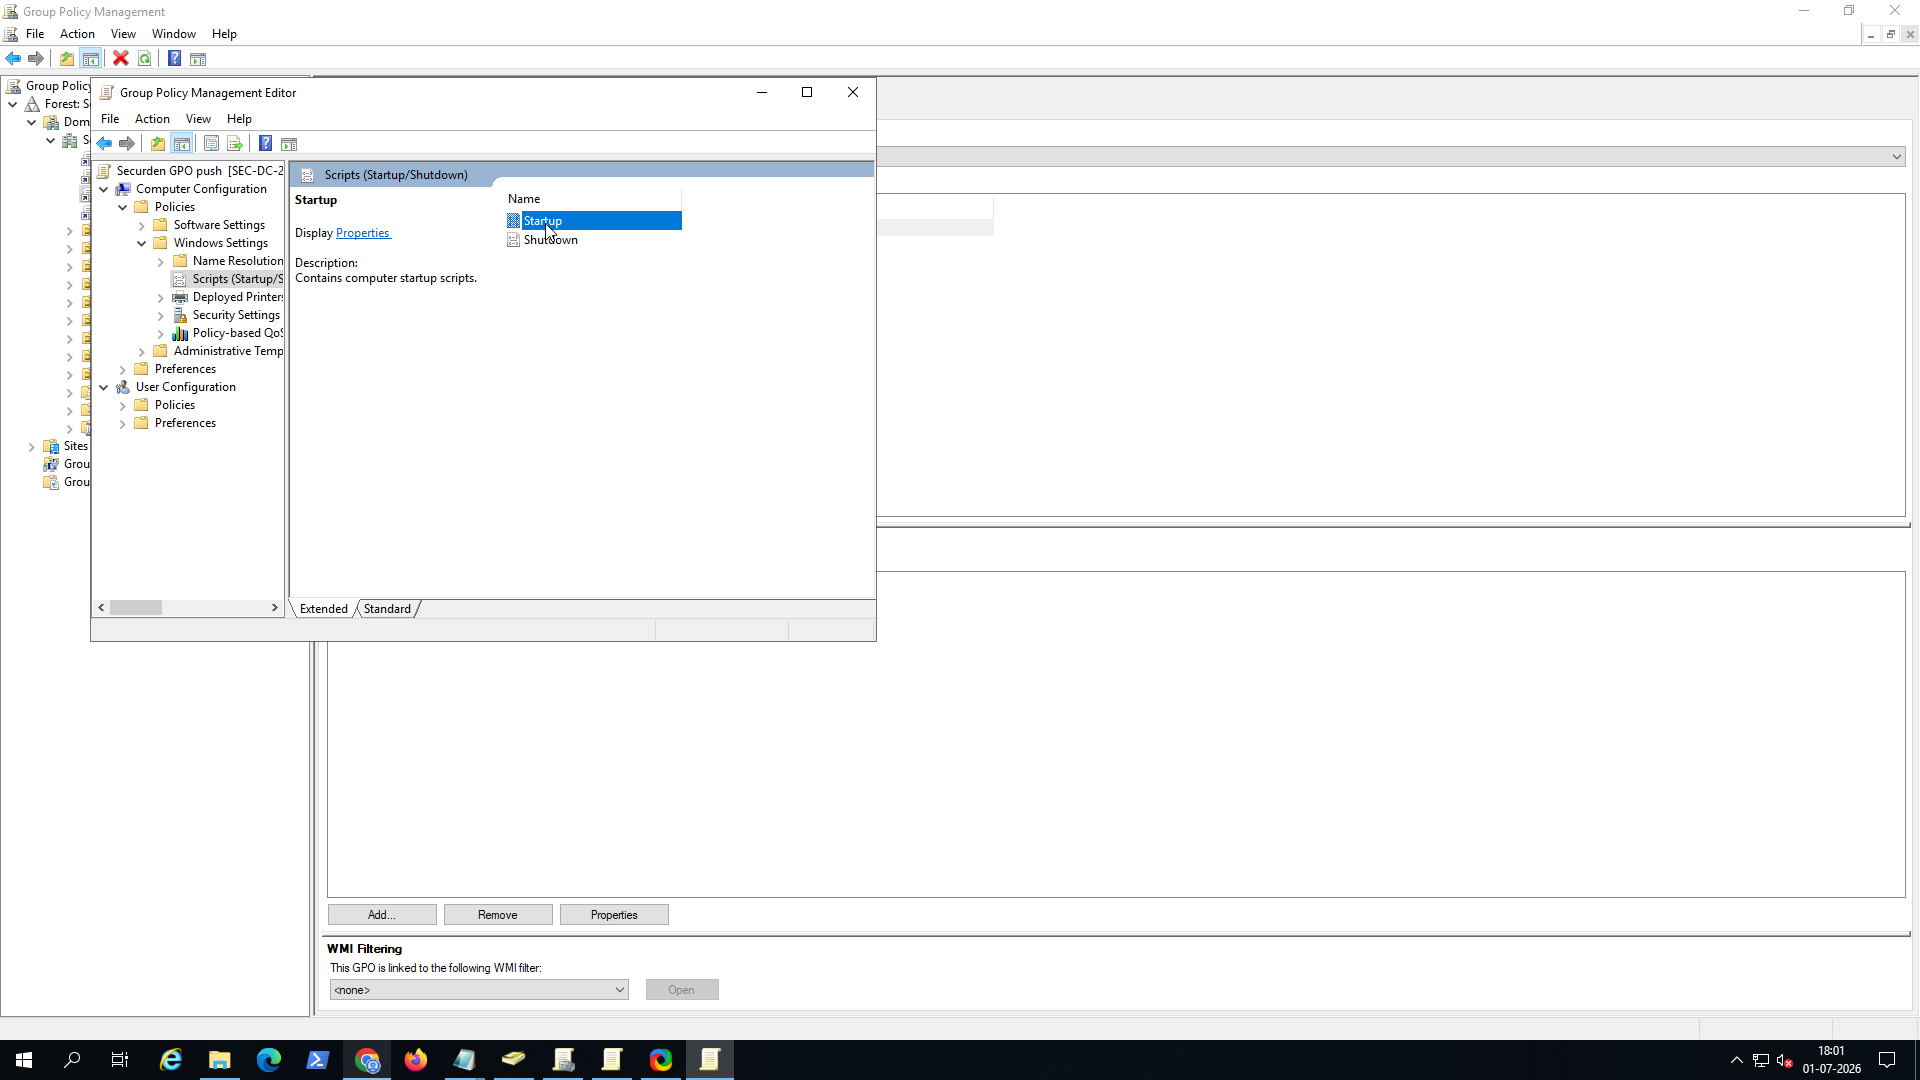
Step 5: Adding the Securden Installation Script
-
Double-click Startup to open the Startup Properties dialog.
-
Ensure that the Scripts tab is selected and click Add to open the Add a Script dialog.
-
This dialog allows you to specify the Script Name and Script Parameters.
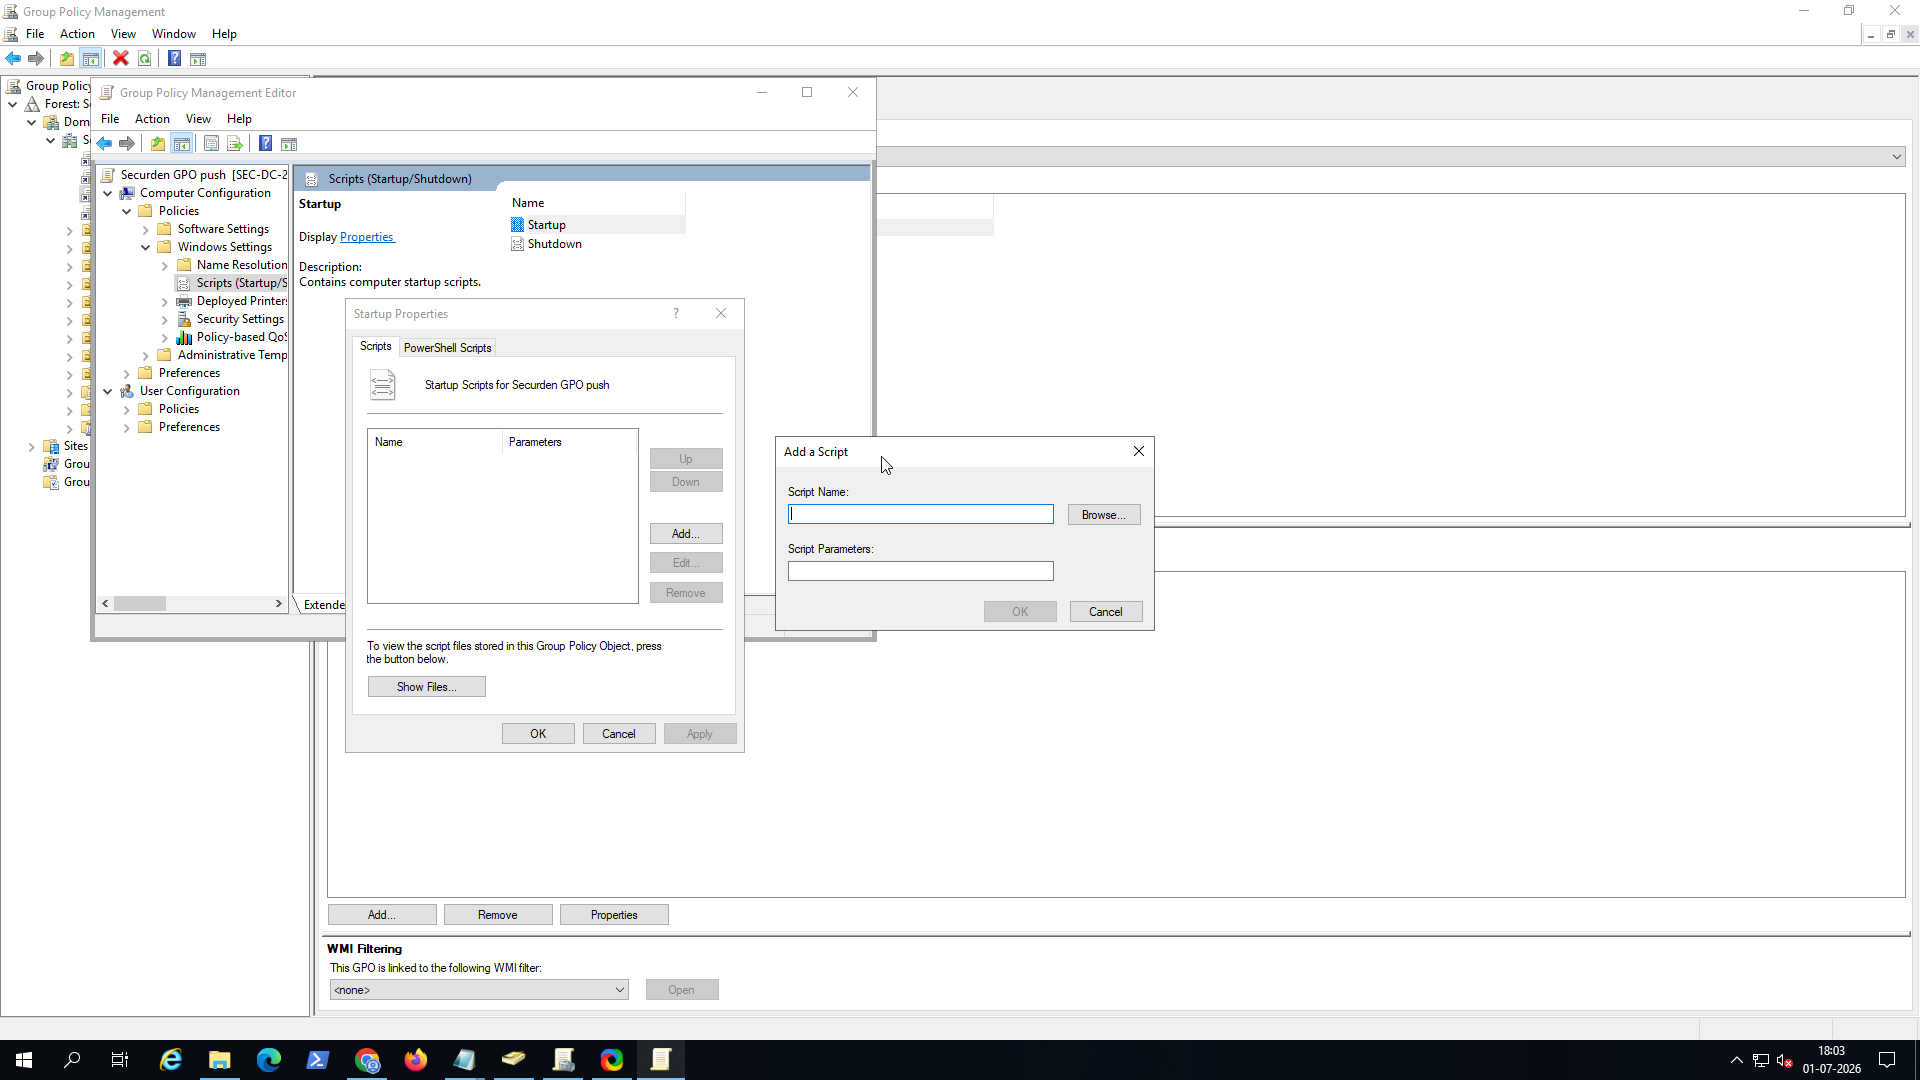
- Click Browse and select the InstallAgent.vbs script downloaded from the Securden web client. Once selected, the script name is automatically populated.
Note
The script must be copied to the GPO's script folder. If required, click Show Files in the Startup Properties dialog and copy the script into that location before proceeding.
Step 6: Configure Script Parameters
- In the Script Parameters field, enter the required installation parameters.
Example:
/MSIPATH:"\\172.31.1.11\share\SecurdenAgent.msi" /SERVER:"172.31.6.33,172.31.13.73" /PORT:"5151 /INSTALLATIONKEY q23nDFw58iWH"
Replace the server IP addresses and port number with the values applicable to your environment.
Note
Ensure that the SecurdenAgent.msi installer is available on an accessible network share before configuring the parameters.
- Click OK to save the script configuration, and then click Apply in the Startup Properties dialog.
Step 7: Enforcing the Group Policy Object
-
Return to the Group Policy Management Console.
-
Under the Links section, right-click the domain entry associated with the GPO and select Enforced. This ensures that the policy takes precedence over conflicting policies with lower priority.
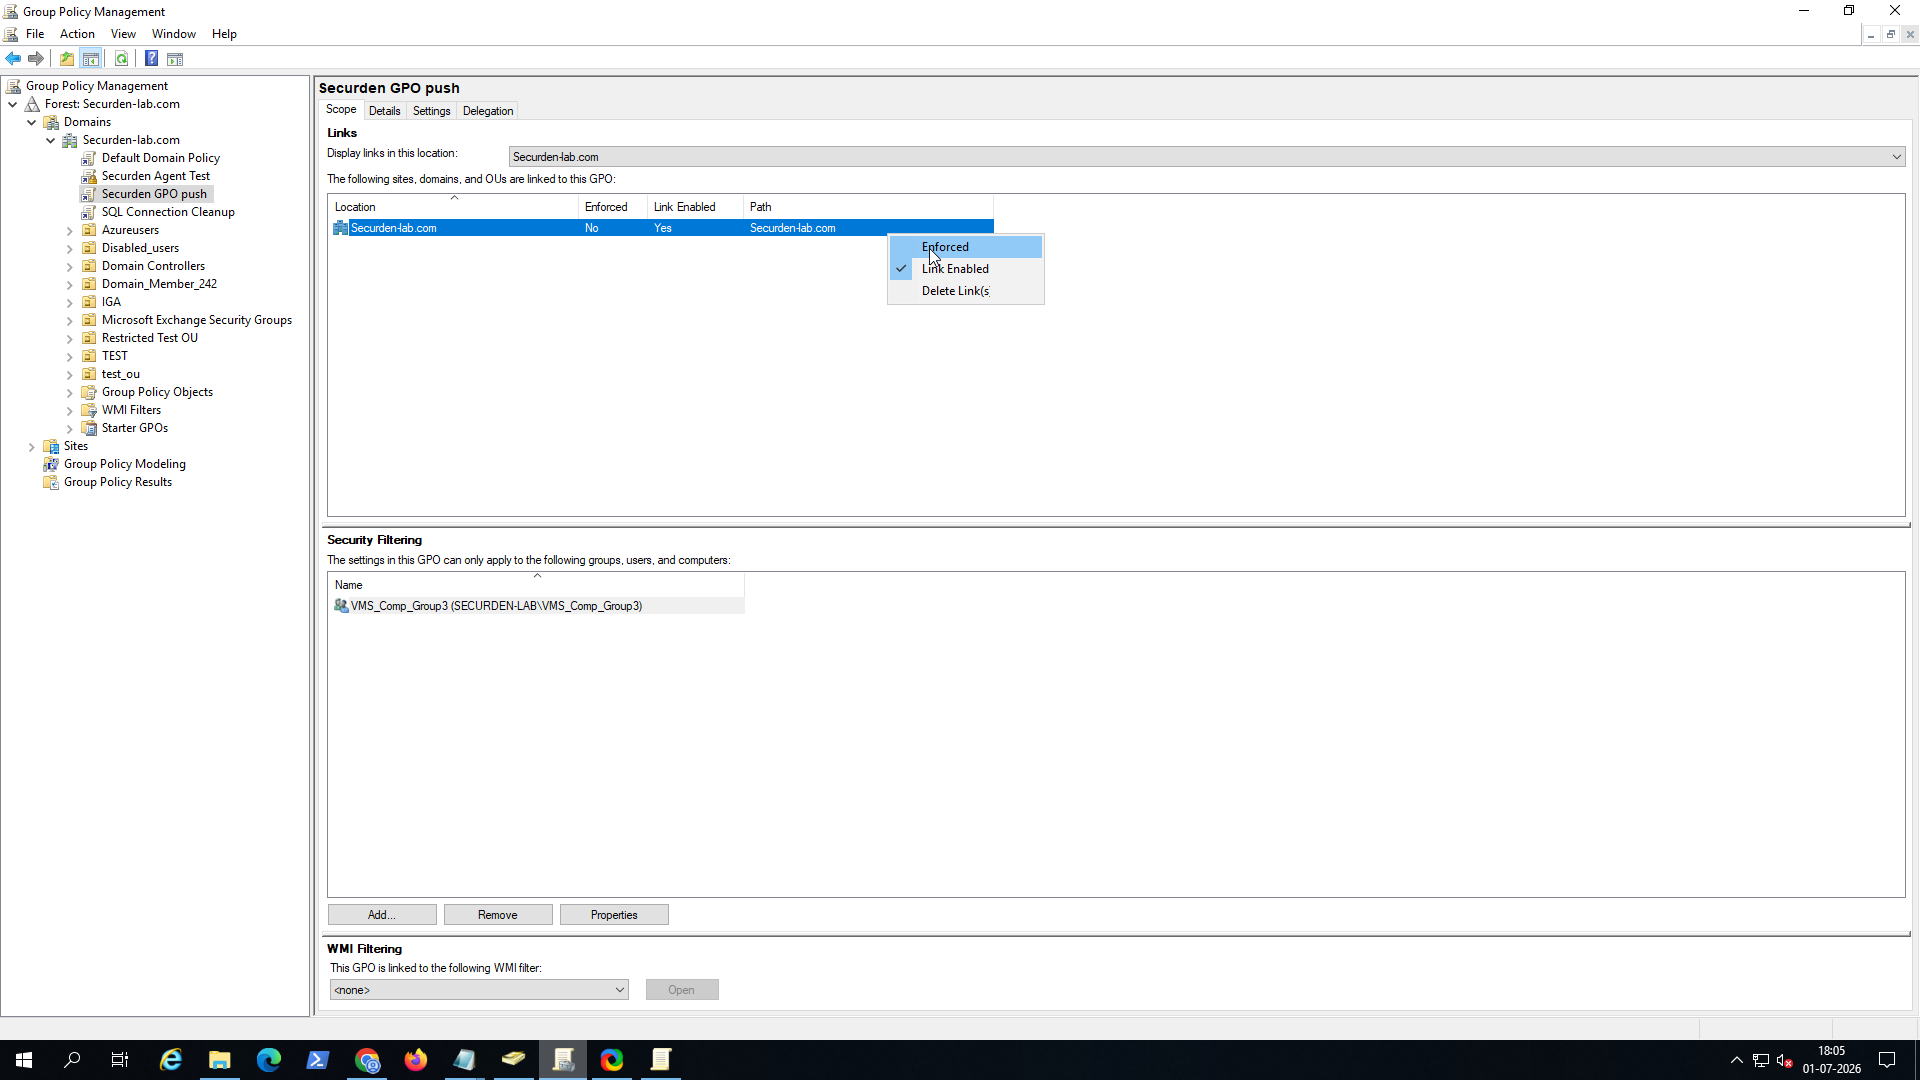
Step 8: Configuring Permissions and Delegation
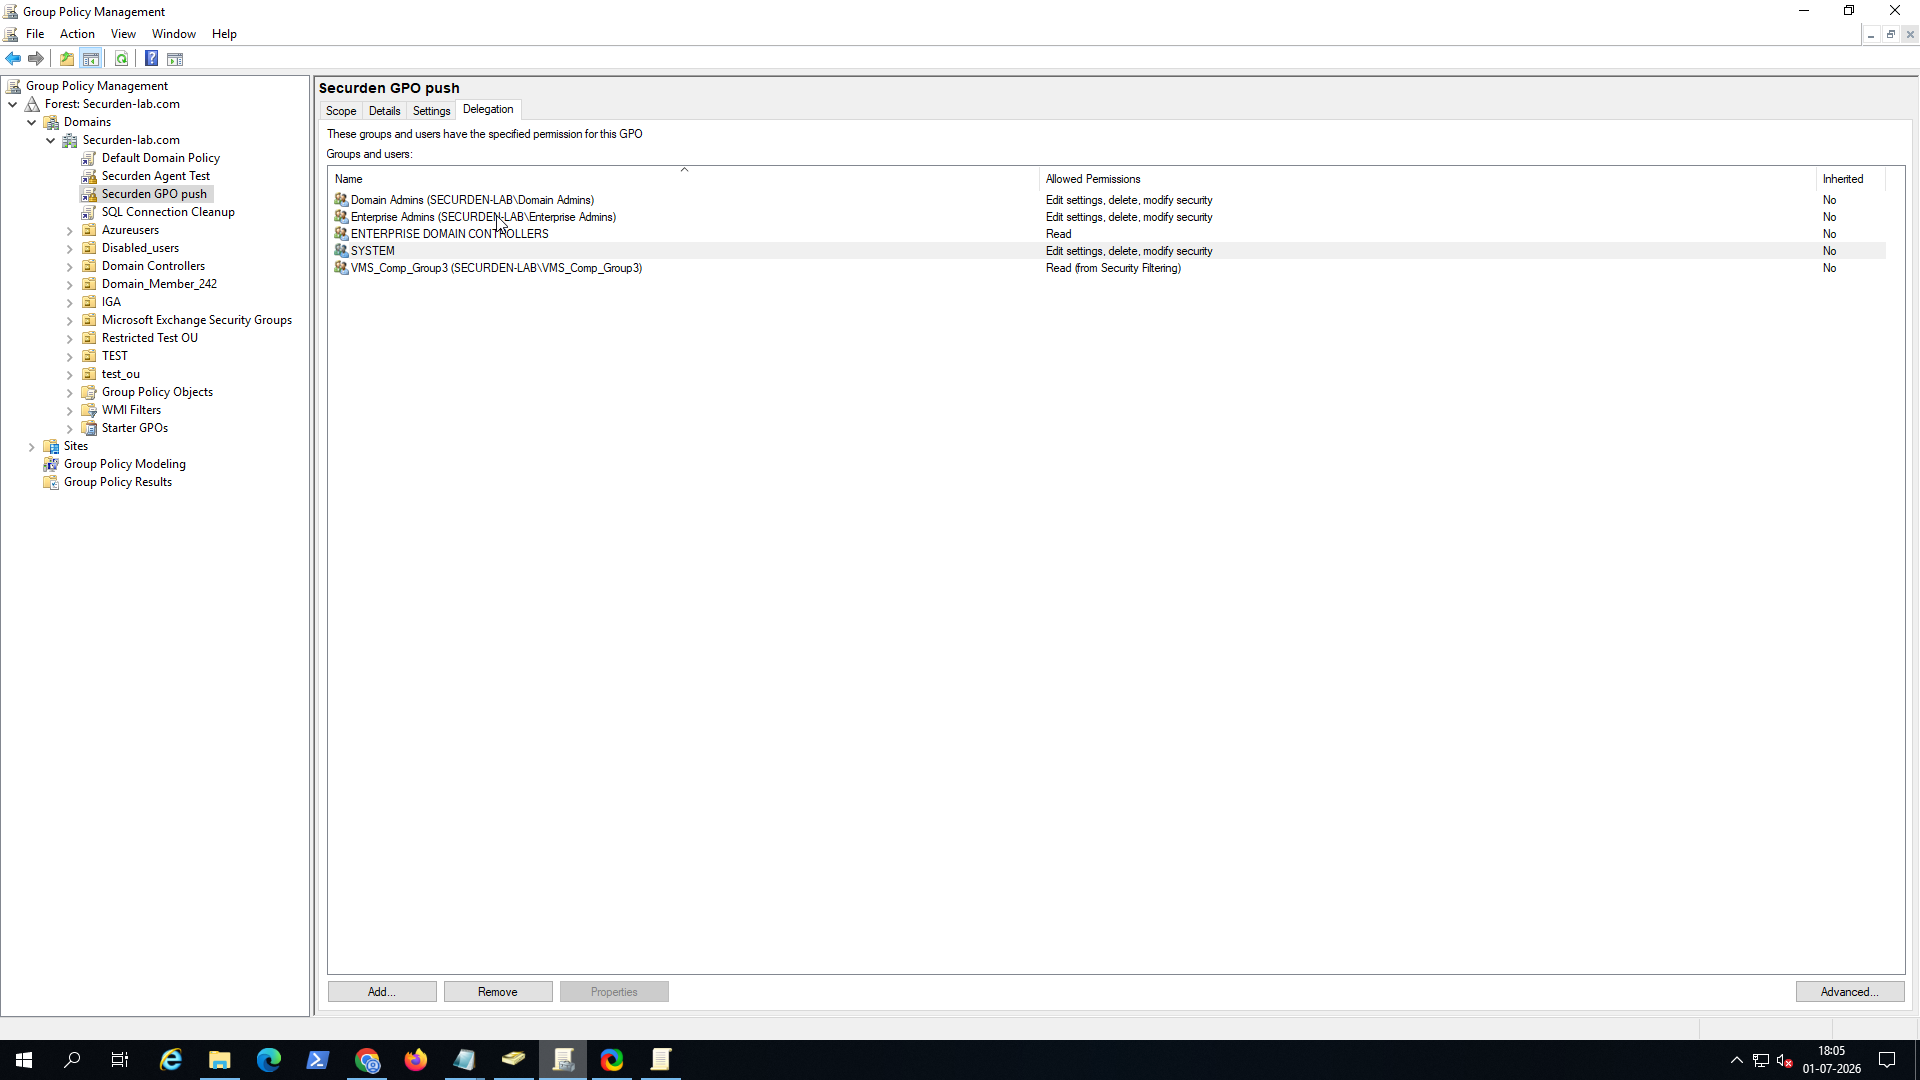
- Select the GPO and navigate to the Delegation tab. This tab displays the users and groups that have permissions on the GPO along with their assigned permission levels. Click Add.
-
In the Select User, Computer, or Group dialog, enter Authenticated Users and click OK. This allows domain members to read and process the GPO while Security Filtering determines which computers the policy applies to.
-
Verify that Authenticated Users have Read permission only. This allows authenticated users to read the GPO without granting permission to modify it.
Note
With Security Filtering limiting the GPO to the designated computer group and Authenticated Users granted only Read permission through Delegation, the policy will be evaluated by all authenticated domain members but applied only to the intended computers.
Once all steps are complete, the Securden agent will be deployed automatically to the specified computer groups upon next startup.
How to Deploy the Securden Agent Using Group Policy (GPO) and Associate with Organizational Units (OUs)?
The steps to create a group policy object for deploying the agent at the OU level have been explained in this section.
Step 1: Create and Configure the GPO
-
Open Group Policy Management Console on the domain controller, or any system with Remote Server Administration Tools (RSAT) installed.
-
You can launch the console from the Start menu or by running
gpmc.mscfrom the Run dialog. -
To create a new GPO in the GPMC, right-click the target domain (for example, SECURDEN.AWS.COM) and select Create a GPO in this domain, and Link it here...
- Enter a descriptive name for the policy, such as Securden Agent Push GPO, and click OK.
-
In the left navigation pane, select the newly created GPO.
-
Verify that the Scope, Details, Settings, and Delegation tabs are displayed and confirm that the GPO is linked to the intended domain.
-
Remove Authenticated Users from Security Filtering.
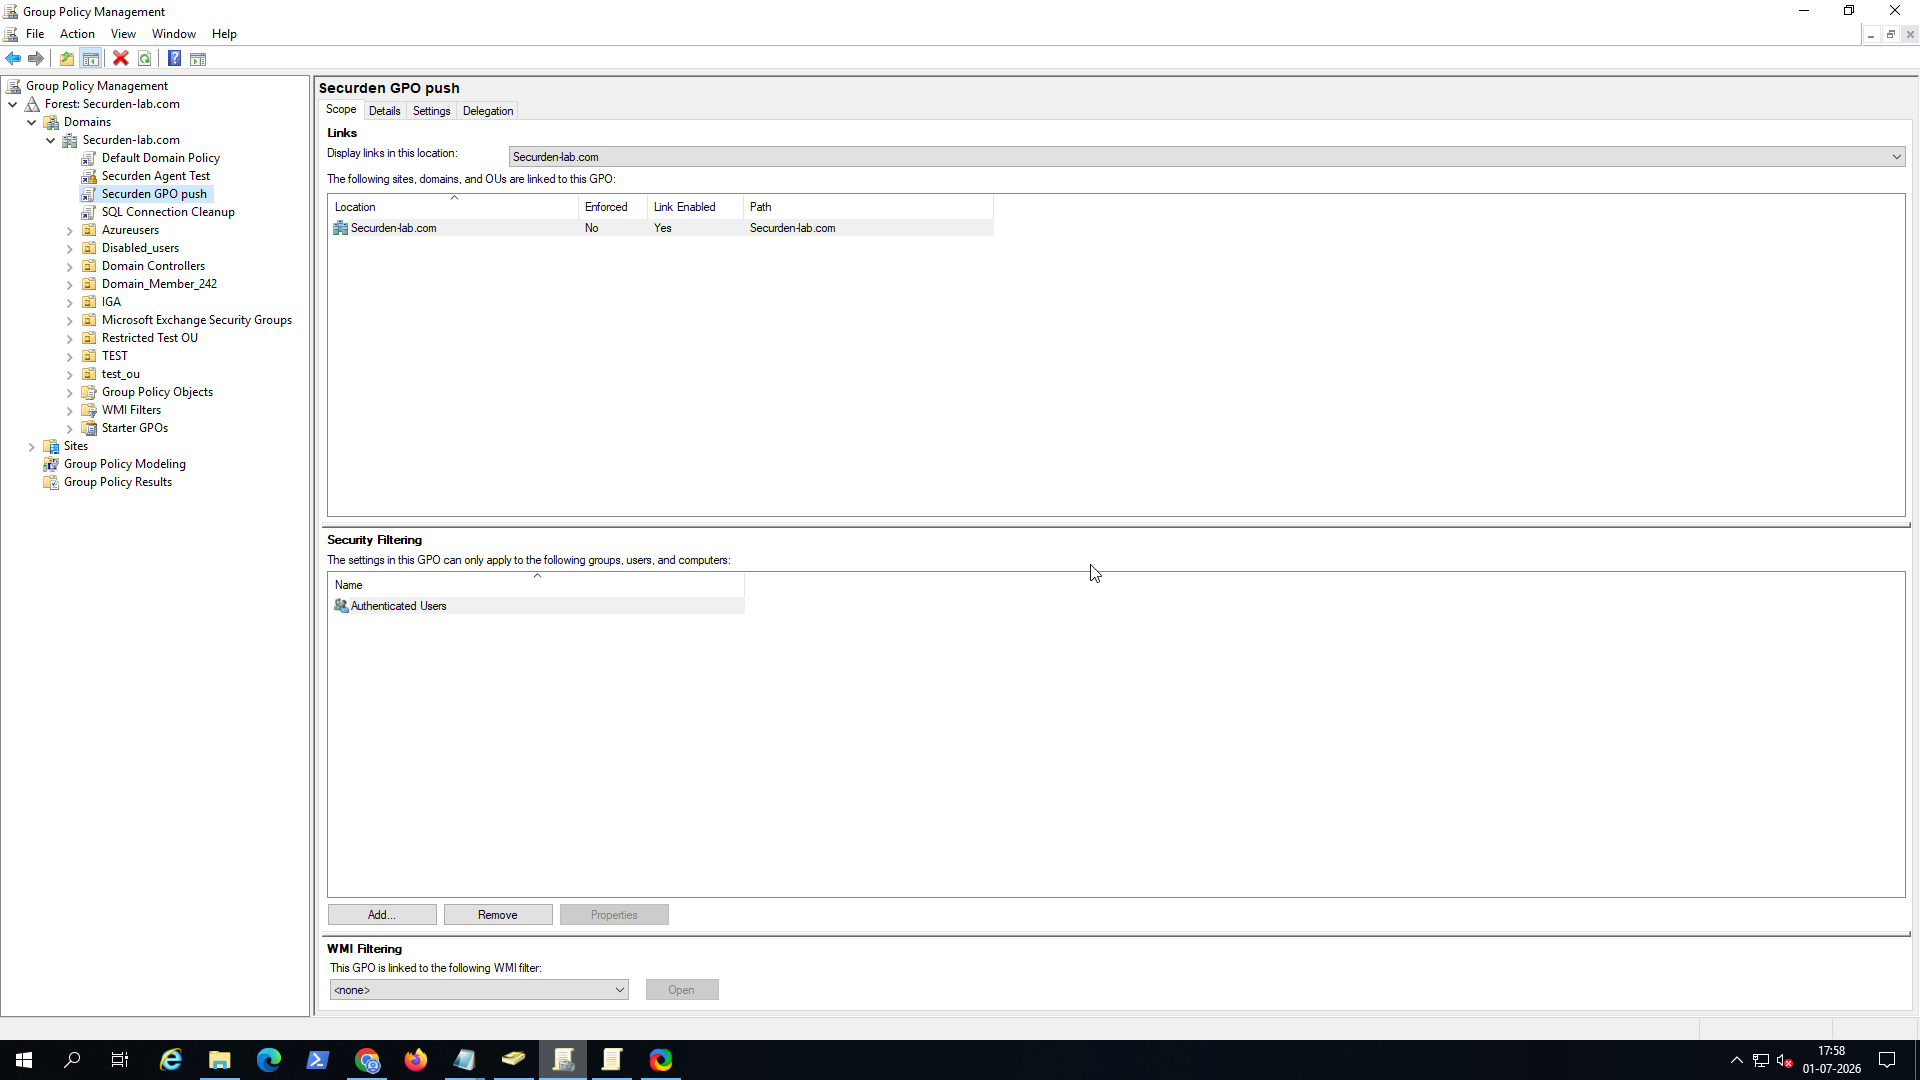
- Add the Domain Computers group (or the computer group to which the agents should be deployed) to Security Filtering.
Step 2: Configure the Startup Script
-
Right-click the GPO and select Edit.
-
Navigate to: Computer Configuration → Windows Settings → Scripts (Startup/Shutdown) → Startup
-
Double-click Startup and click Add.
-
Browse and select the InstallAgent.vbs script downloaded from the Securden web client.
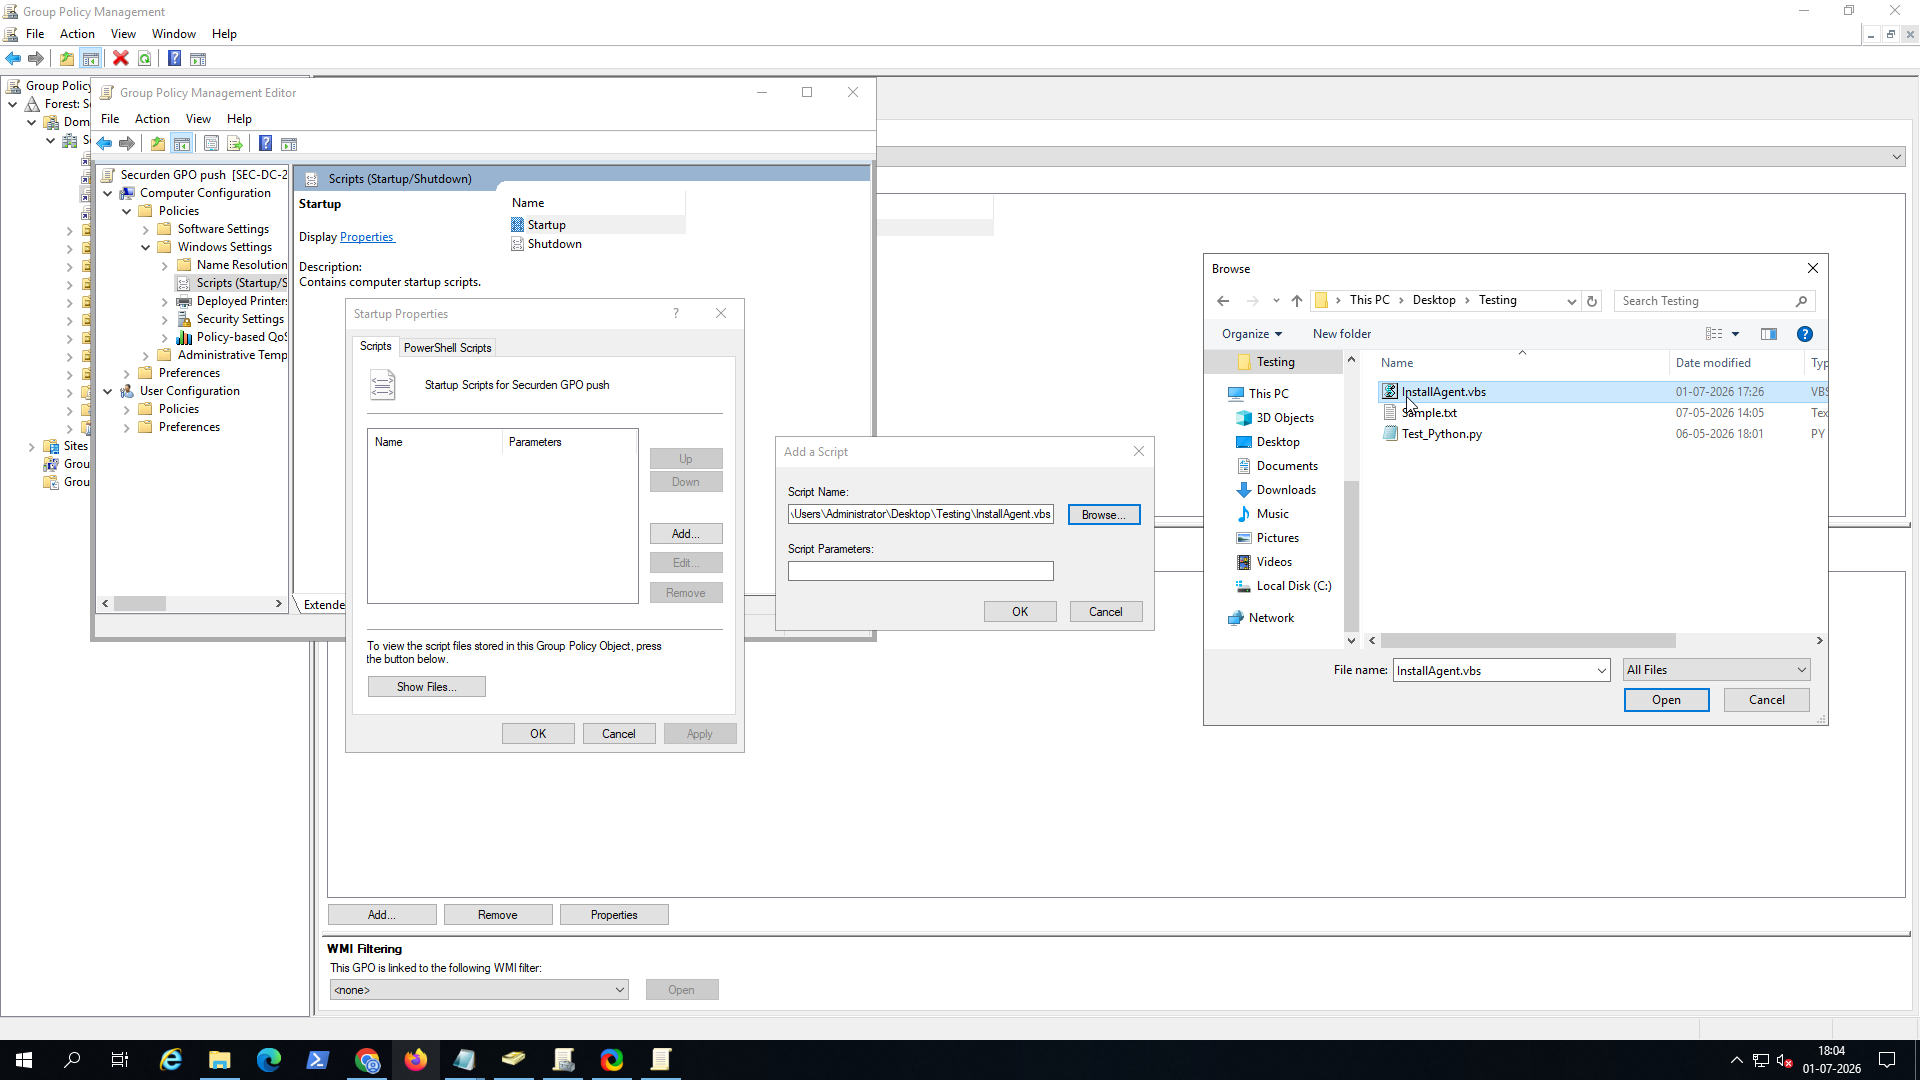
- Specify the script parameters as shown in the example below. The location should point to the installer file’s location on the shared network location. The connectivity details of the server machine on which Securden is installed must also be added.
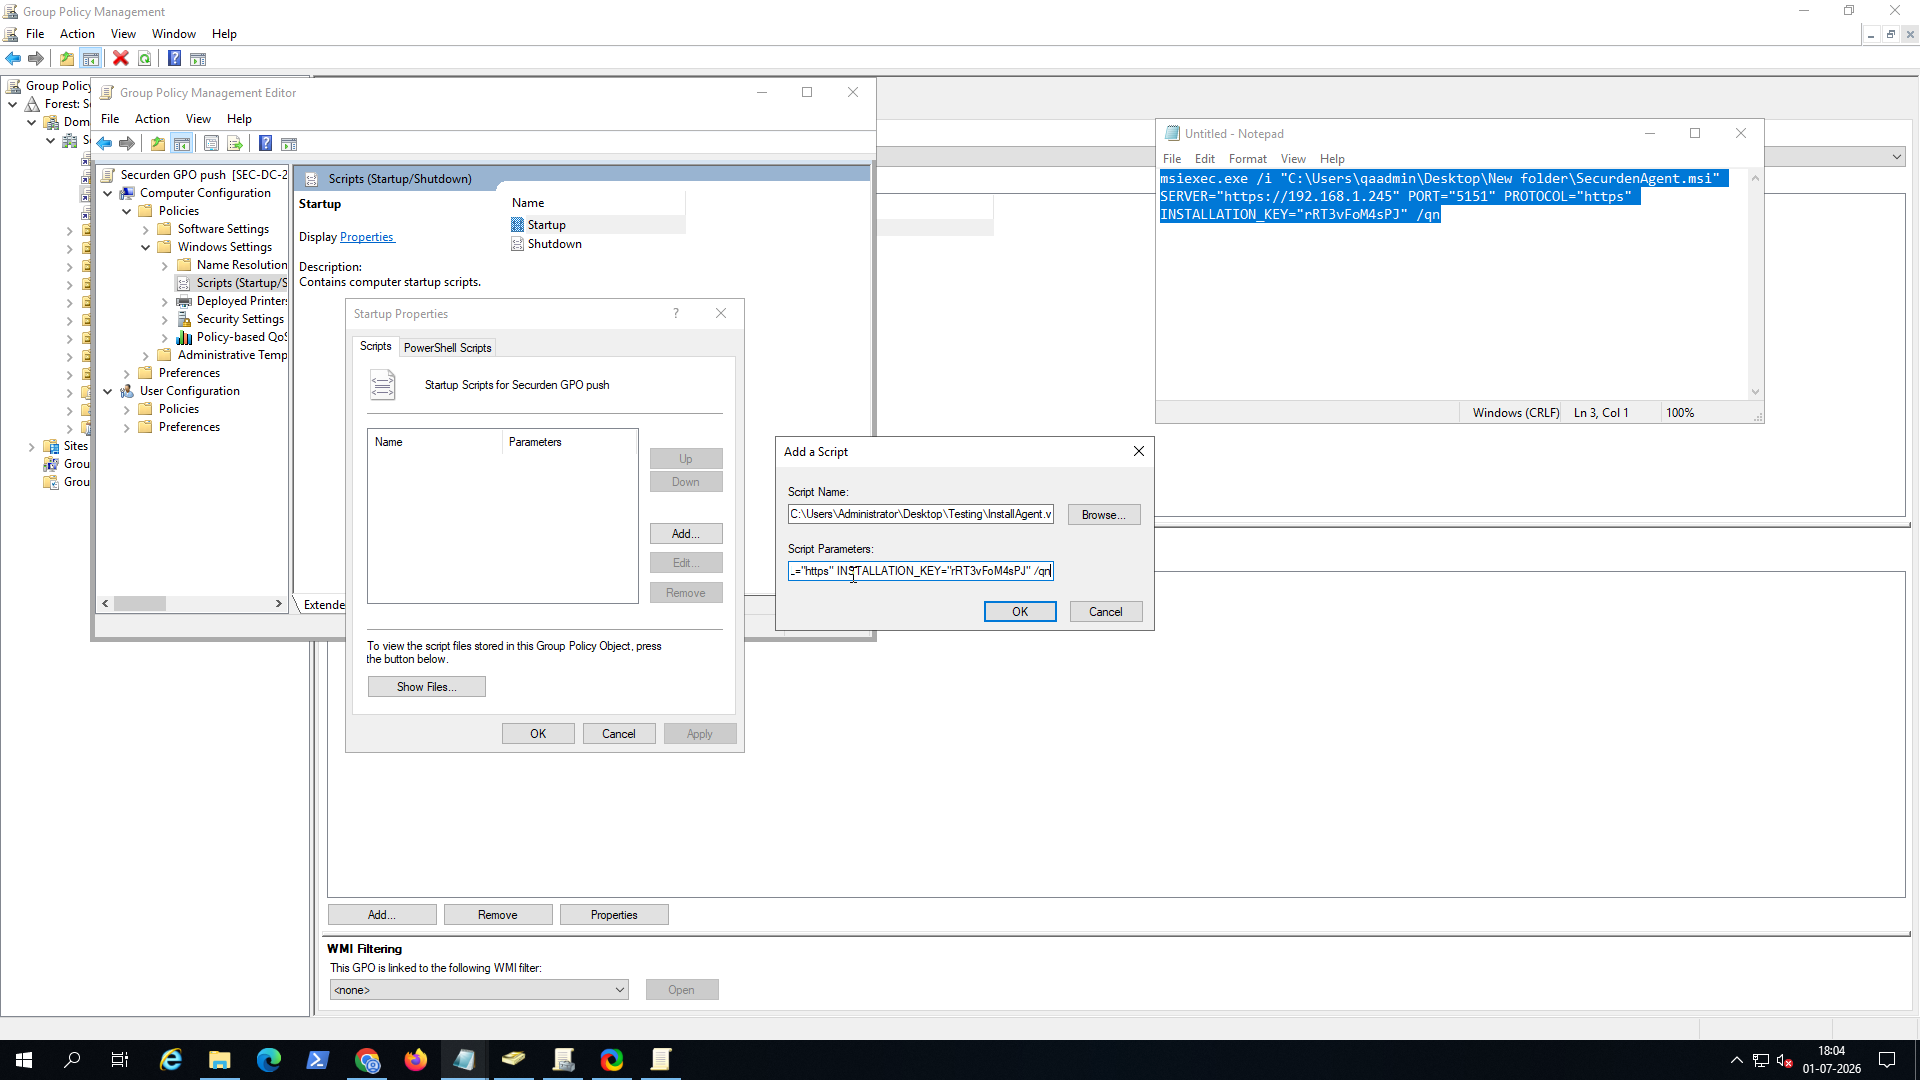
Example:
/MSIPATH:"\\172.31.1.11\share\SecurdenAgent.msi" /SERVER:"172.31.6.33,172.31.13.73" /PORT:"5151 /INSTALLATIONKEY q23nDFw58iWH"
Note
Ensure that the SecurdenAgent.msi package is available in a shared network folder that is accessible to the target computers.
Step 3: Link the GPO to the Target Organizational Unit (OU)
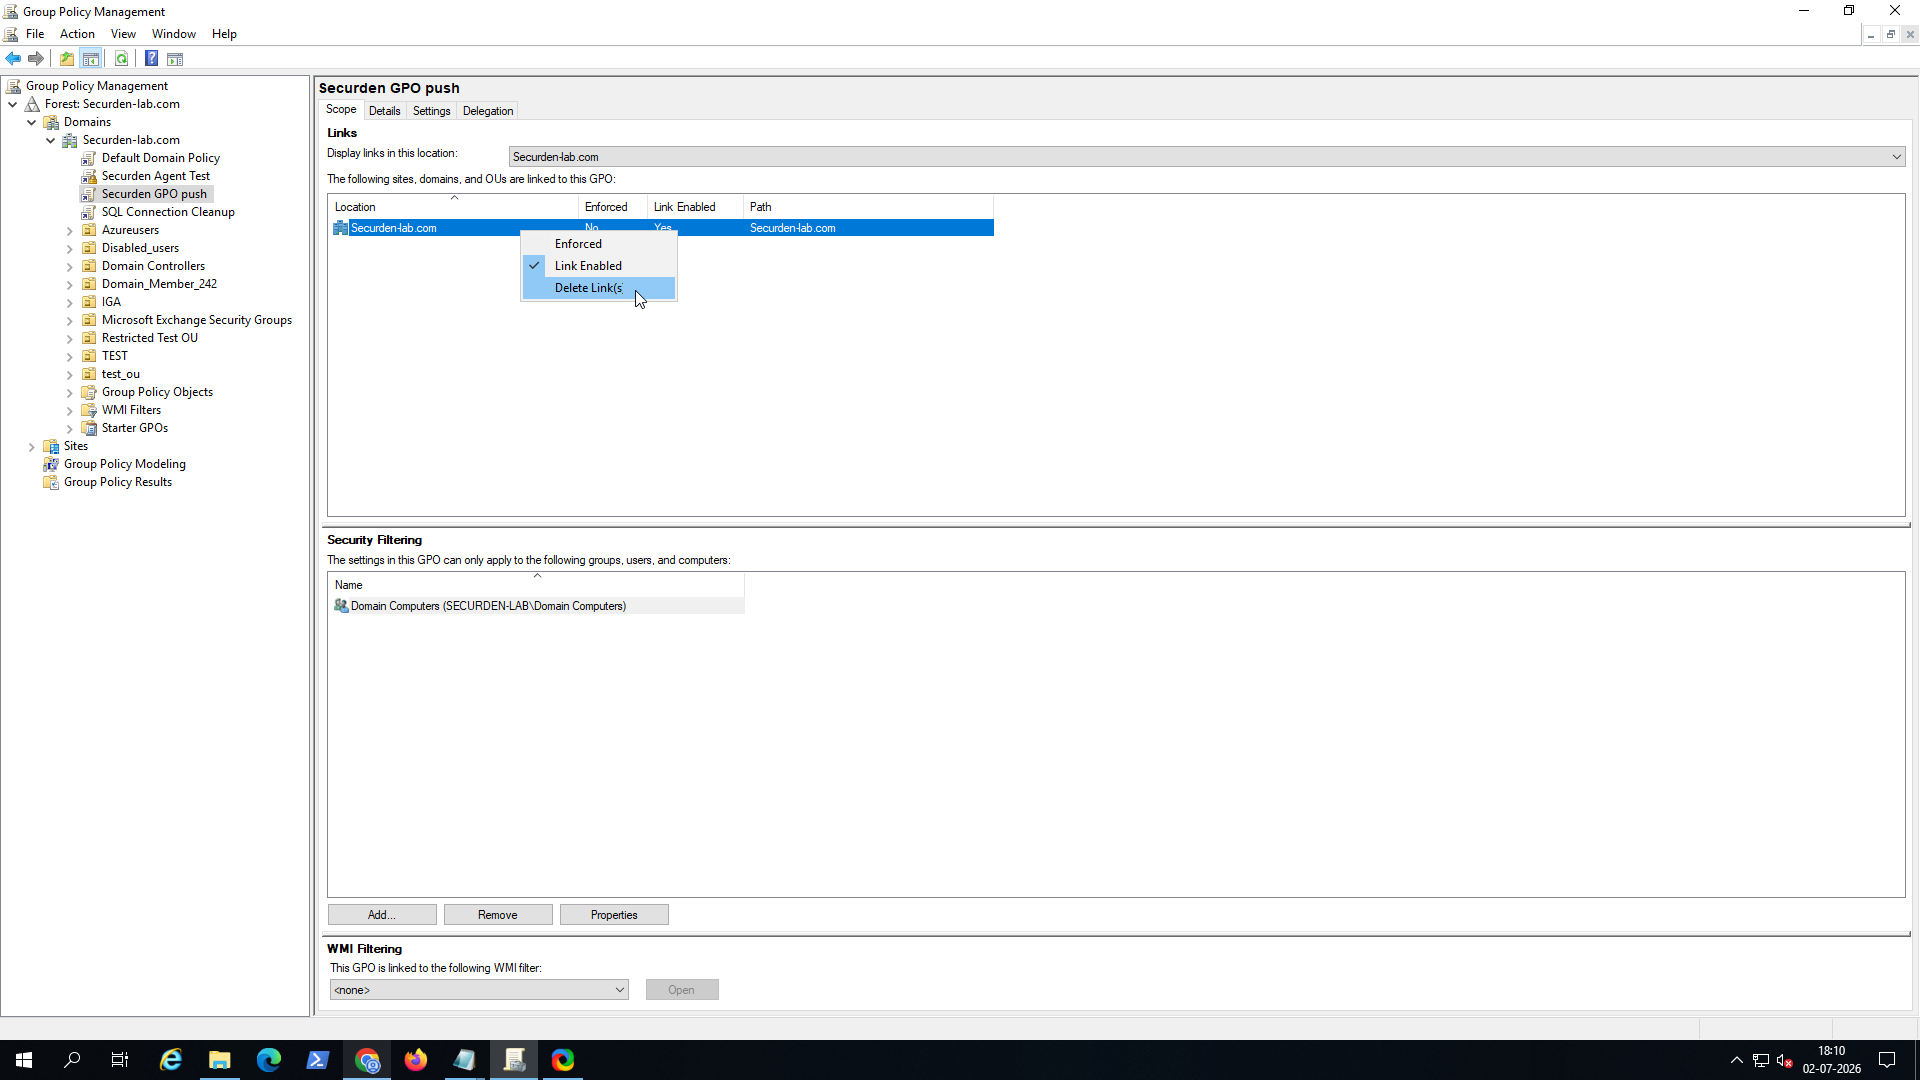
- Remove the GPO link from the domain. Right click on the linked domain and select Delete Links.
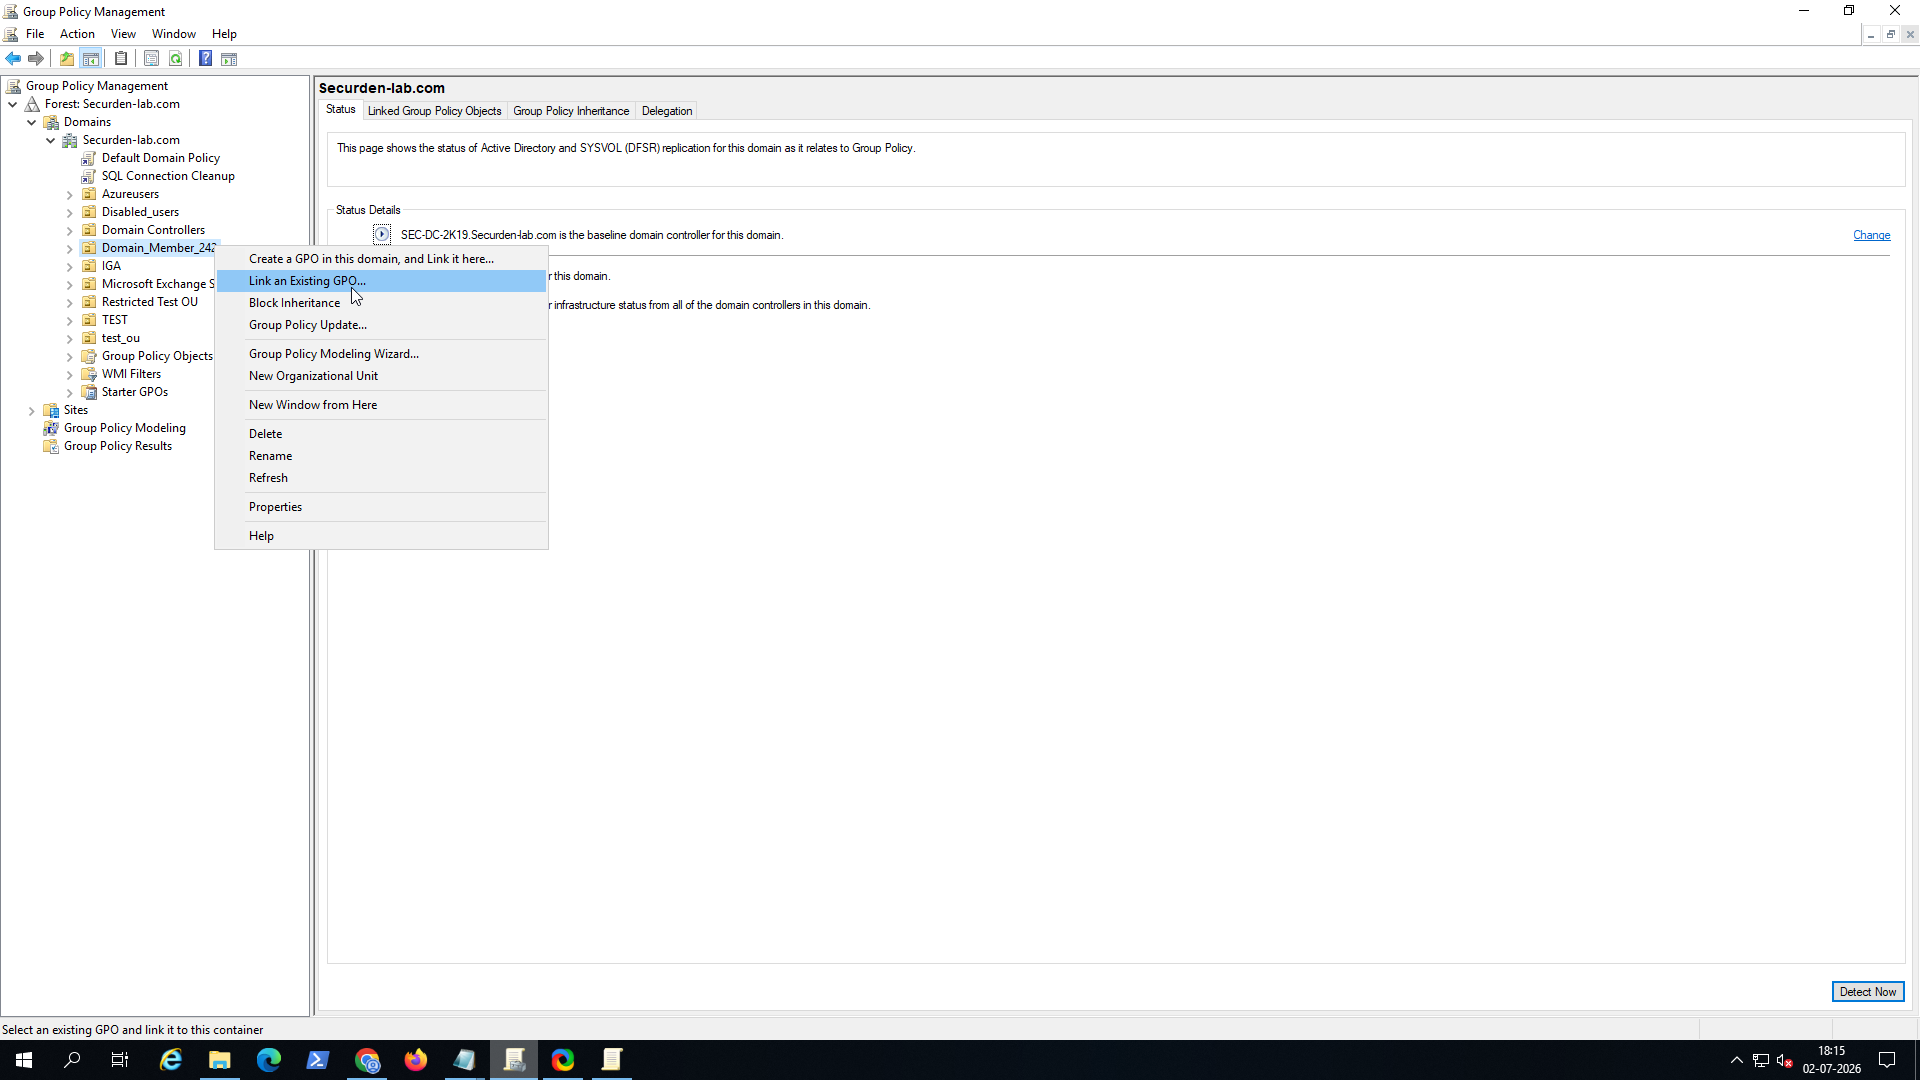
- Right-click the target Organizational Unit (OU) and select Link an Existing GPO.
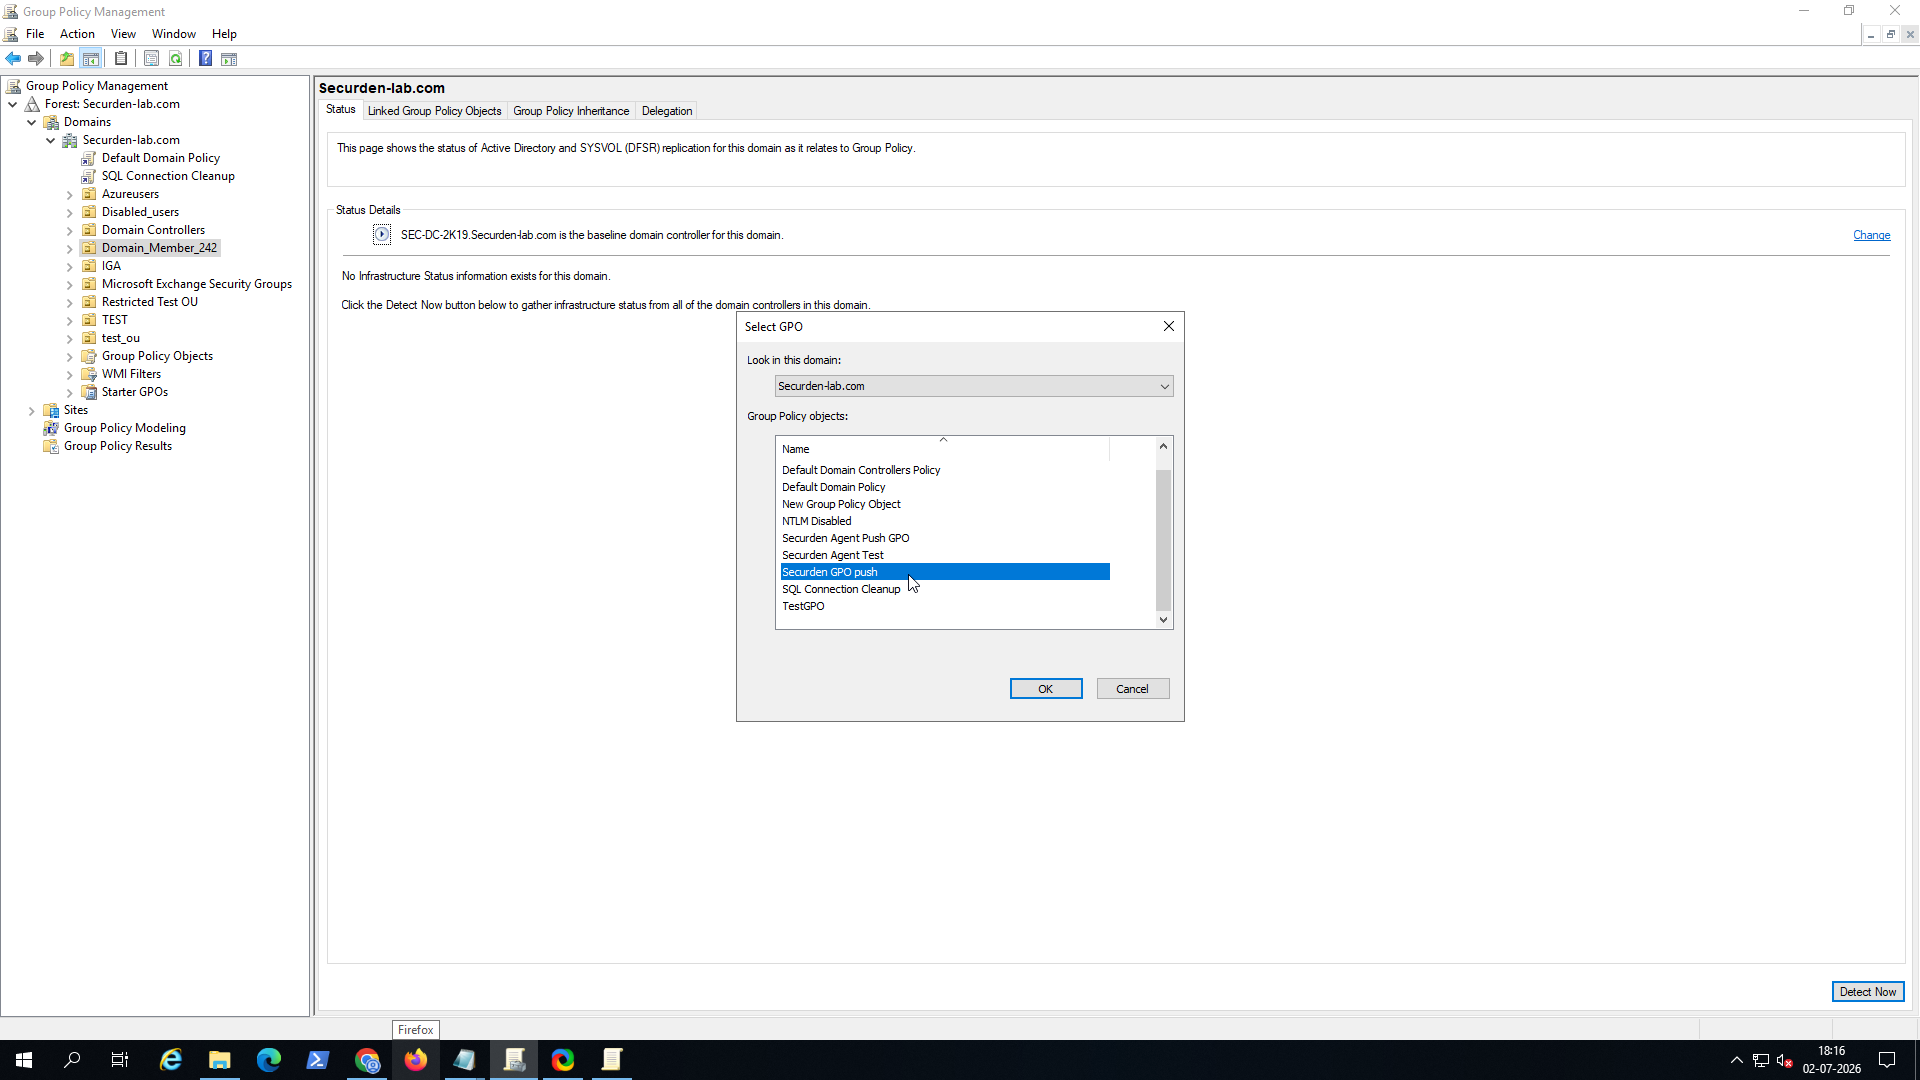
- In the Select GPO dialog, choose the GPO created earlier.
-
Click OK to link the GPO to the selected OU.
-
Select the GPO under Group Policy Objects and verify that the selected OU is listed as a linked target.
-
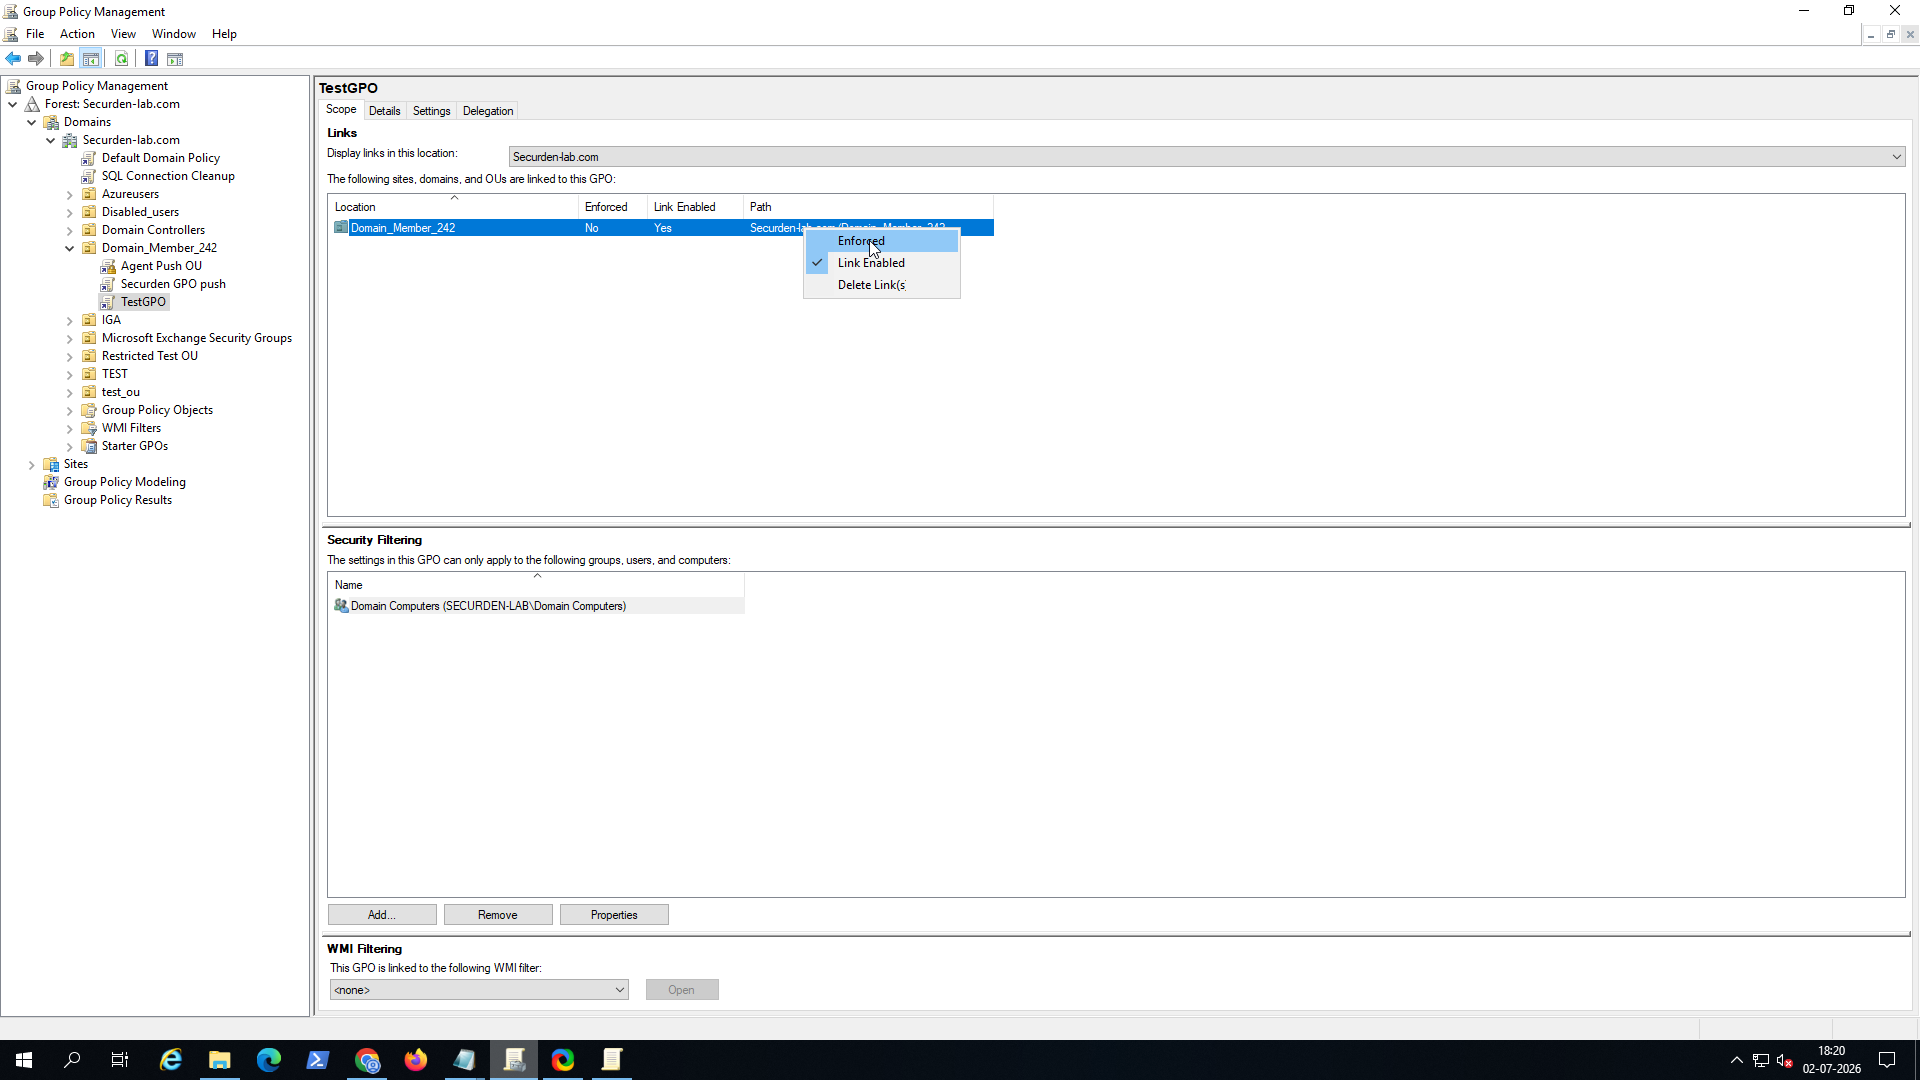
Right-click the linked OU and select Enforced.
Step 4: Configure Delegation Permissions
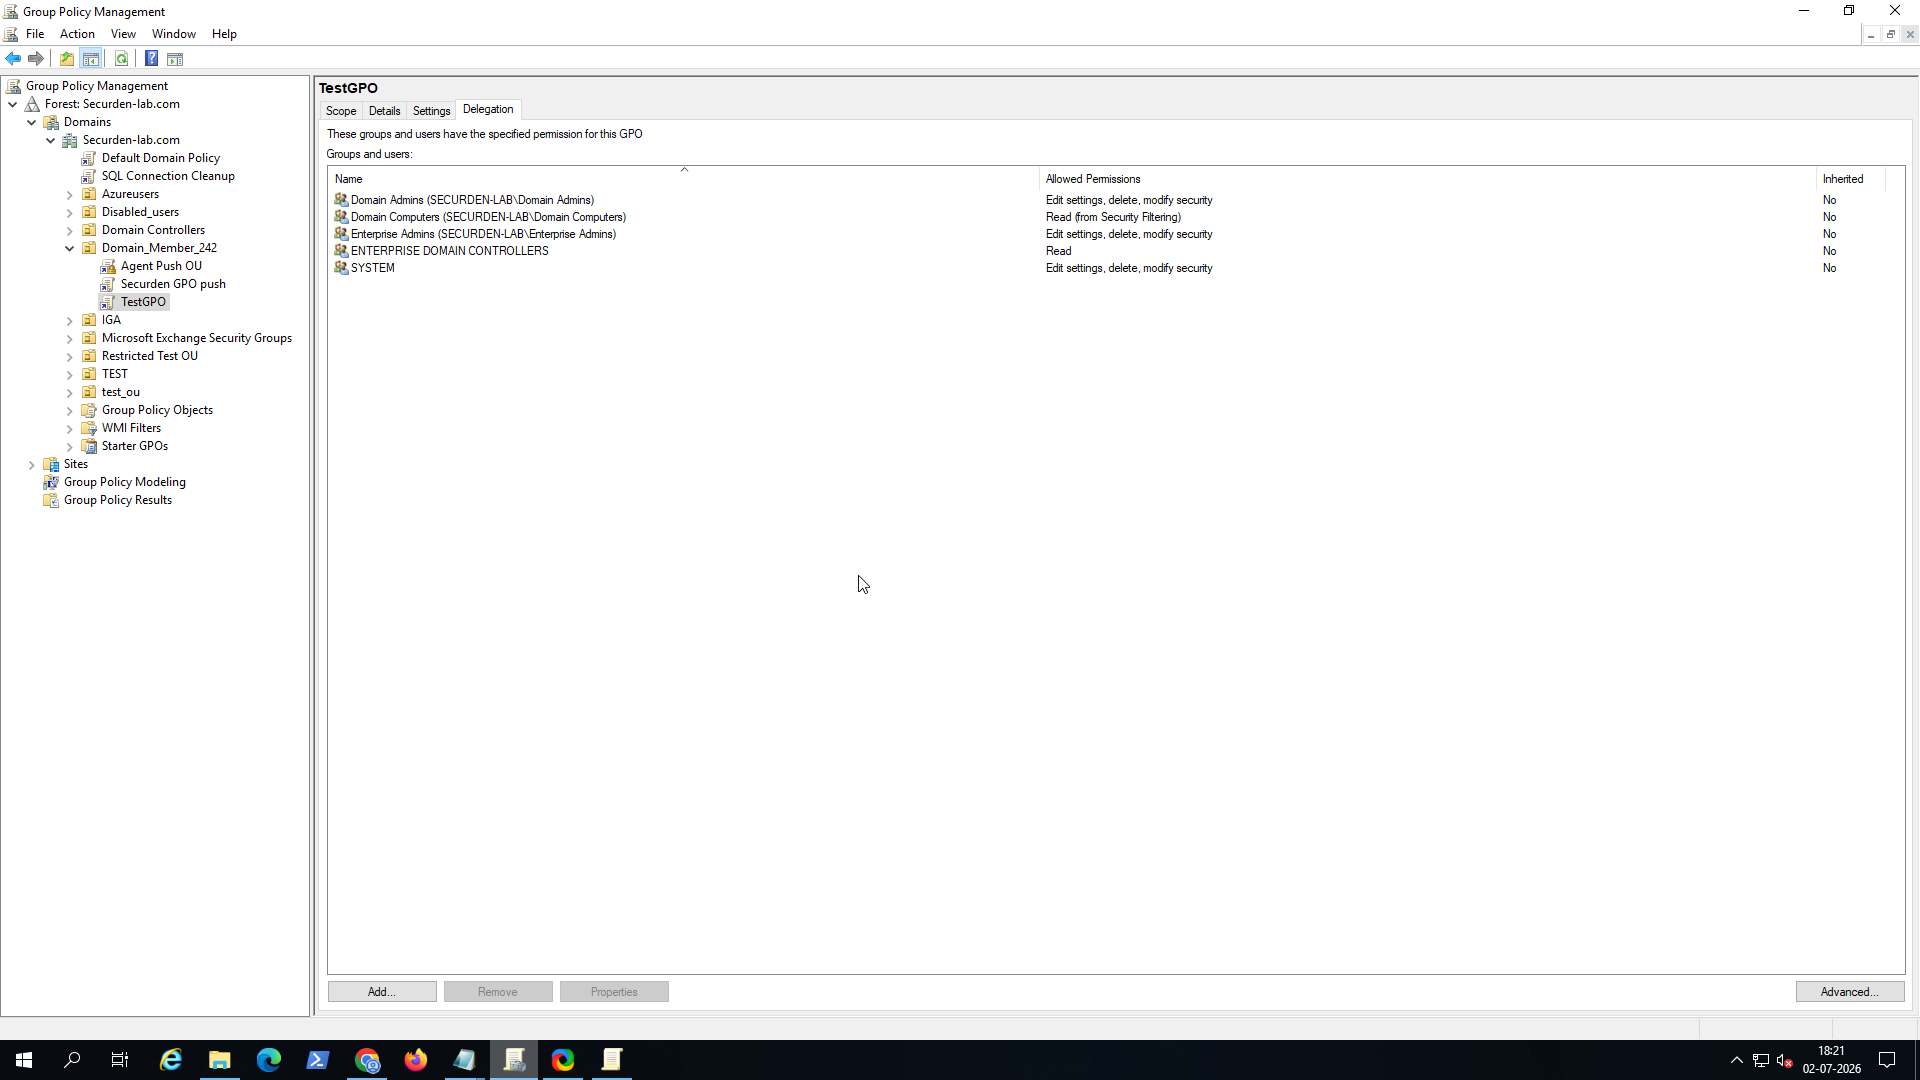
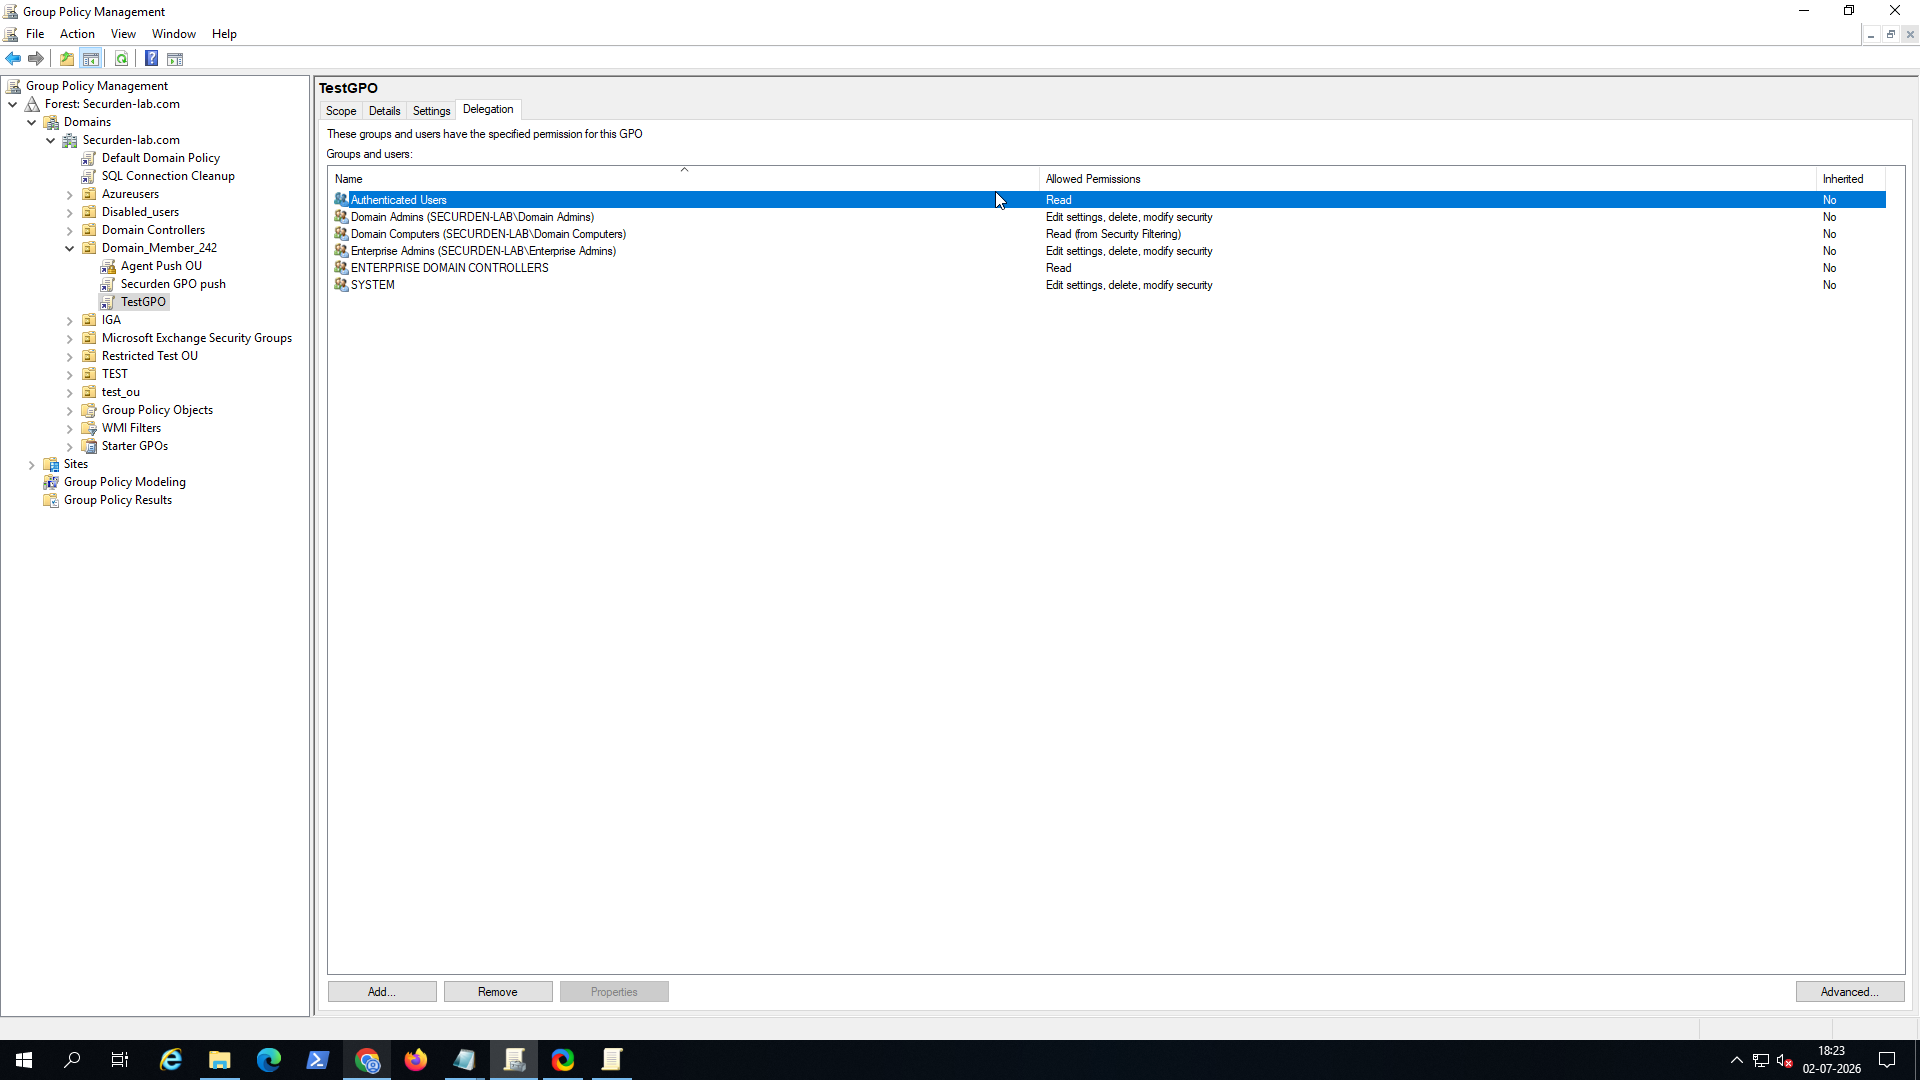
- Select the GPO and navigate to the Delegation tab. This tab displays the users and groups that have permissions on the GPO along with their assigned permission levels. Click Add.
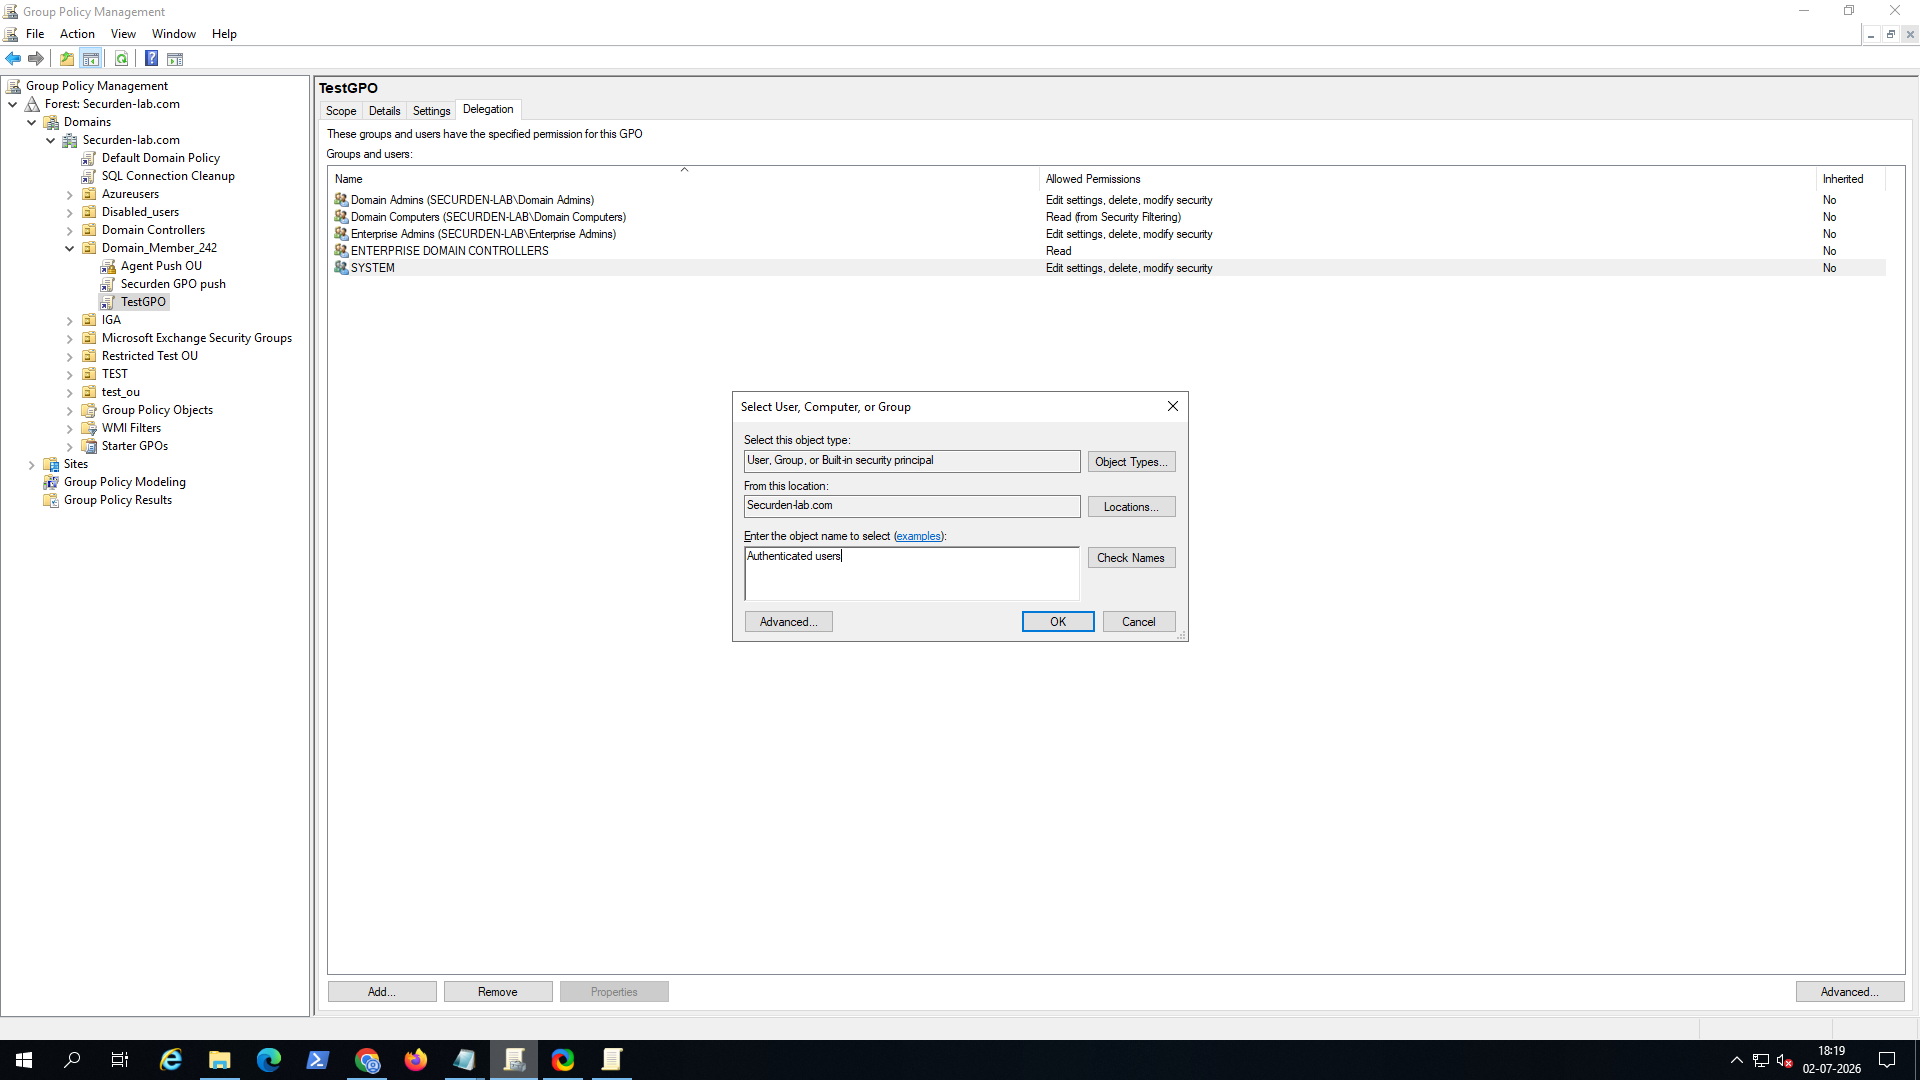
- In the Select User, Computer, or Group dialog, enter Authenticated Users and click OK. This allows domain members to read and process the GPO while Security Filtering determines which computers the policy applies to.
- Verify that Authenticated Users have Read permission only. This allows authenticated users to read the GPO without granting permission to modify it.
Note
With Security Filtering limiting the GPO to the designated computer group and Authenticated Users granted only Read permission through Delegation, the policy will be evaluated by all authenticated domain members but applied only to the intended computers.
The GPO configuration is now complete and ready to deploy the Securden agent to the target computers at the OU level.


