How to Add Applications to Securden EPM?
Once the computers are added to Securden EPM and the agents are deployed on all domain and non-domain endpoints, adding the applications that are used by employees is the next step.
Securden provides three ways to add applications to the repository.
- Automatic Discovery by Agent
- Manually Adding Individual Applications
- Import from Applocker
The Agent will automatically discover applications that are run with elevated permissions and add them to the Securden repository.
Note
The agent will be able to observe and fetch applications in learning and operational mode. If the agent is in idle mode, it would not fetch any applications from the endpoints.
Administrators can manually add applications to the repository through two methods. They can define the application attributes explicitly or import applications from Applocker.
How to Add Applications with Child Processes?
For privilege elevation,
You only need to add the parent/primary application to Securden EPM. Any child processes spawned by an application that is already covered by a policy automatically inherit the same privilege level as the parent.
There is no need to separately discover, add, or create policies for these child processes. This applies whether the application was added through automatic discovery, manual addition, or imported from AppLocker.
For application allowlisting,
When adding the application(s), you can select the checkbox name ‘Include sub-processes' to include the apps and processes spawned by the application (child processes) when the app is added to an allowlist.
How to Import Applications from AppLocker into Securden EPM?
If you utilize the AppLocker tool to allow or deny applications from running, you can import the applications and policies in Securden.
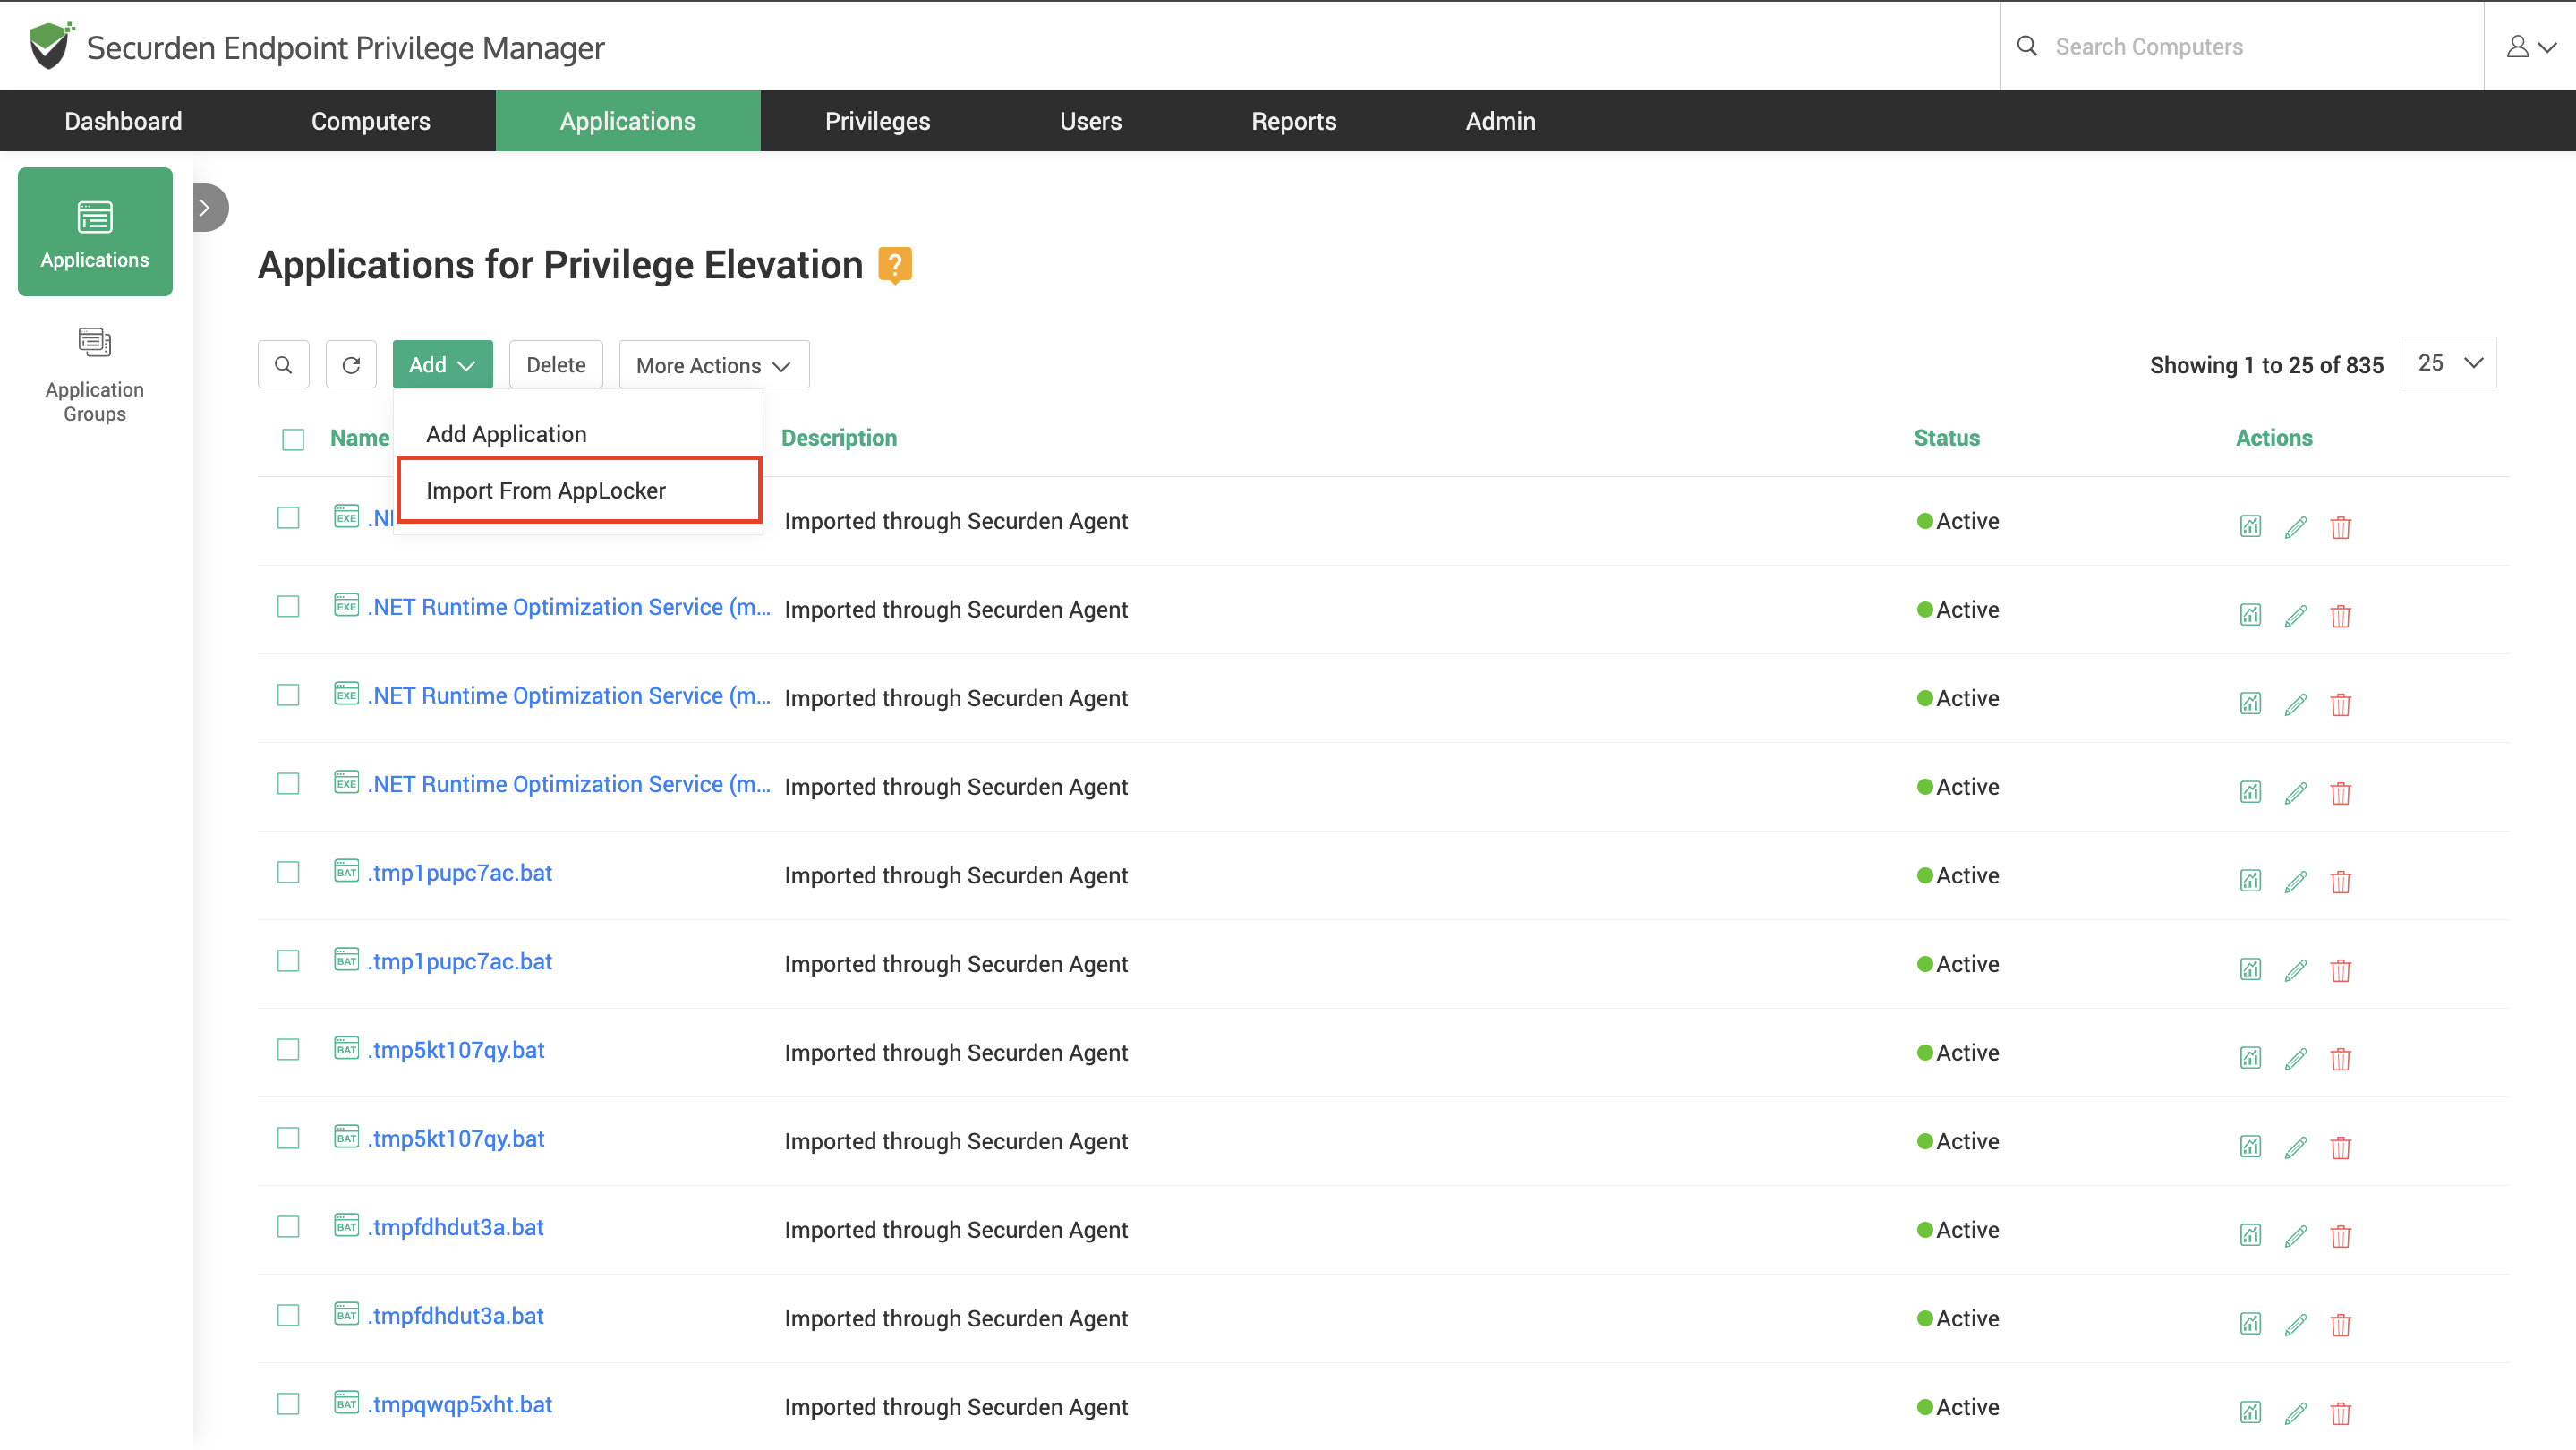
You can import from AppLocker by navigating to Applications >> Add >> Import from AppLocker.
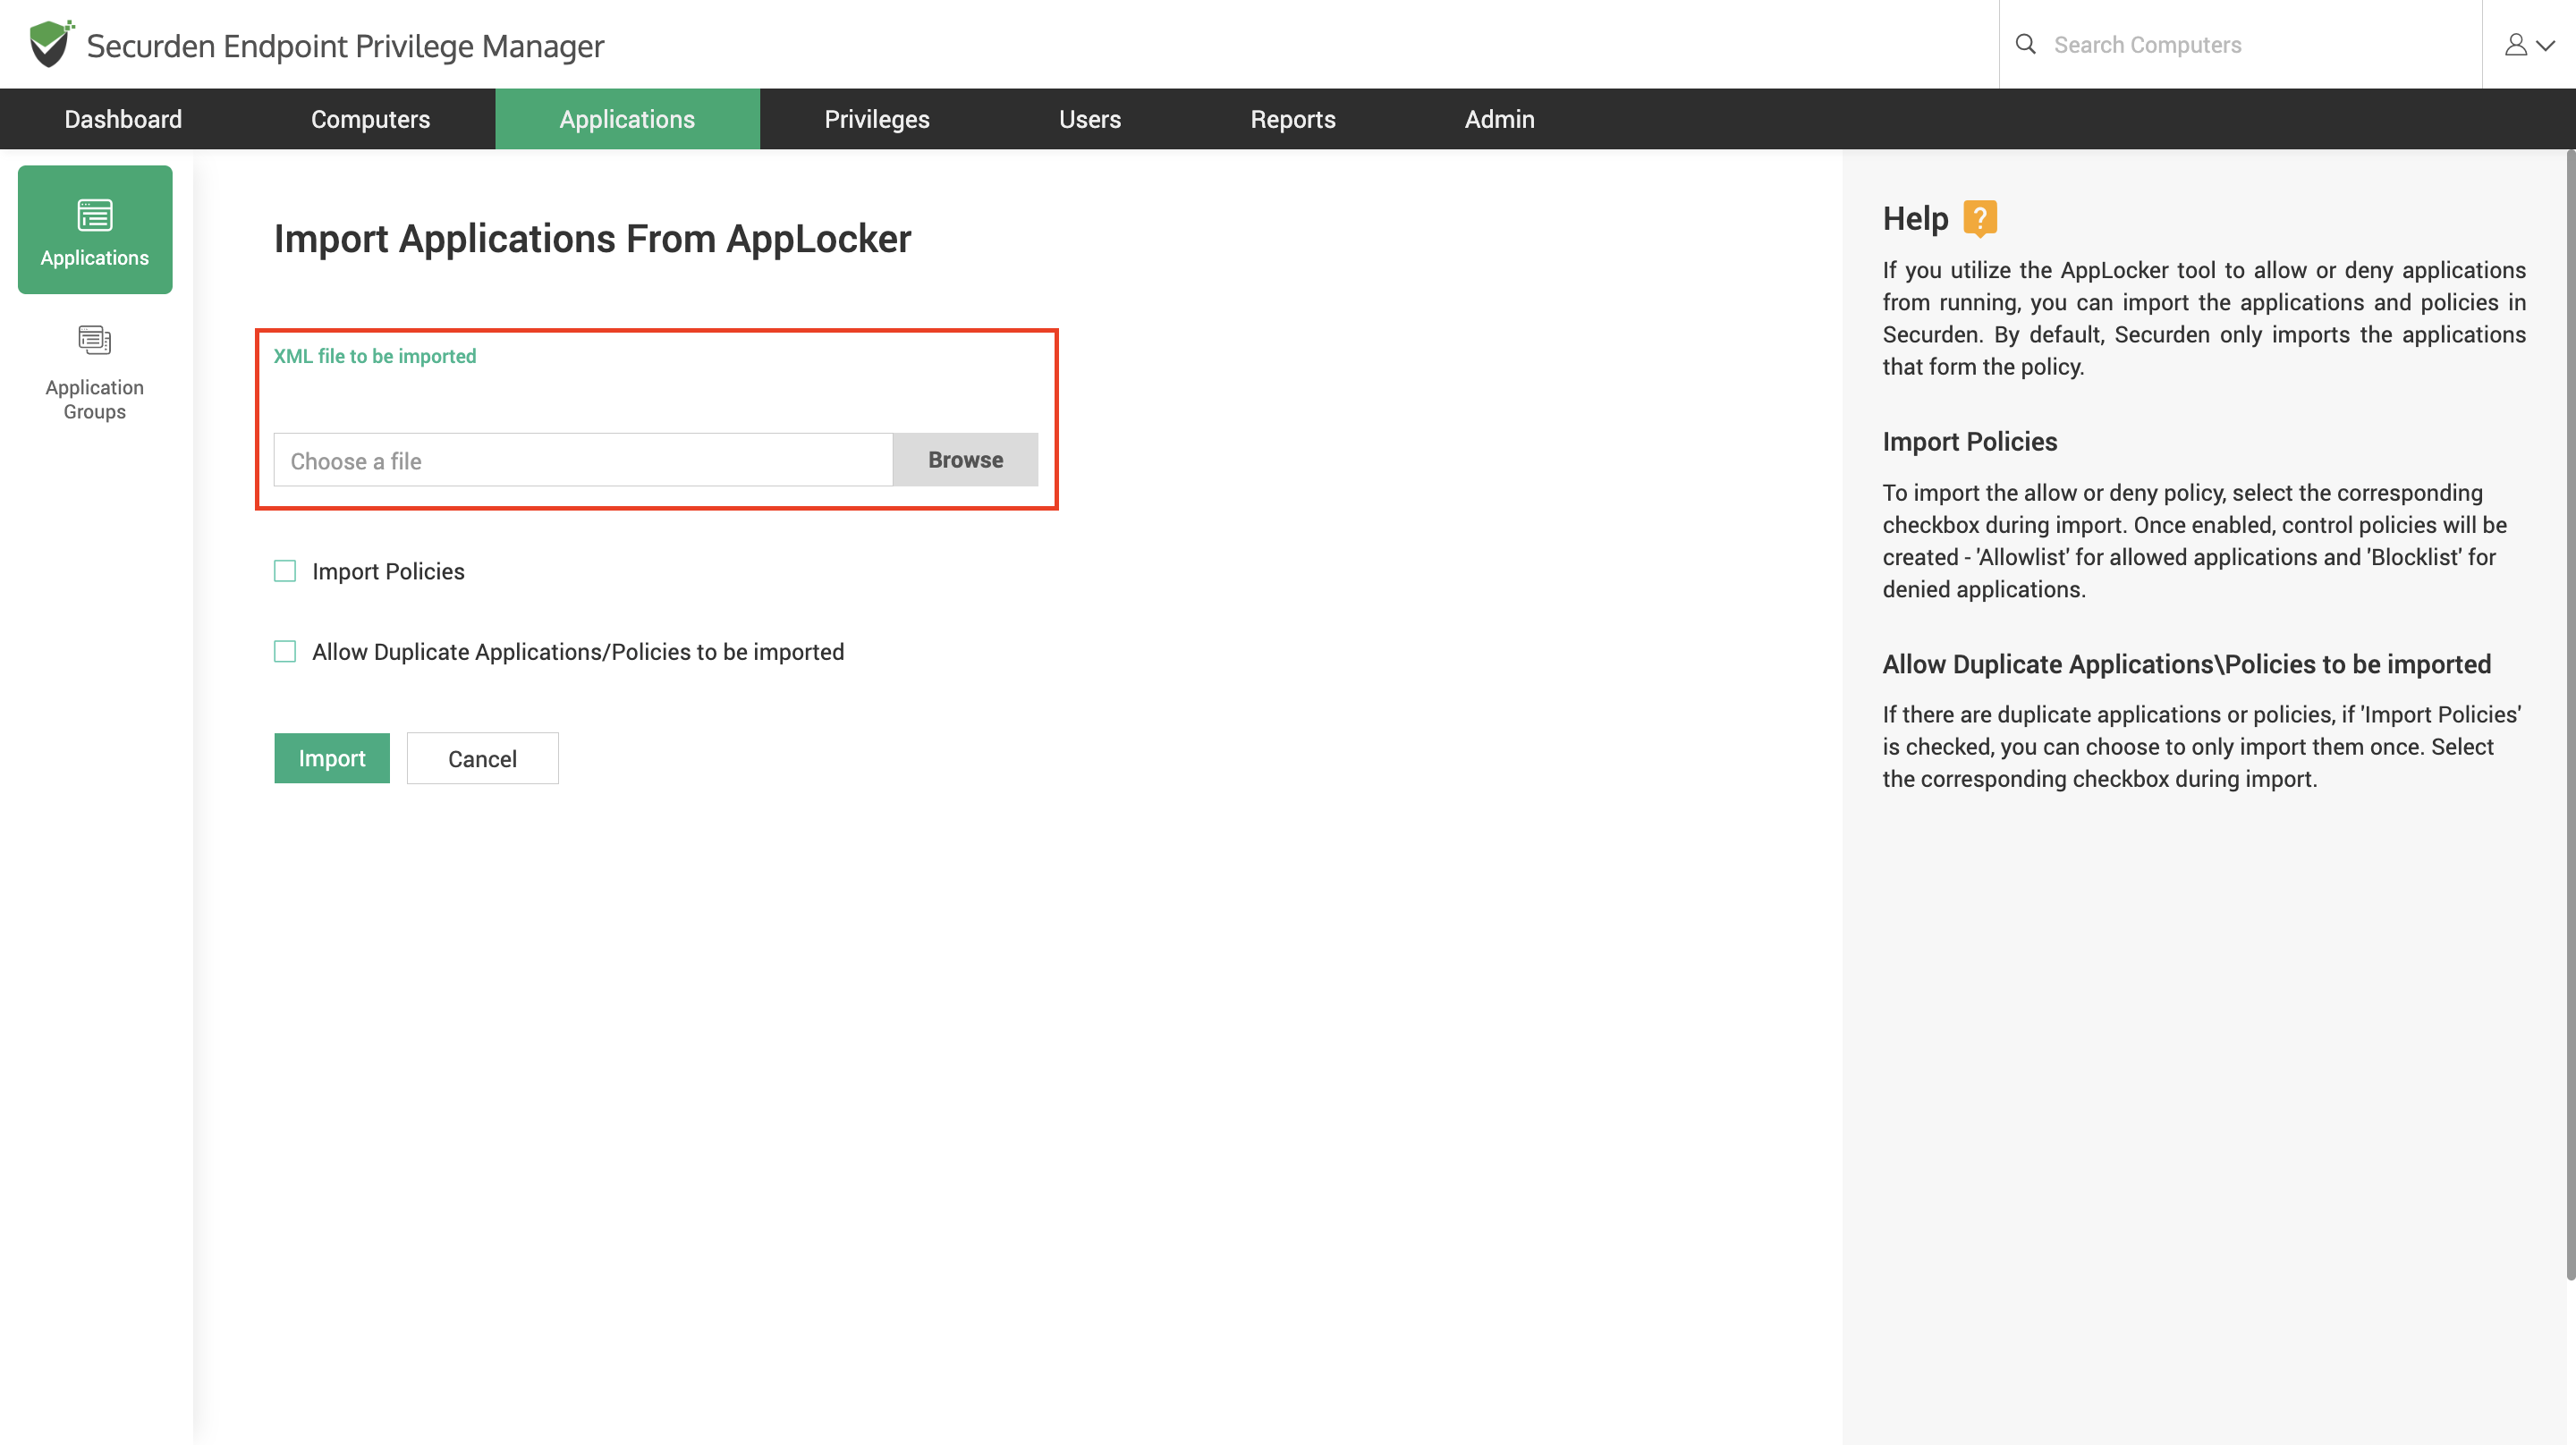
Click browse to search and select the file exported from AppLocker.
By default, Securden only imports the applications that form the policies in AppLocker. Applications that are not a part of any policy in AppLocker will be skipped by Securden.
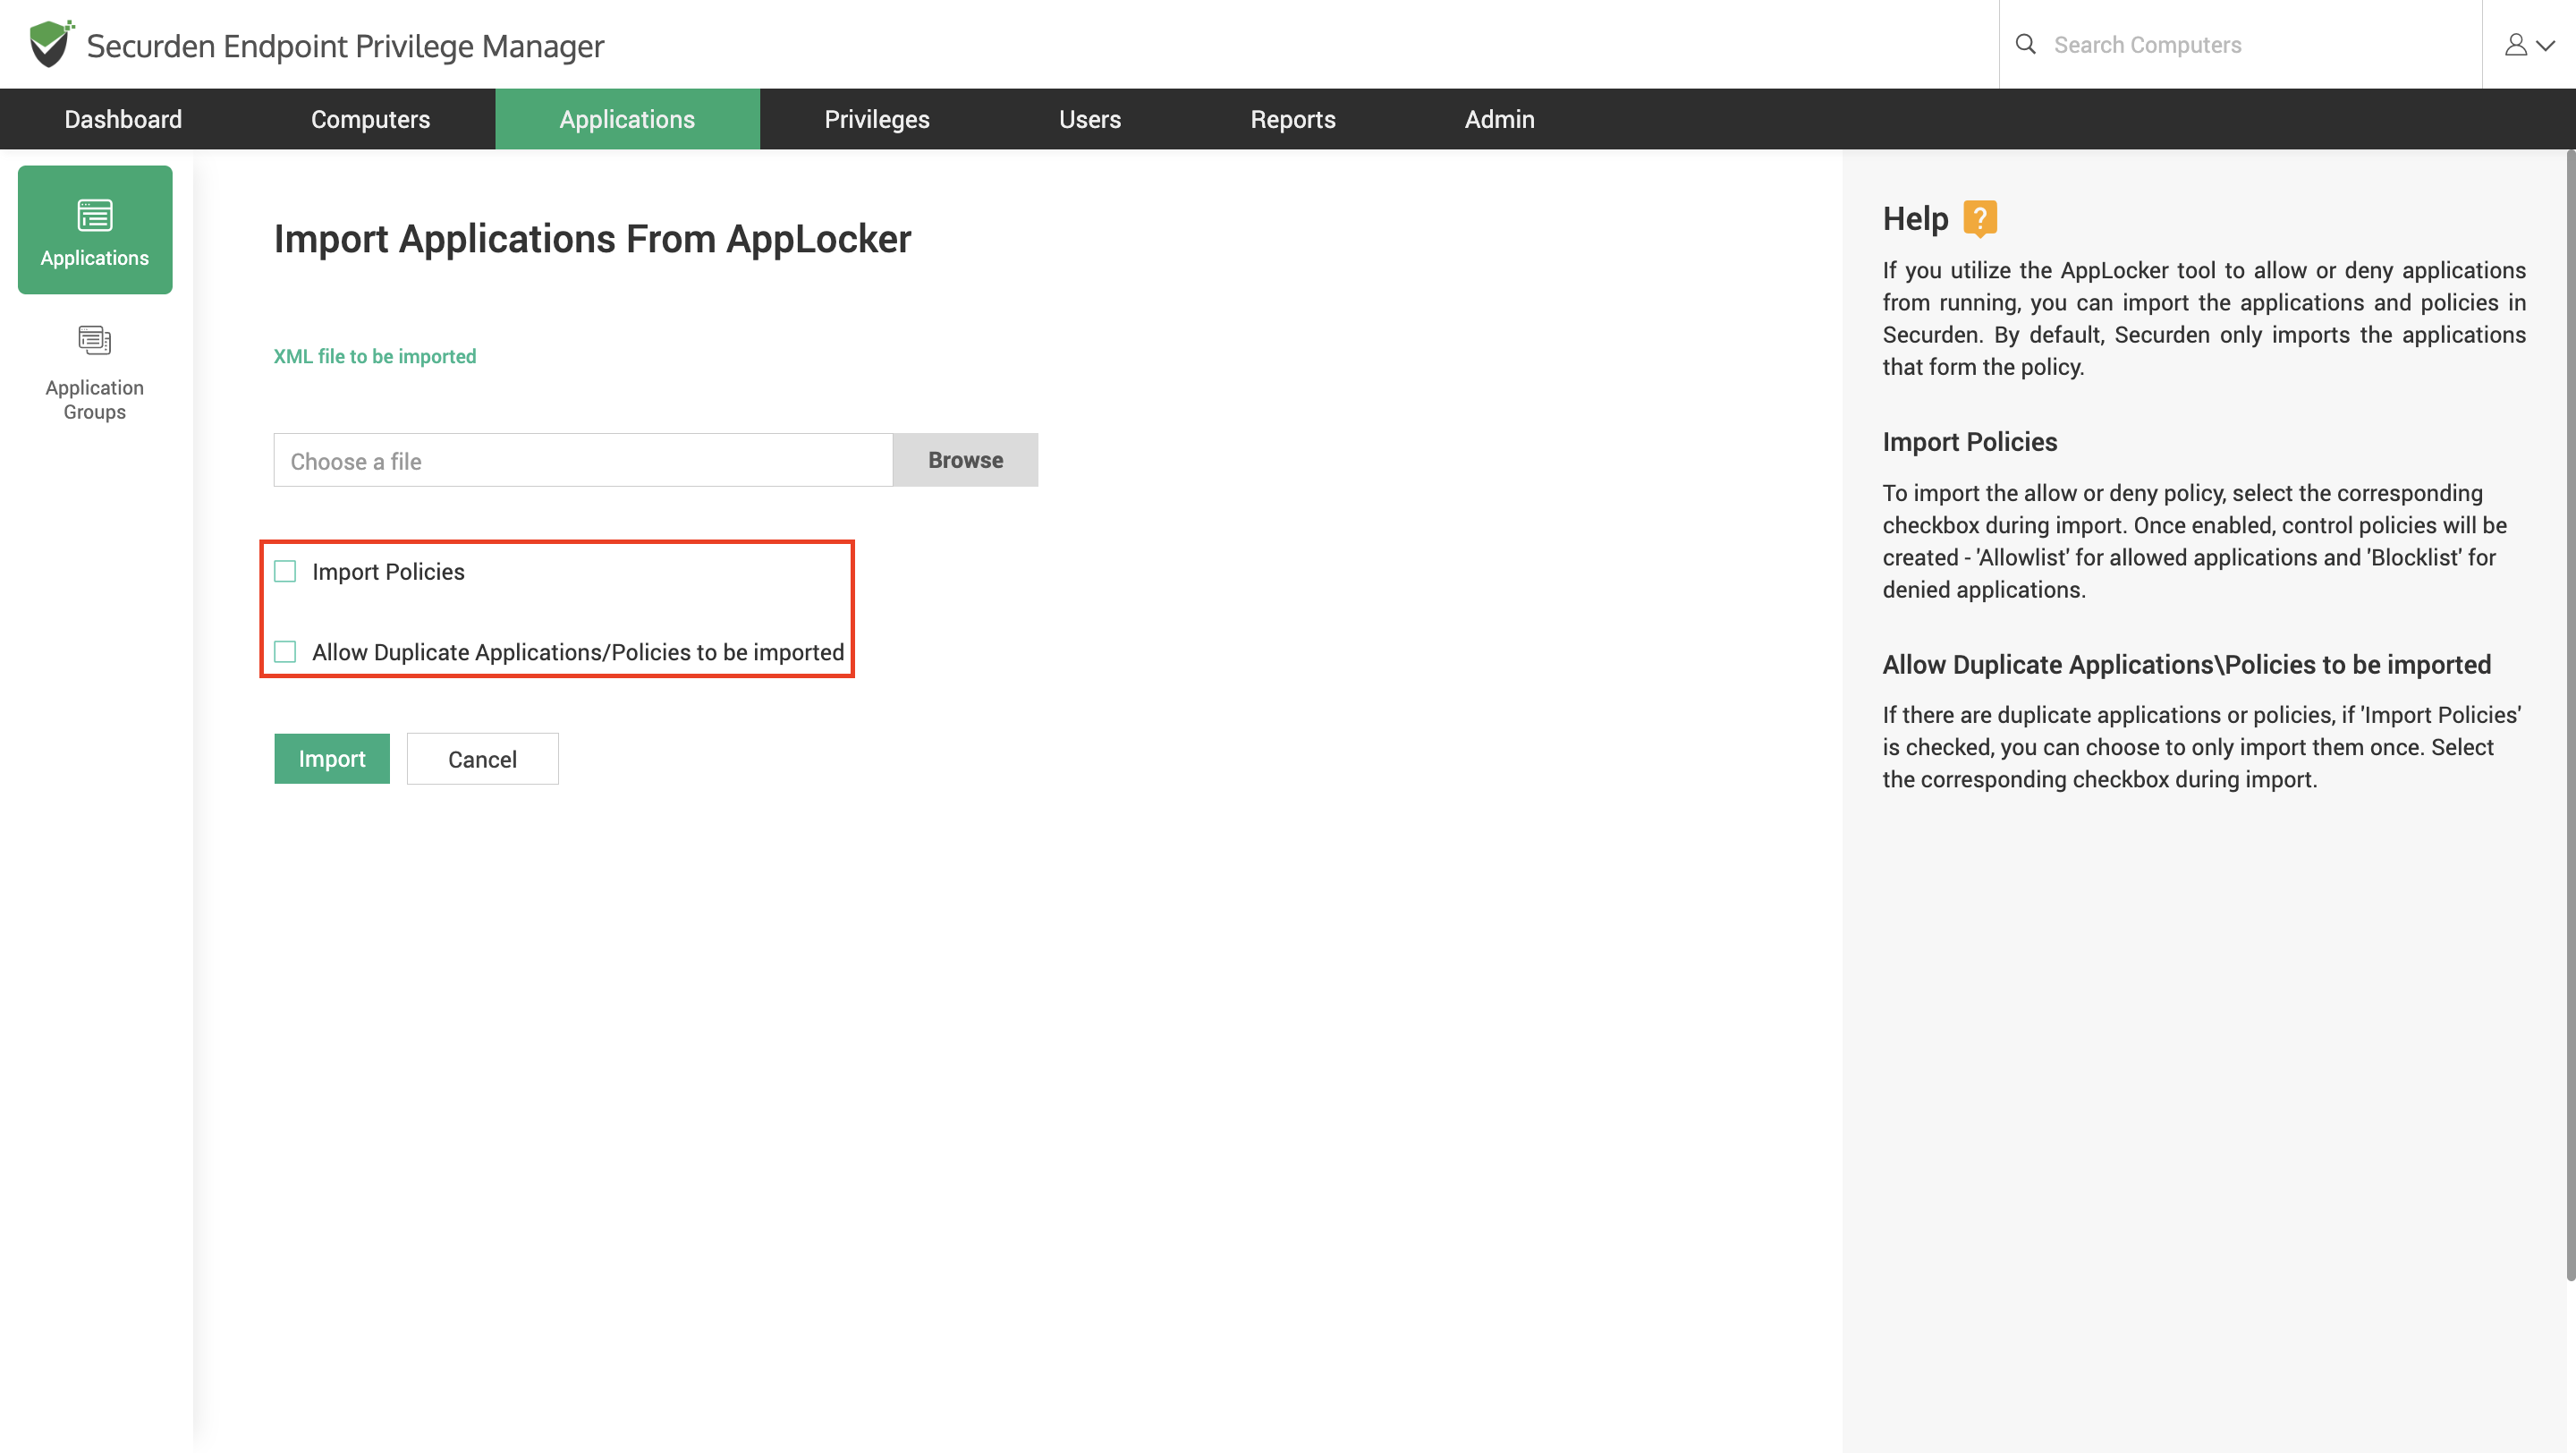
Import Policies
To import the allow or deny policy, select the corresponding checkbox during import. Once enabled, Securden control policies will be created - 'Allowlist' for allowed applications and 'Blocklist' for denied applications in AppLocker.
Allow Duplicate Applications\Policies to be imported
If you have duplicate applications and policies, you can select this checkbox to import the duplicates. If you want to skip importing duplicates, leave this checkbox unchecked.
How to Manually Add Applications to Securden EPM?
- To add applications manually navigate to Applications >> Add >> Add Application.
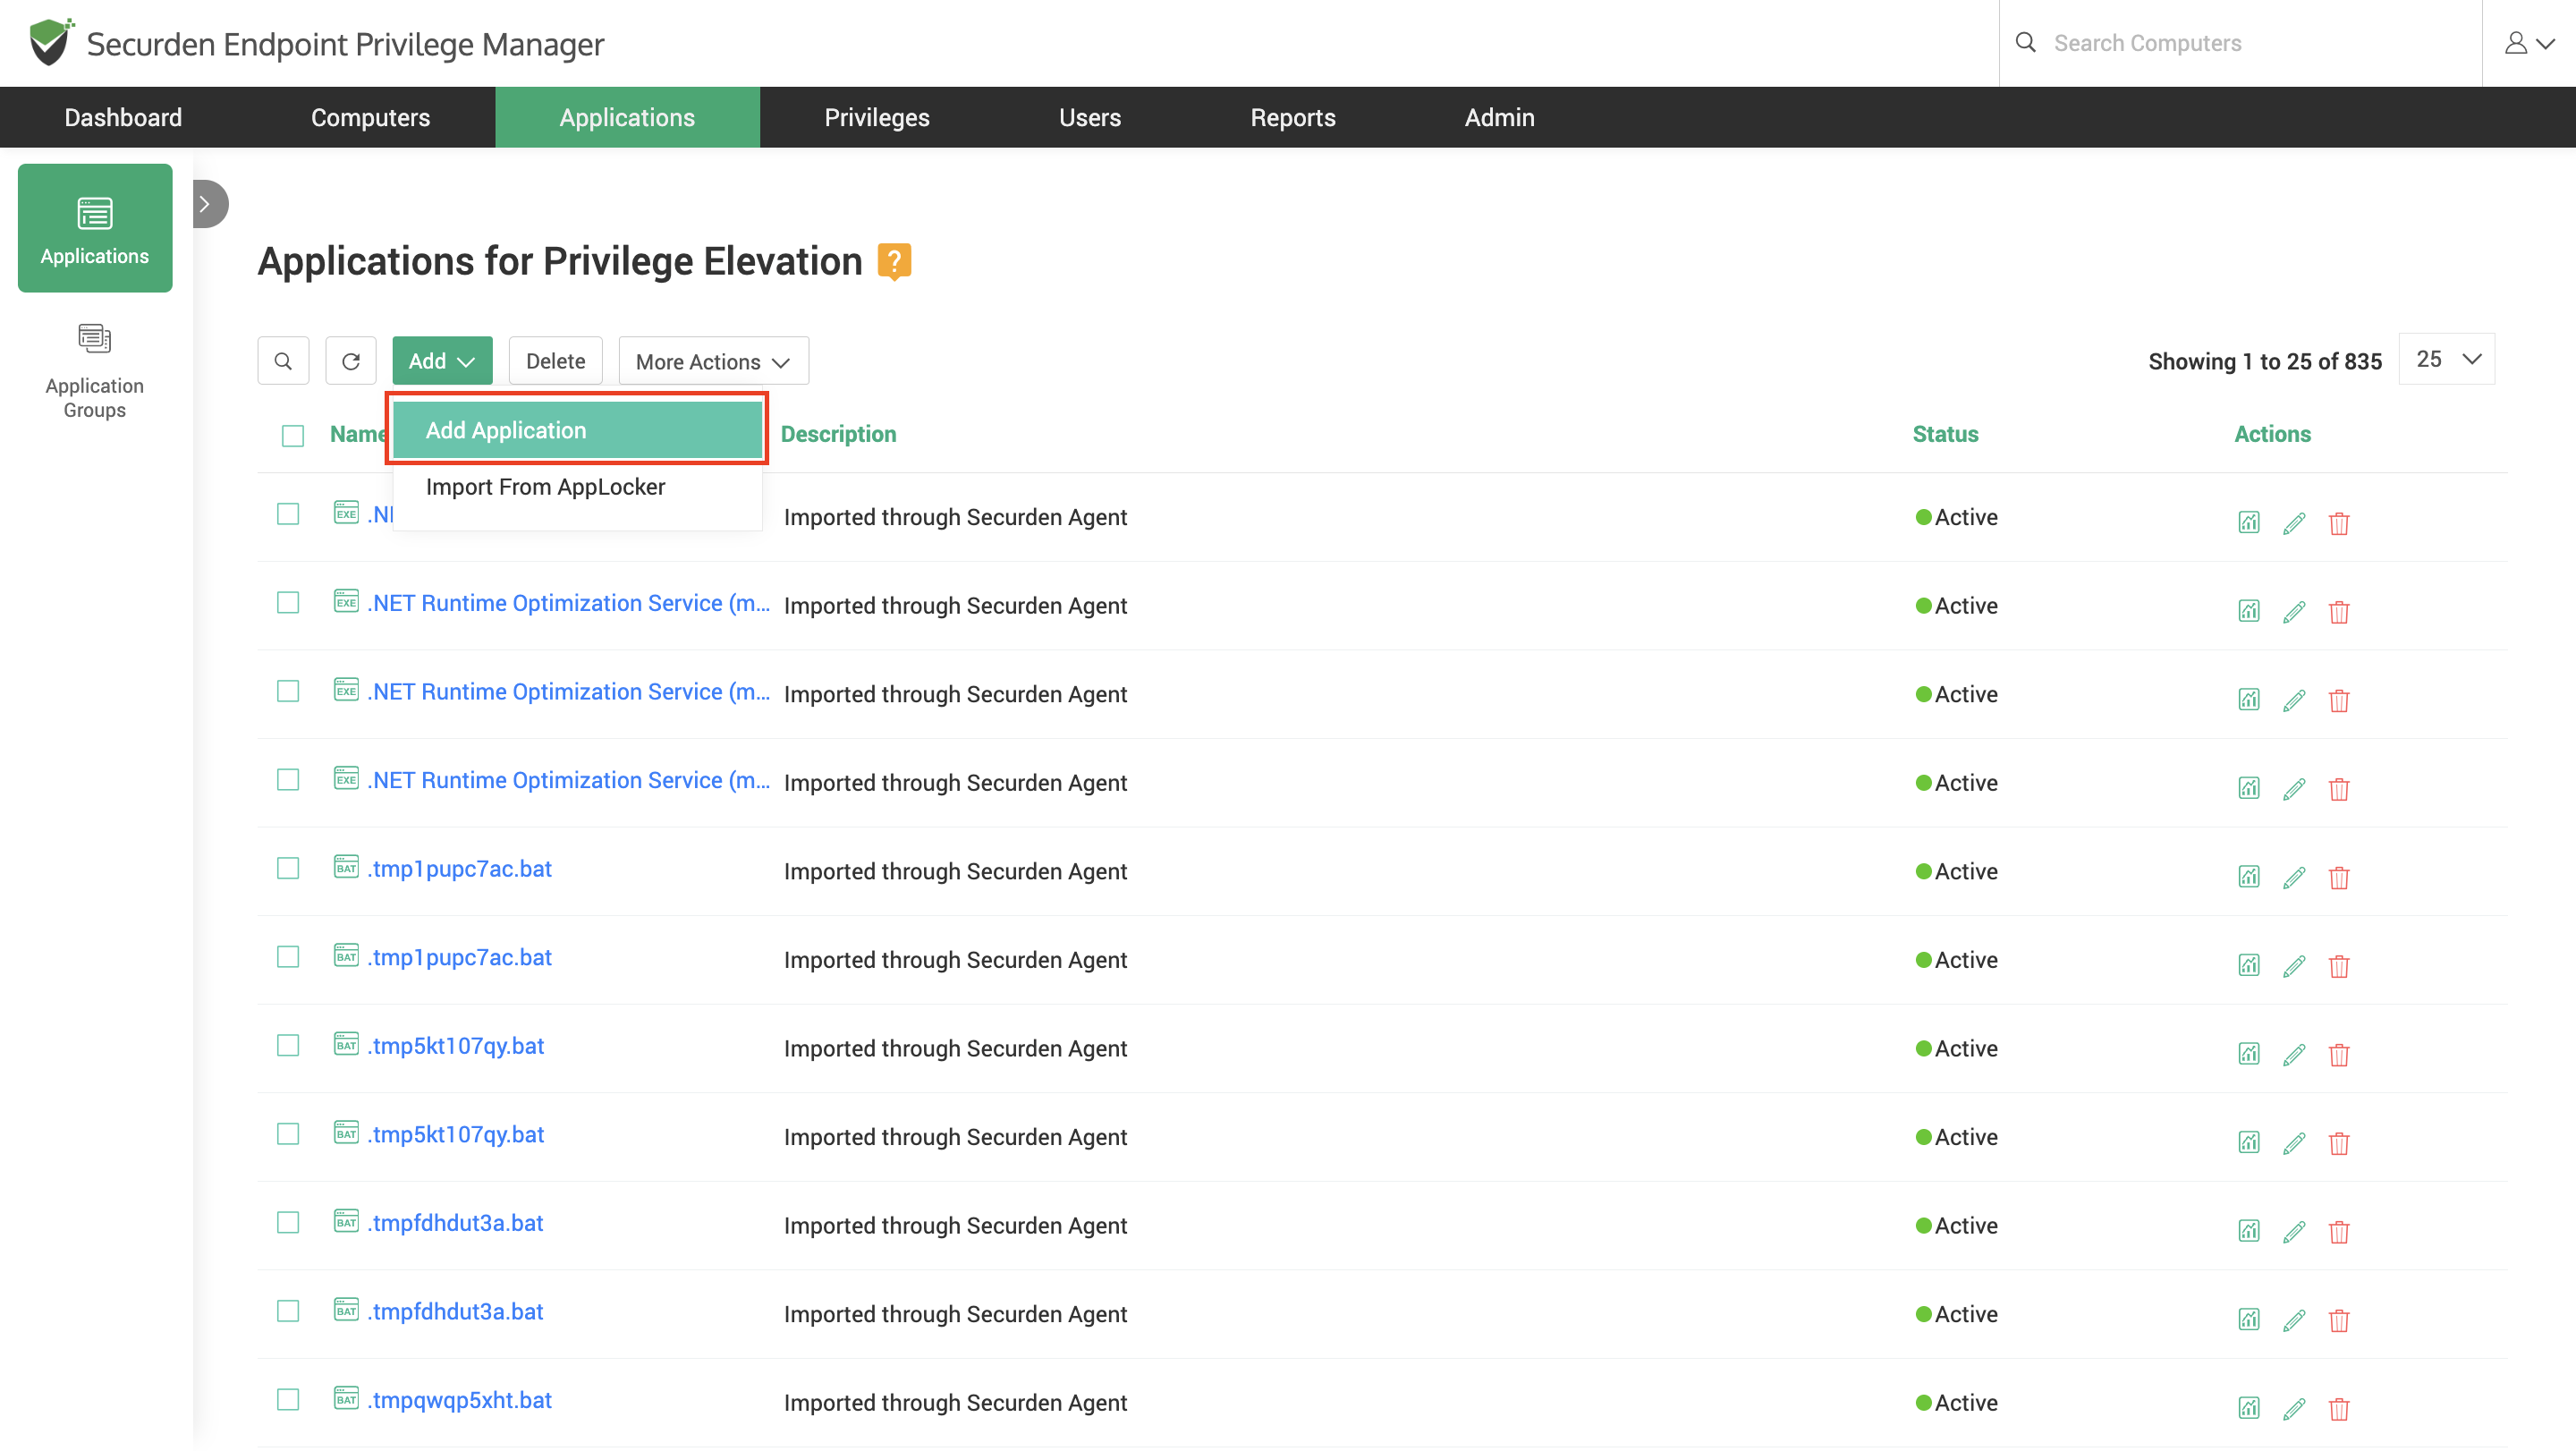
- In the window that opens, Specify the application type based on the operating system of the application.
- You need to specify the name of the application and provide a description for the same.
- For each operating system, Securden supports different file types. You can select the application file type of the application you want to add to Securden.
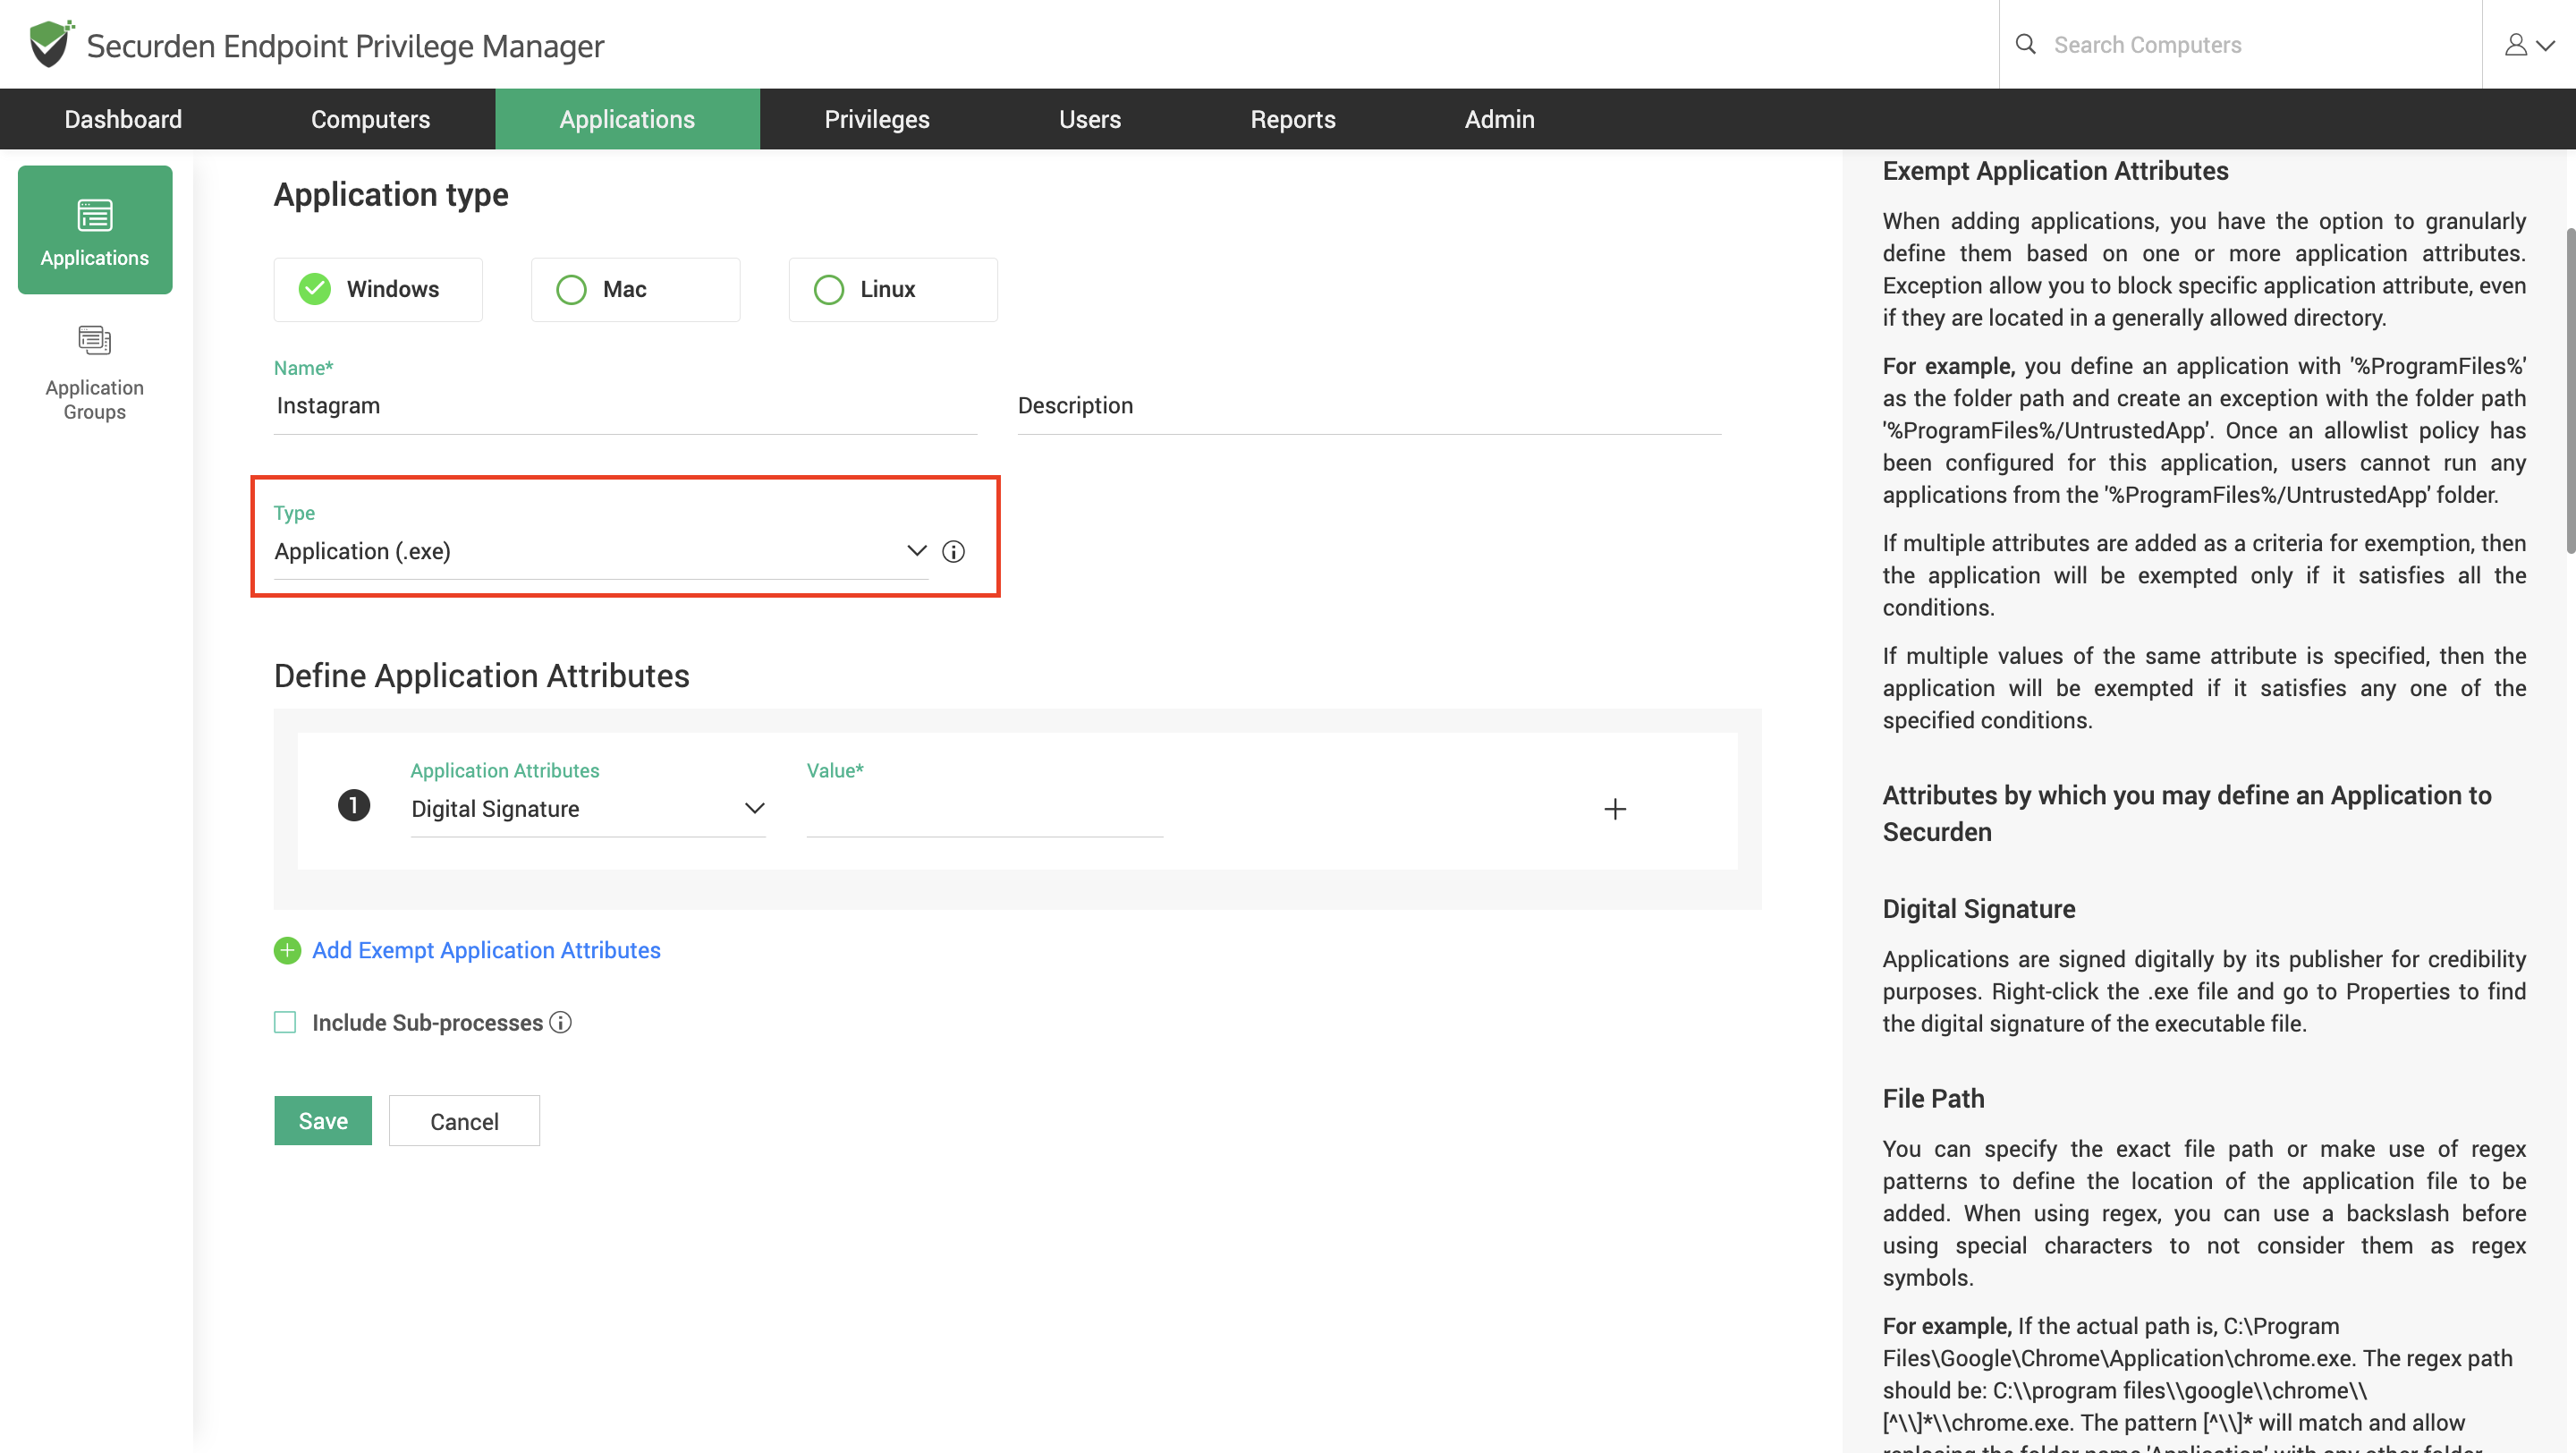
- The file types supported in Securden are explained separately. Visit this page for additional information on each file type.
- Applications can be identified using different attributes. They are explained in the table below.
| Attribute | Description |
|---|---|
| Digital Signature | Verifies whether the file is digitally signed and confirms that it has not been modified since it was signed. This helps establish the authenticity and integrity of the file. |
| File Path | The complete location of the file on the endpoint, including the drive and all parent directories. |
| Folder Path | The directory containing the file, excluding the file name. Useful for creating policies that apply to all files within a specific folder. |
| Original File Name | The original file name embedded in the file's metadata by the software publisher. This value remains unchanged even if the file is renamed after deployment. |
| File Name | The current name of the file as it exists on the endpoint. This may differ from the original file name if the file has been renamed. |
| File Hash Value (SHA-256) | The SHA-256 cryptographic hash of the file. Since the hash uniquely identifies the file's contents, any modification to the file results in a different hash value. |
| Signature Thumbprint | The unique SHA-1 thumbprint of the certificate used to digitally sign the file. It identifies the signing certificate and can be used to verify trusted publishers. |
| Publisher's Name | The name of the software publisher extracted from the file's digital signature certificate. This can be used to create trust-based policies for software from specific vendors. |
| Product Name | The product name specified in the file's version information, indicating the software or application to which the file belongs. |
| File Version | The version number of the file provided by the software publisher. This allows policies to target or exclude specific versions of an application. |
- You need to specify the attribute type and its corresponding value as the criterion for identifying the application.
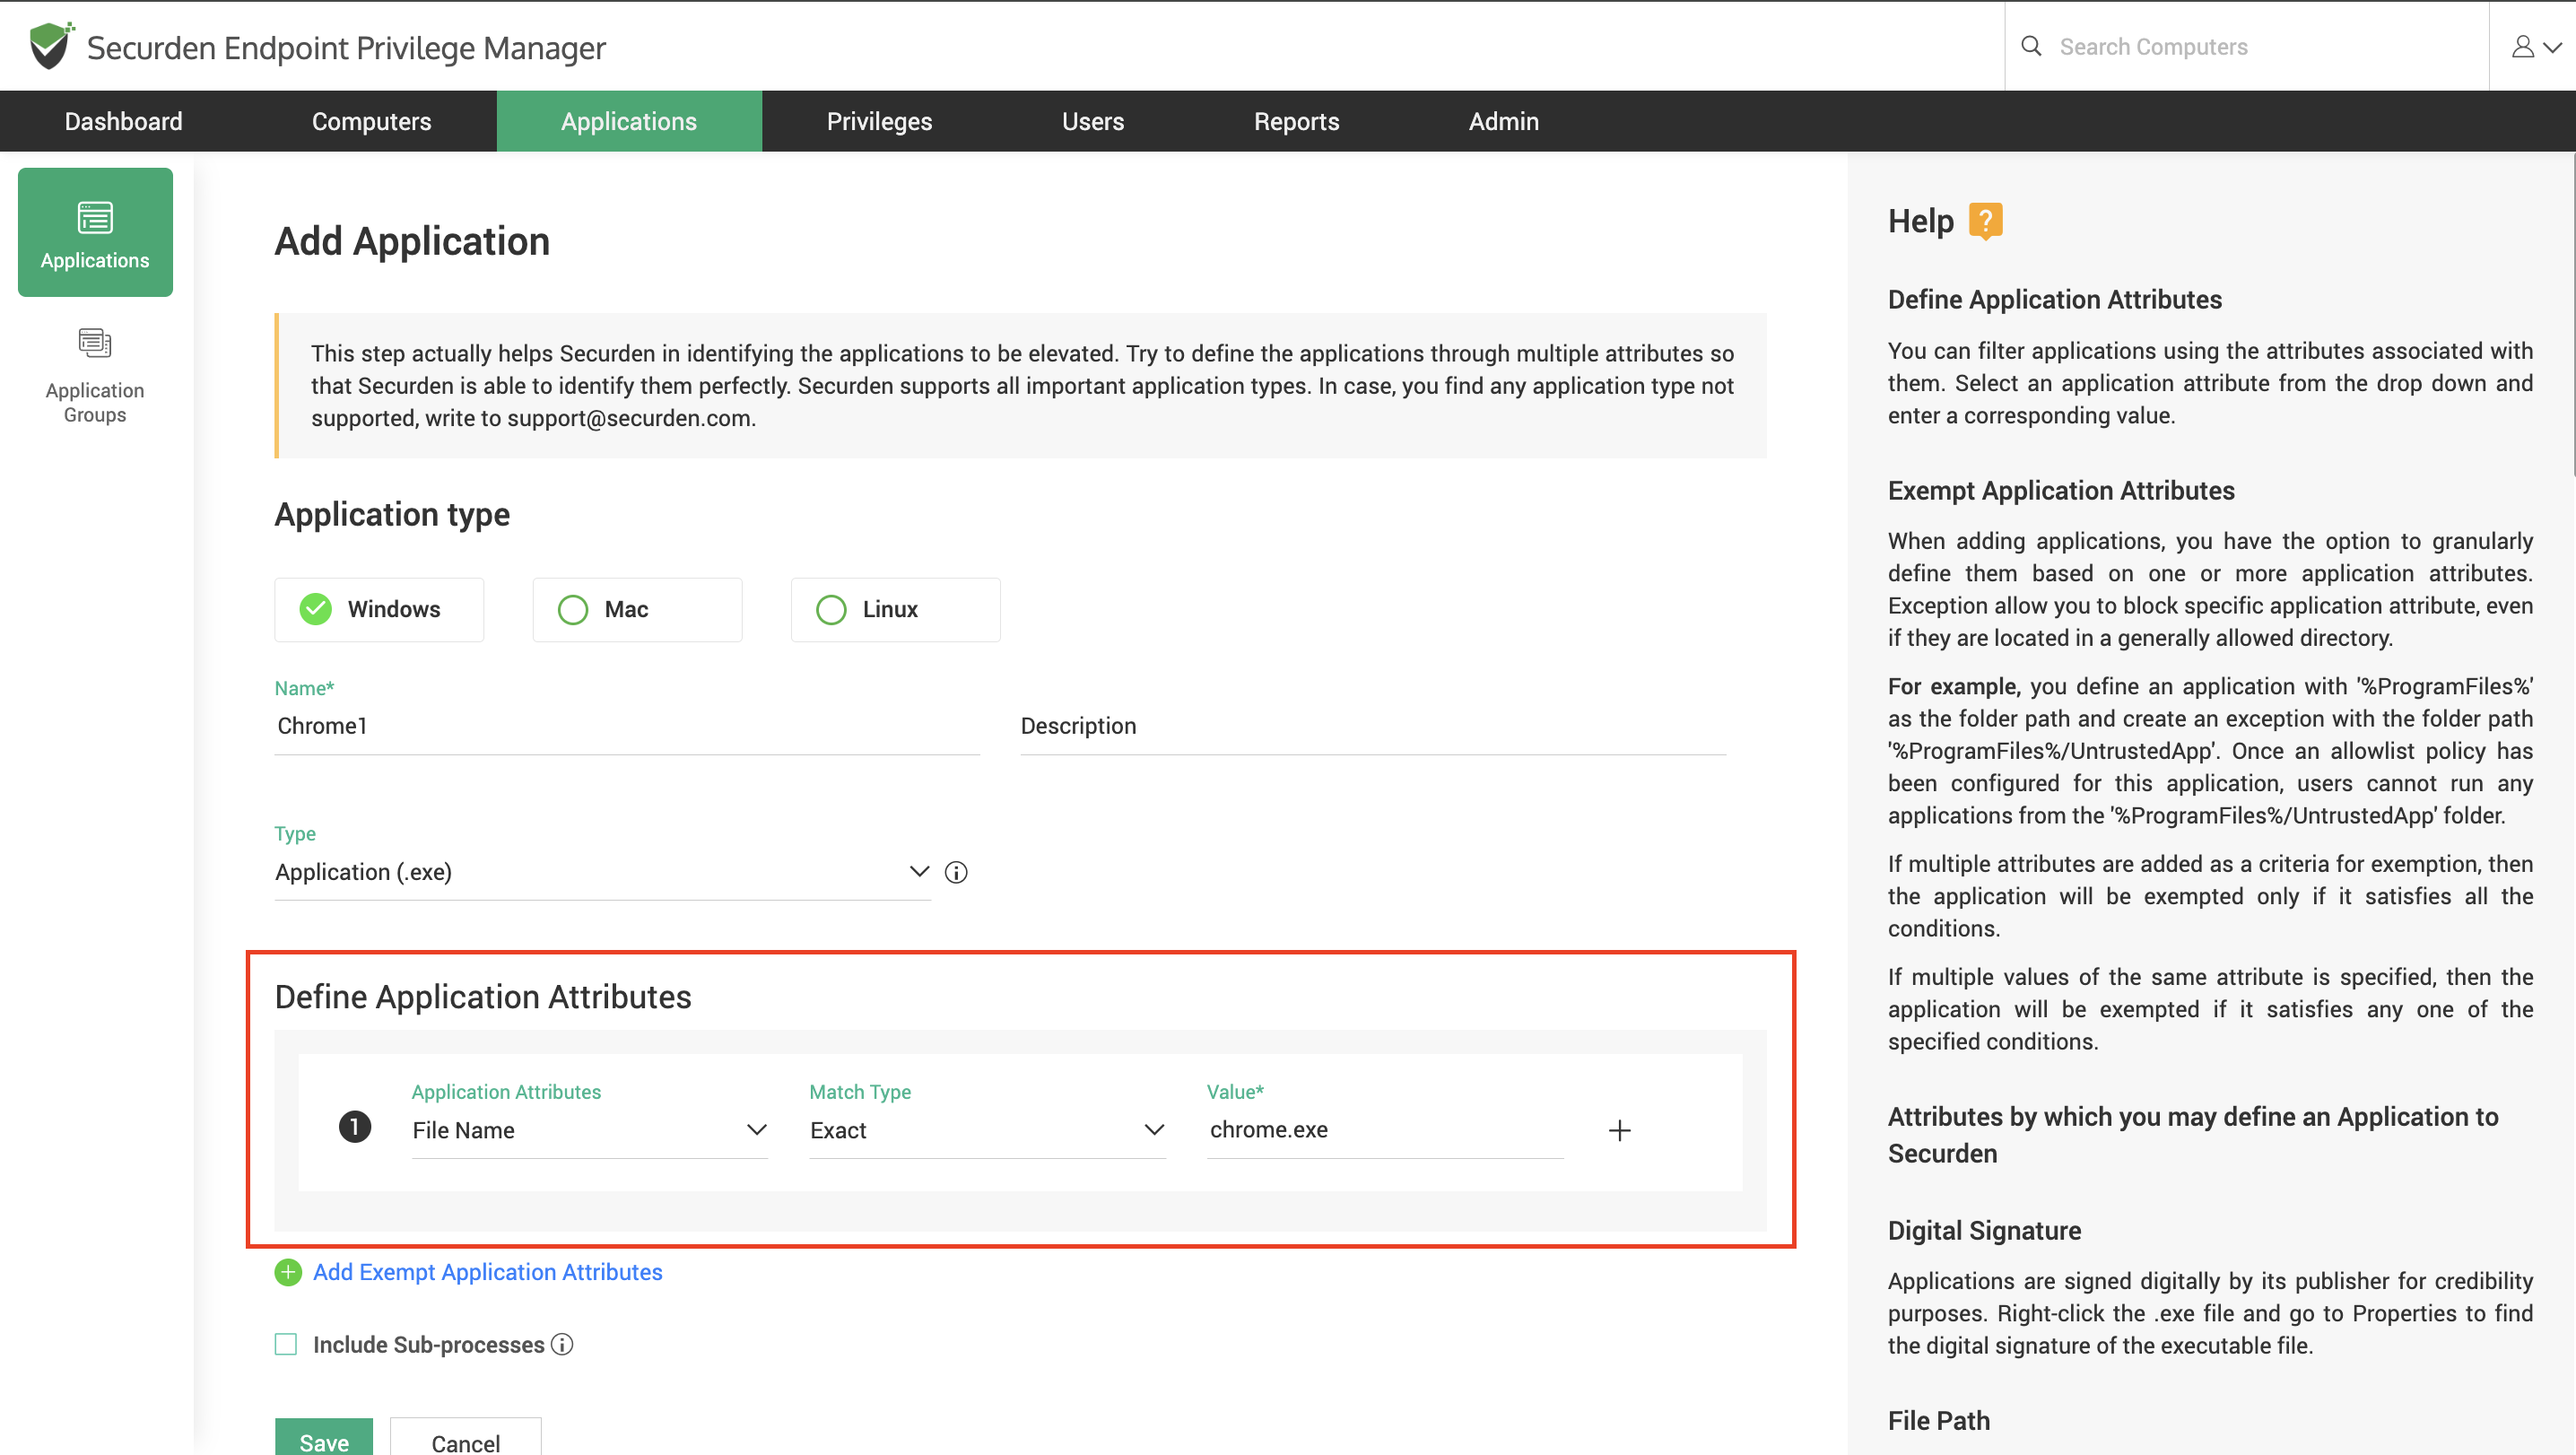
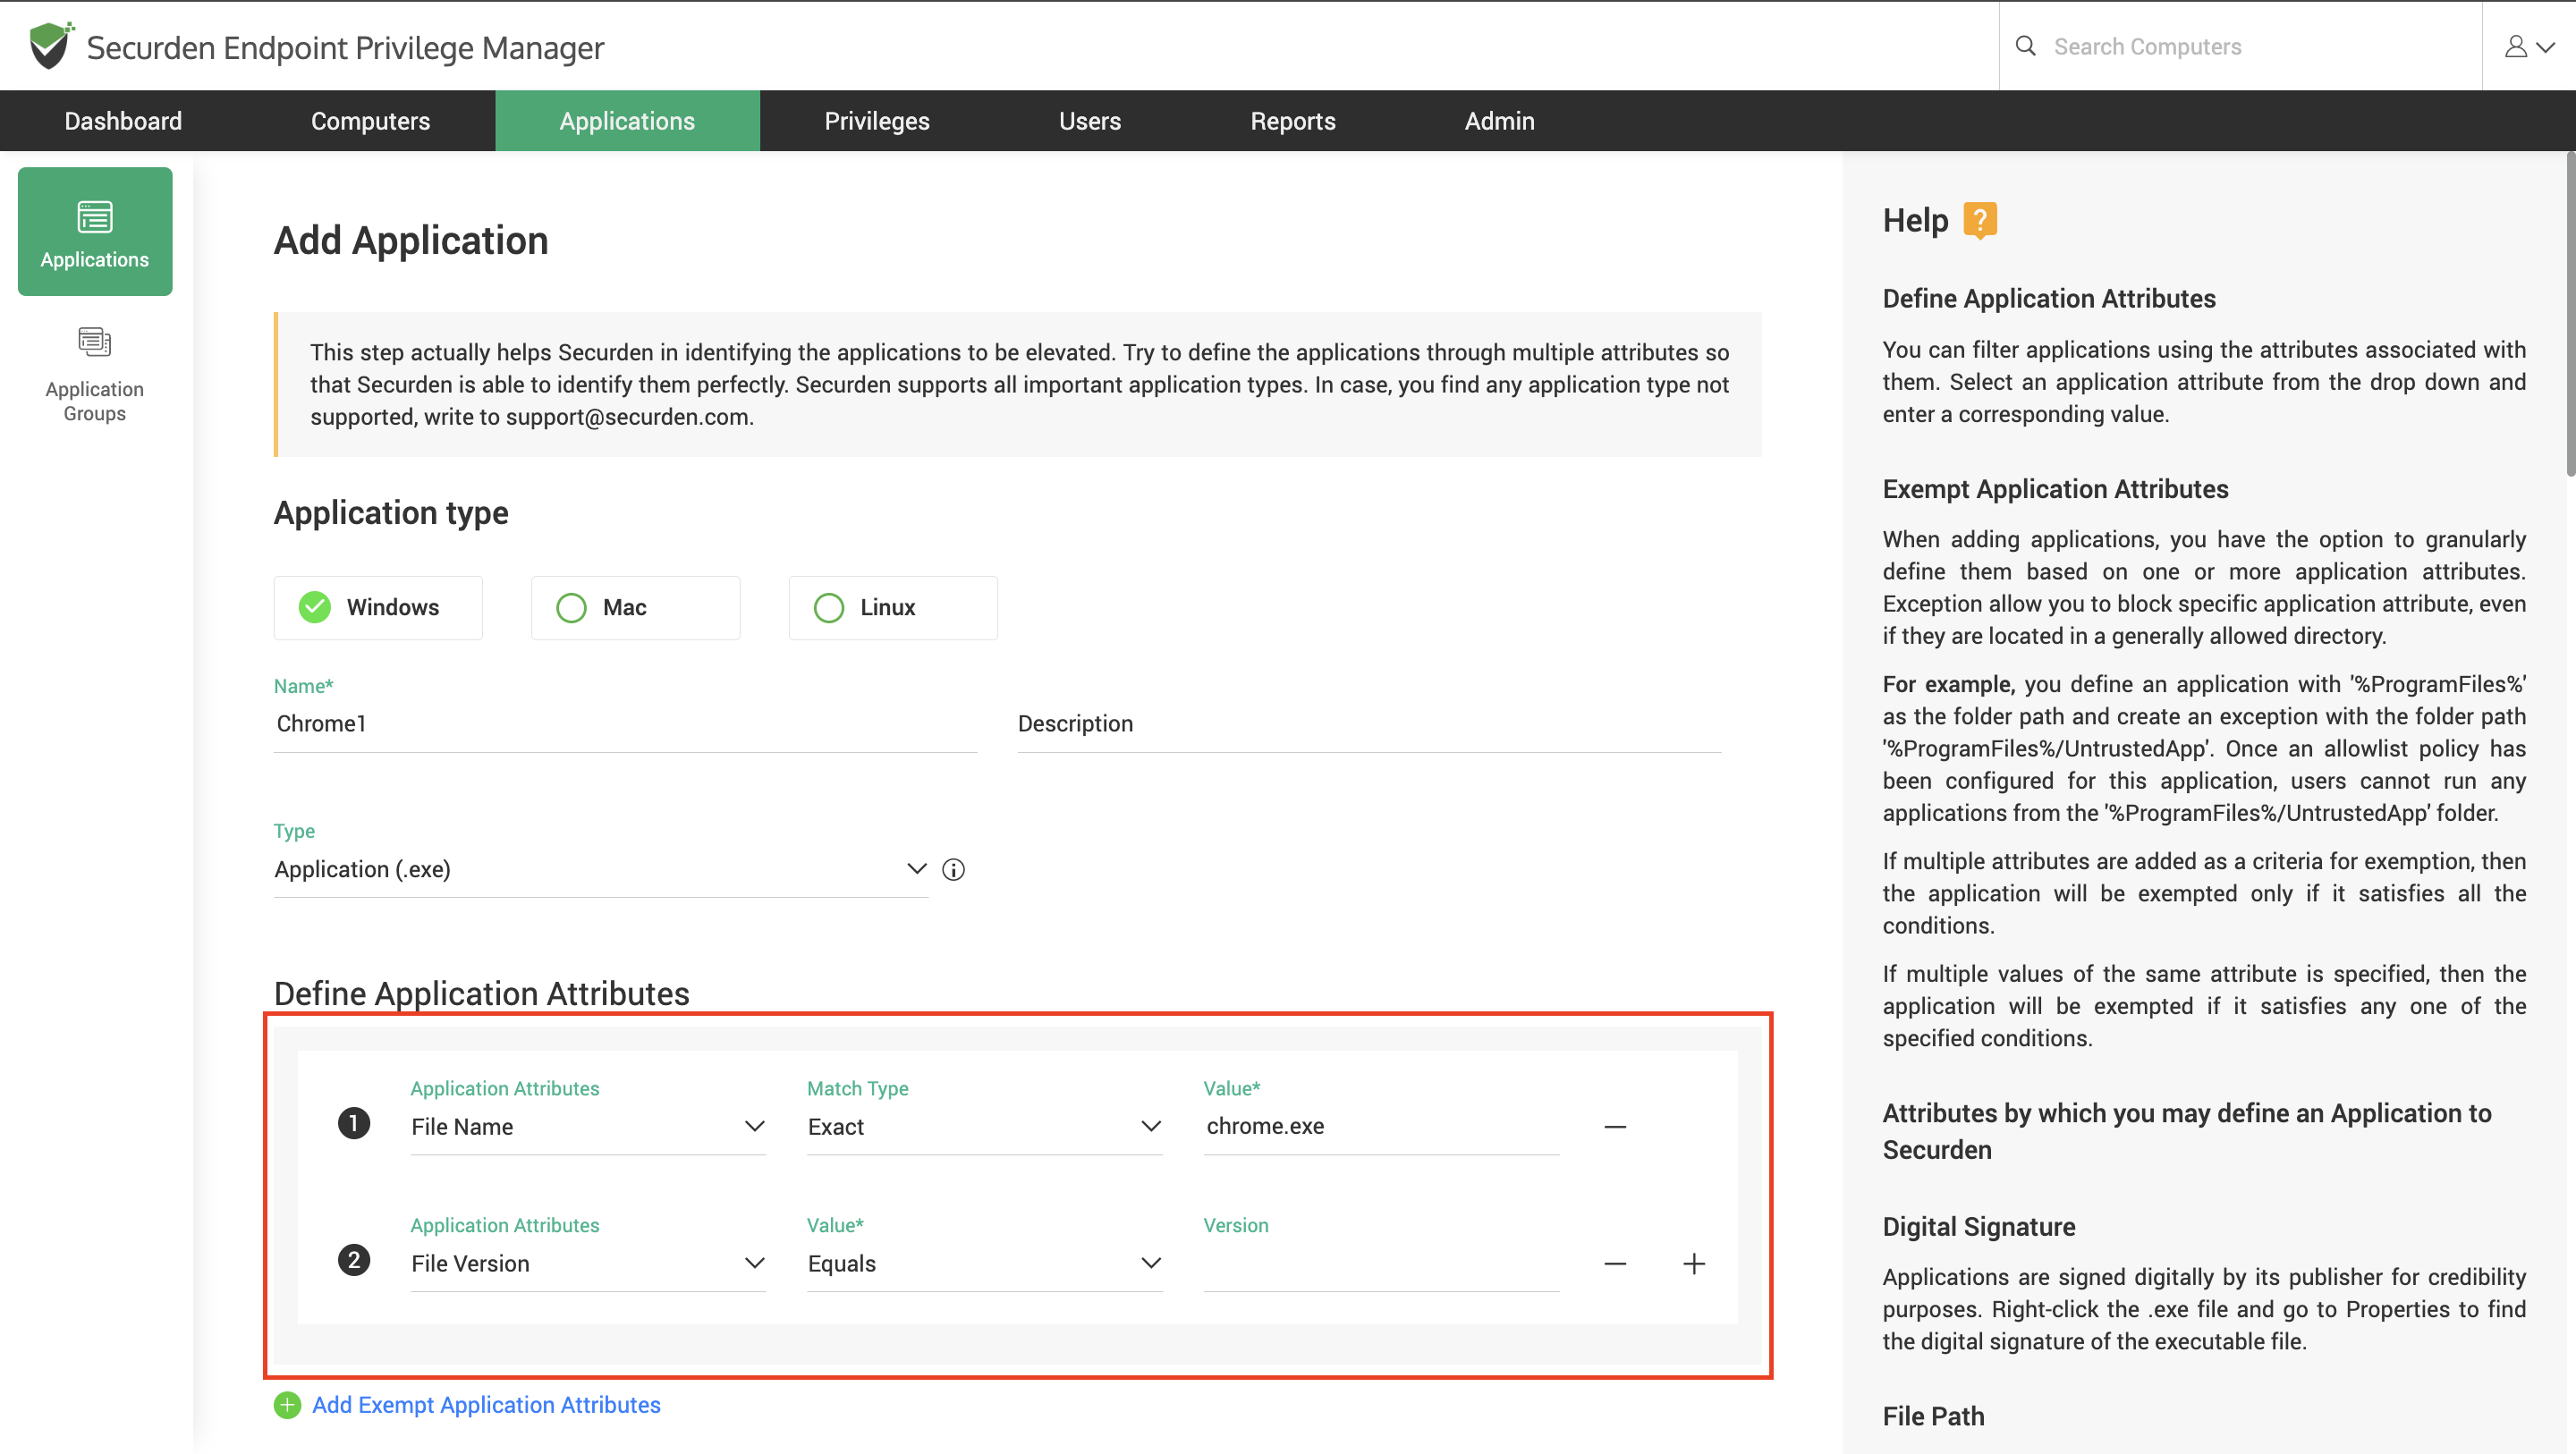
- You can define multiple attributes which Securden uses as the criteria for identifying the application on the endpoints through the agent. You need to add attributes and their corresponding value by clicking on the plus button.
- Optionally, you can create exceptions for importing applications in a similar manner to defining the application attributes.
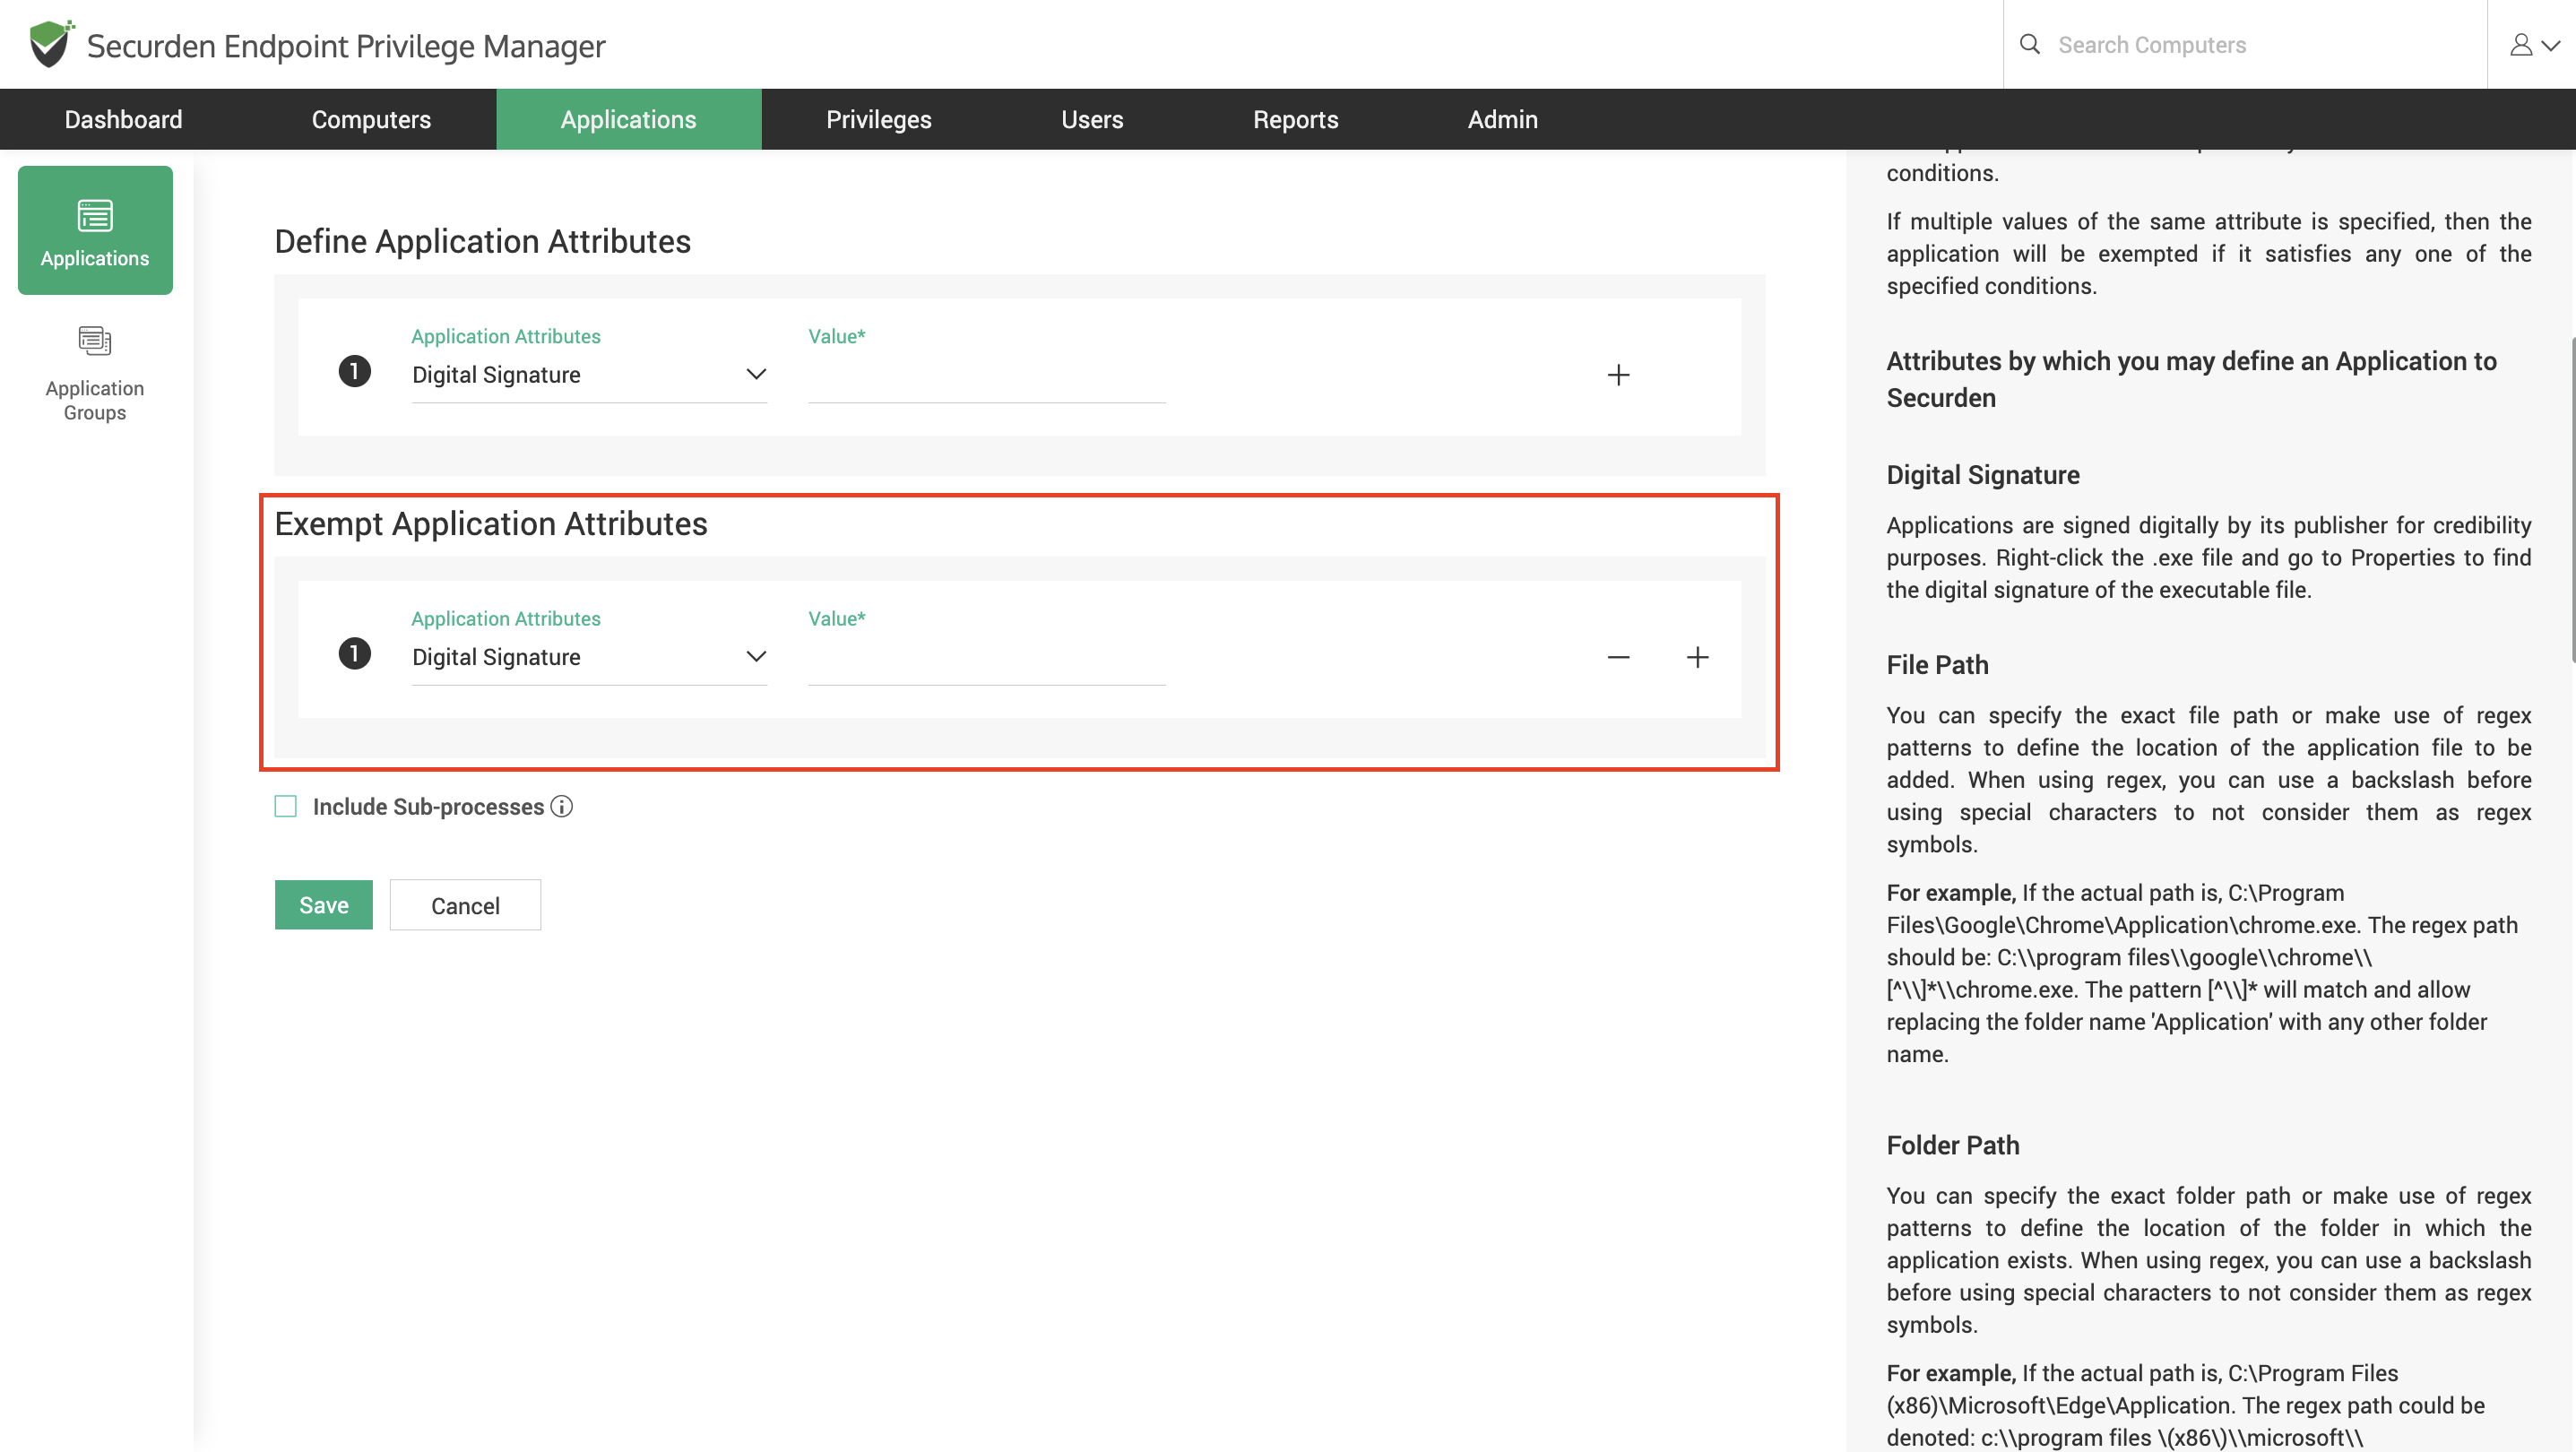
Let us discuss this with an example of importing the application named Photoshop published by Adobe. We don't want to import Photoshop versions 24.0.1 and below.
Here, we would use two attributes to define the application.
- Original File Name -> Adobe Photoshop
- Publisher Name -> Adobe Inc.
Here, the applications will be imported if they satisfy both the conditions.
To prevent the import of versions 24.0.1 and below, we can create an exception using the version attribute.
- Choose the attribute as File Version.
- Select the Value as Lesser Than and provide the Value as 24.0.2.
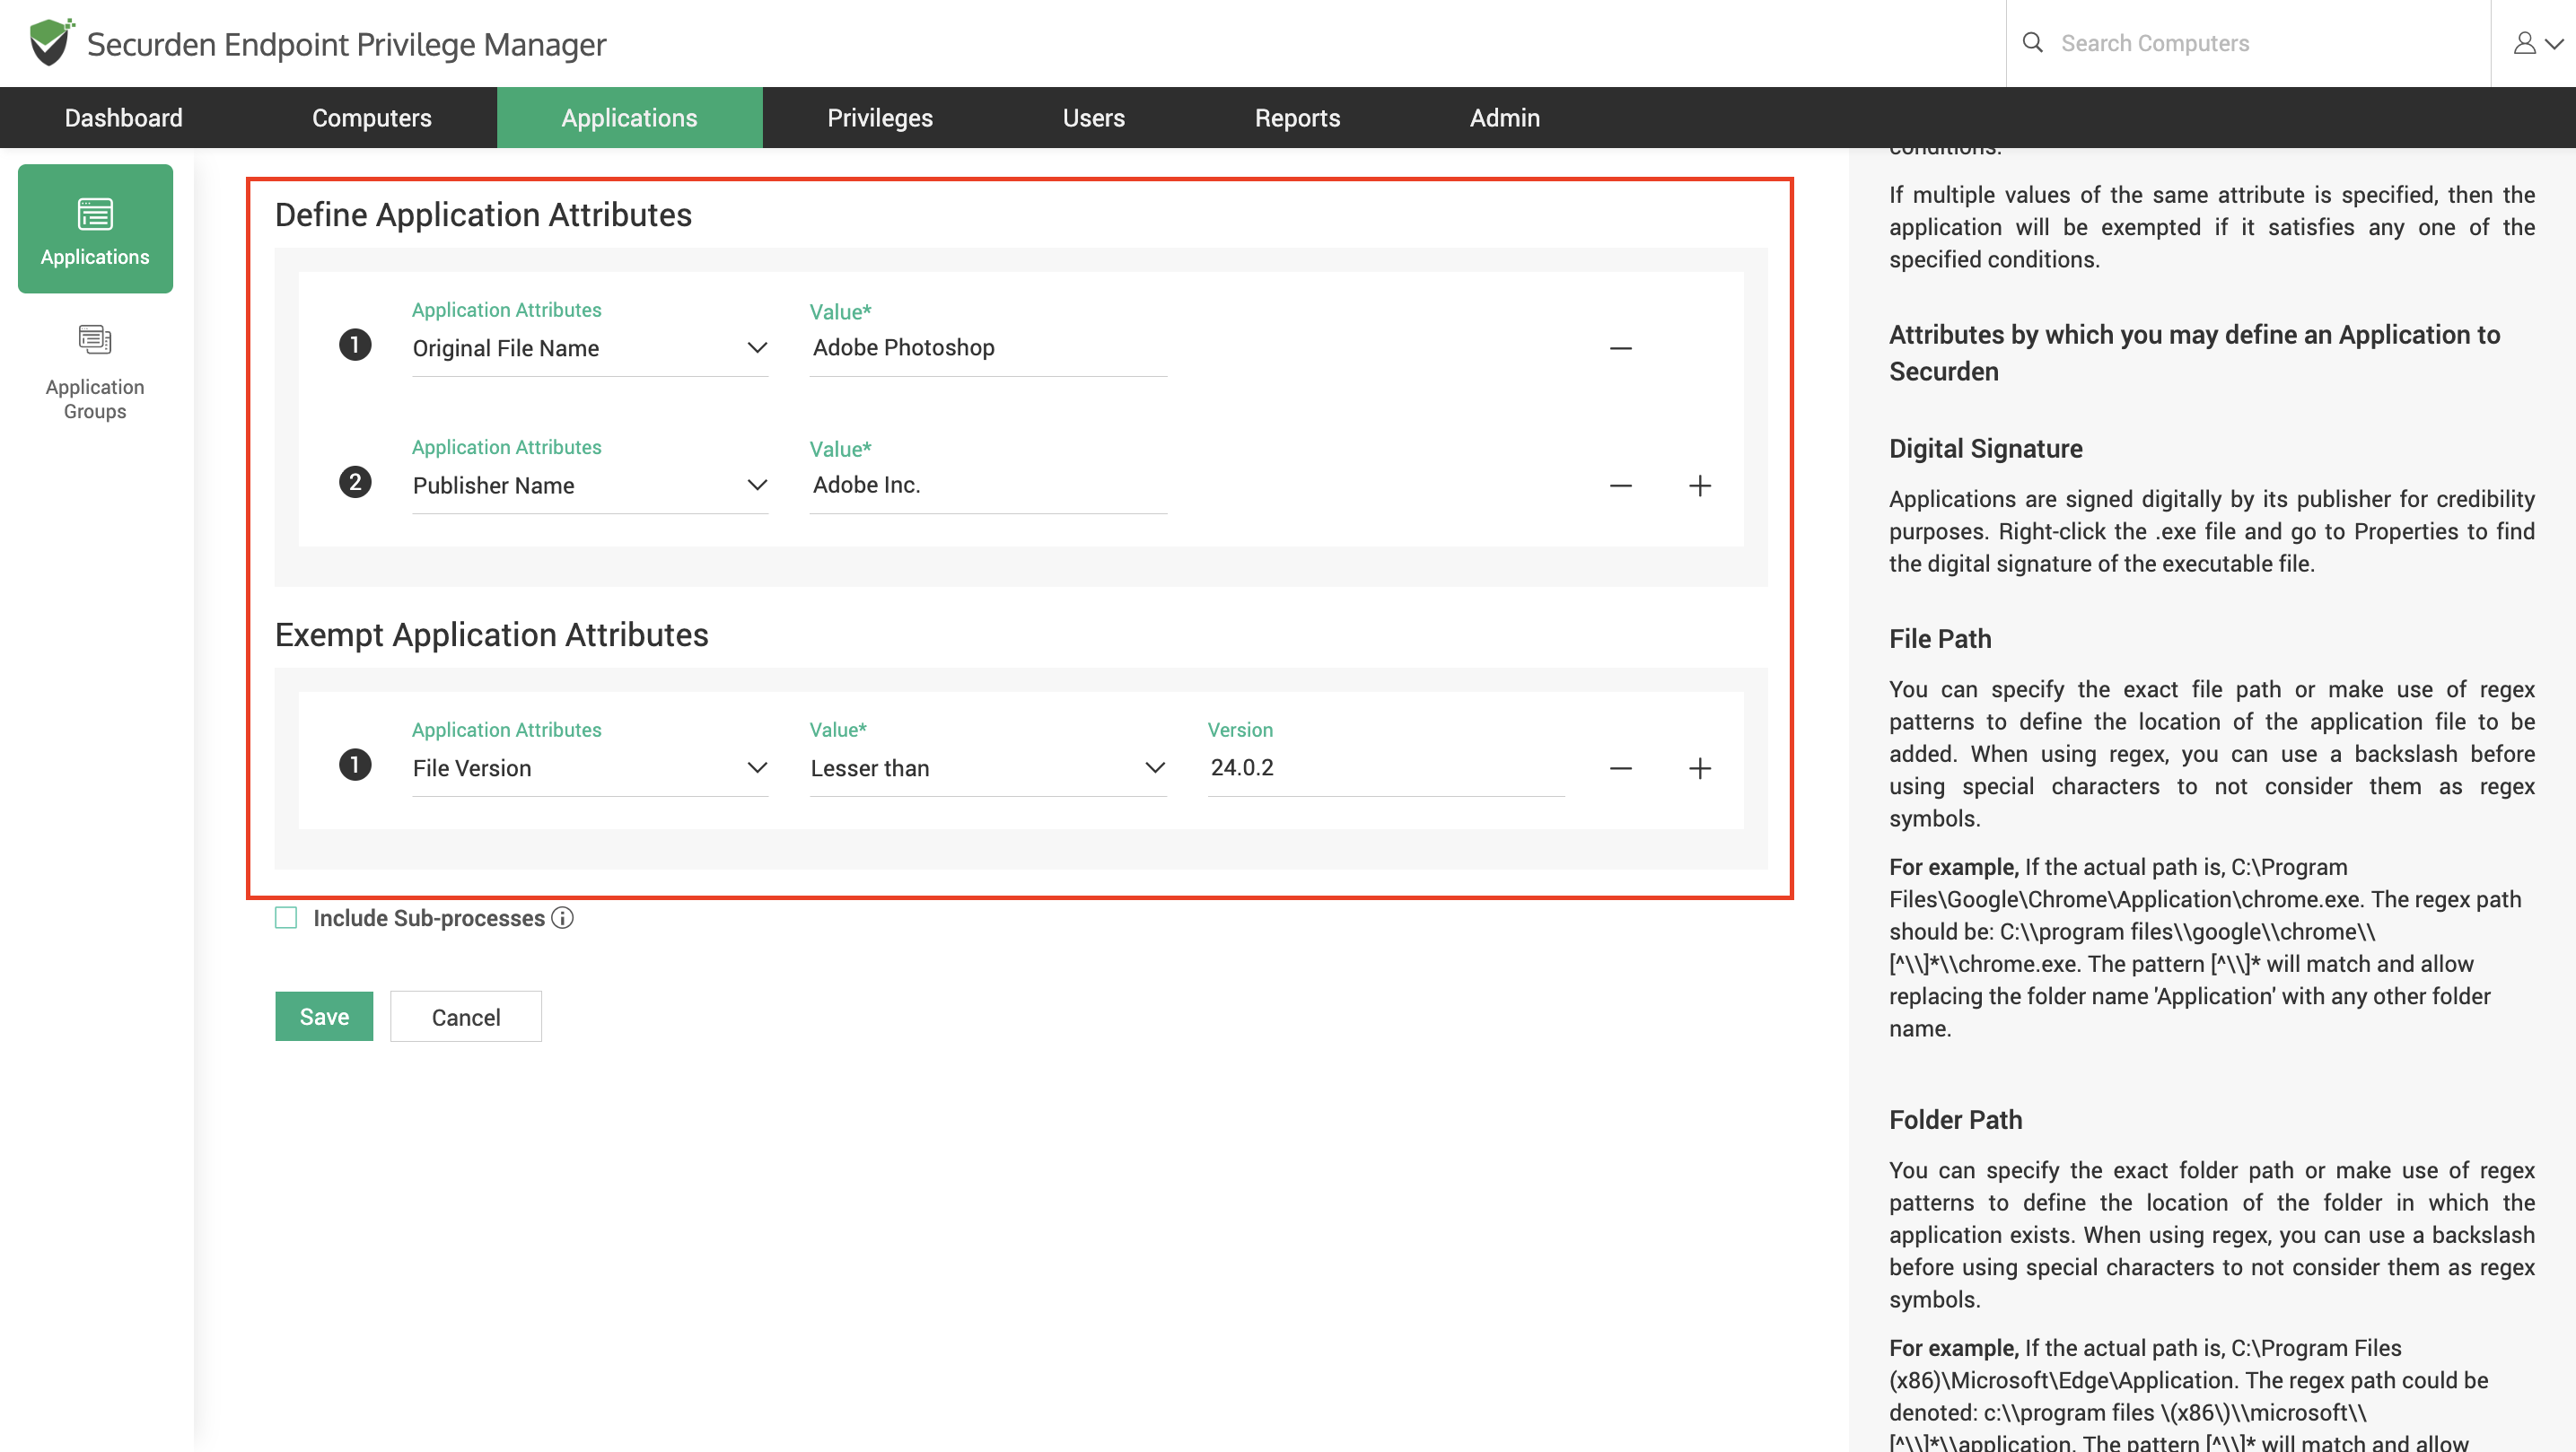
Now, the Adobe Photoshop file that satisfies all the conditions will be affected by the policies and othe governance measures enforced using Securden..
Note
To ensure that the applications and the child processes of the application are included in allowlists for this application, select the checkbox“Include sub-processes". This is not required for privilege elevation as all child processes are run with the same permissions as the parent by default. If you do not want the child processes to be allowlisted along with the application, leave the checkbox unchecked.
How to Organize Applications into Groups?
Applications can be added to a group by navigating to Application Groups >> Add.
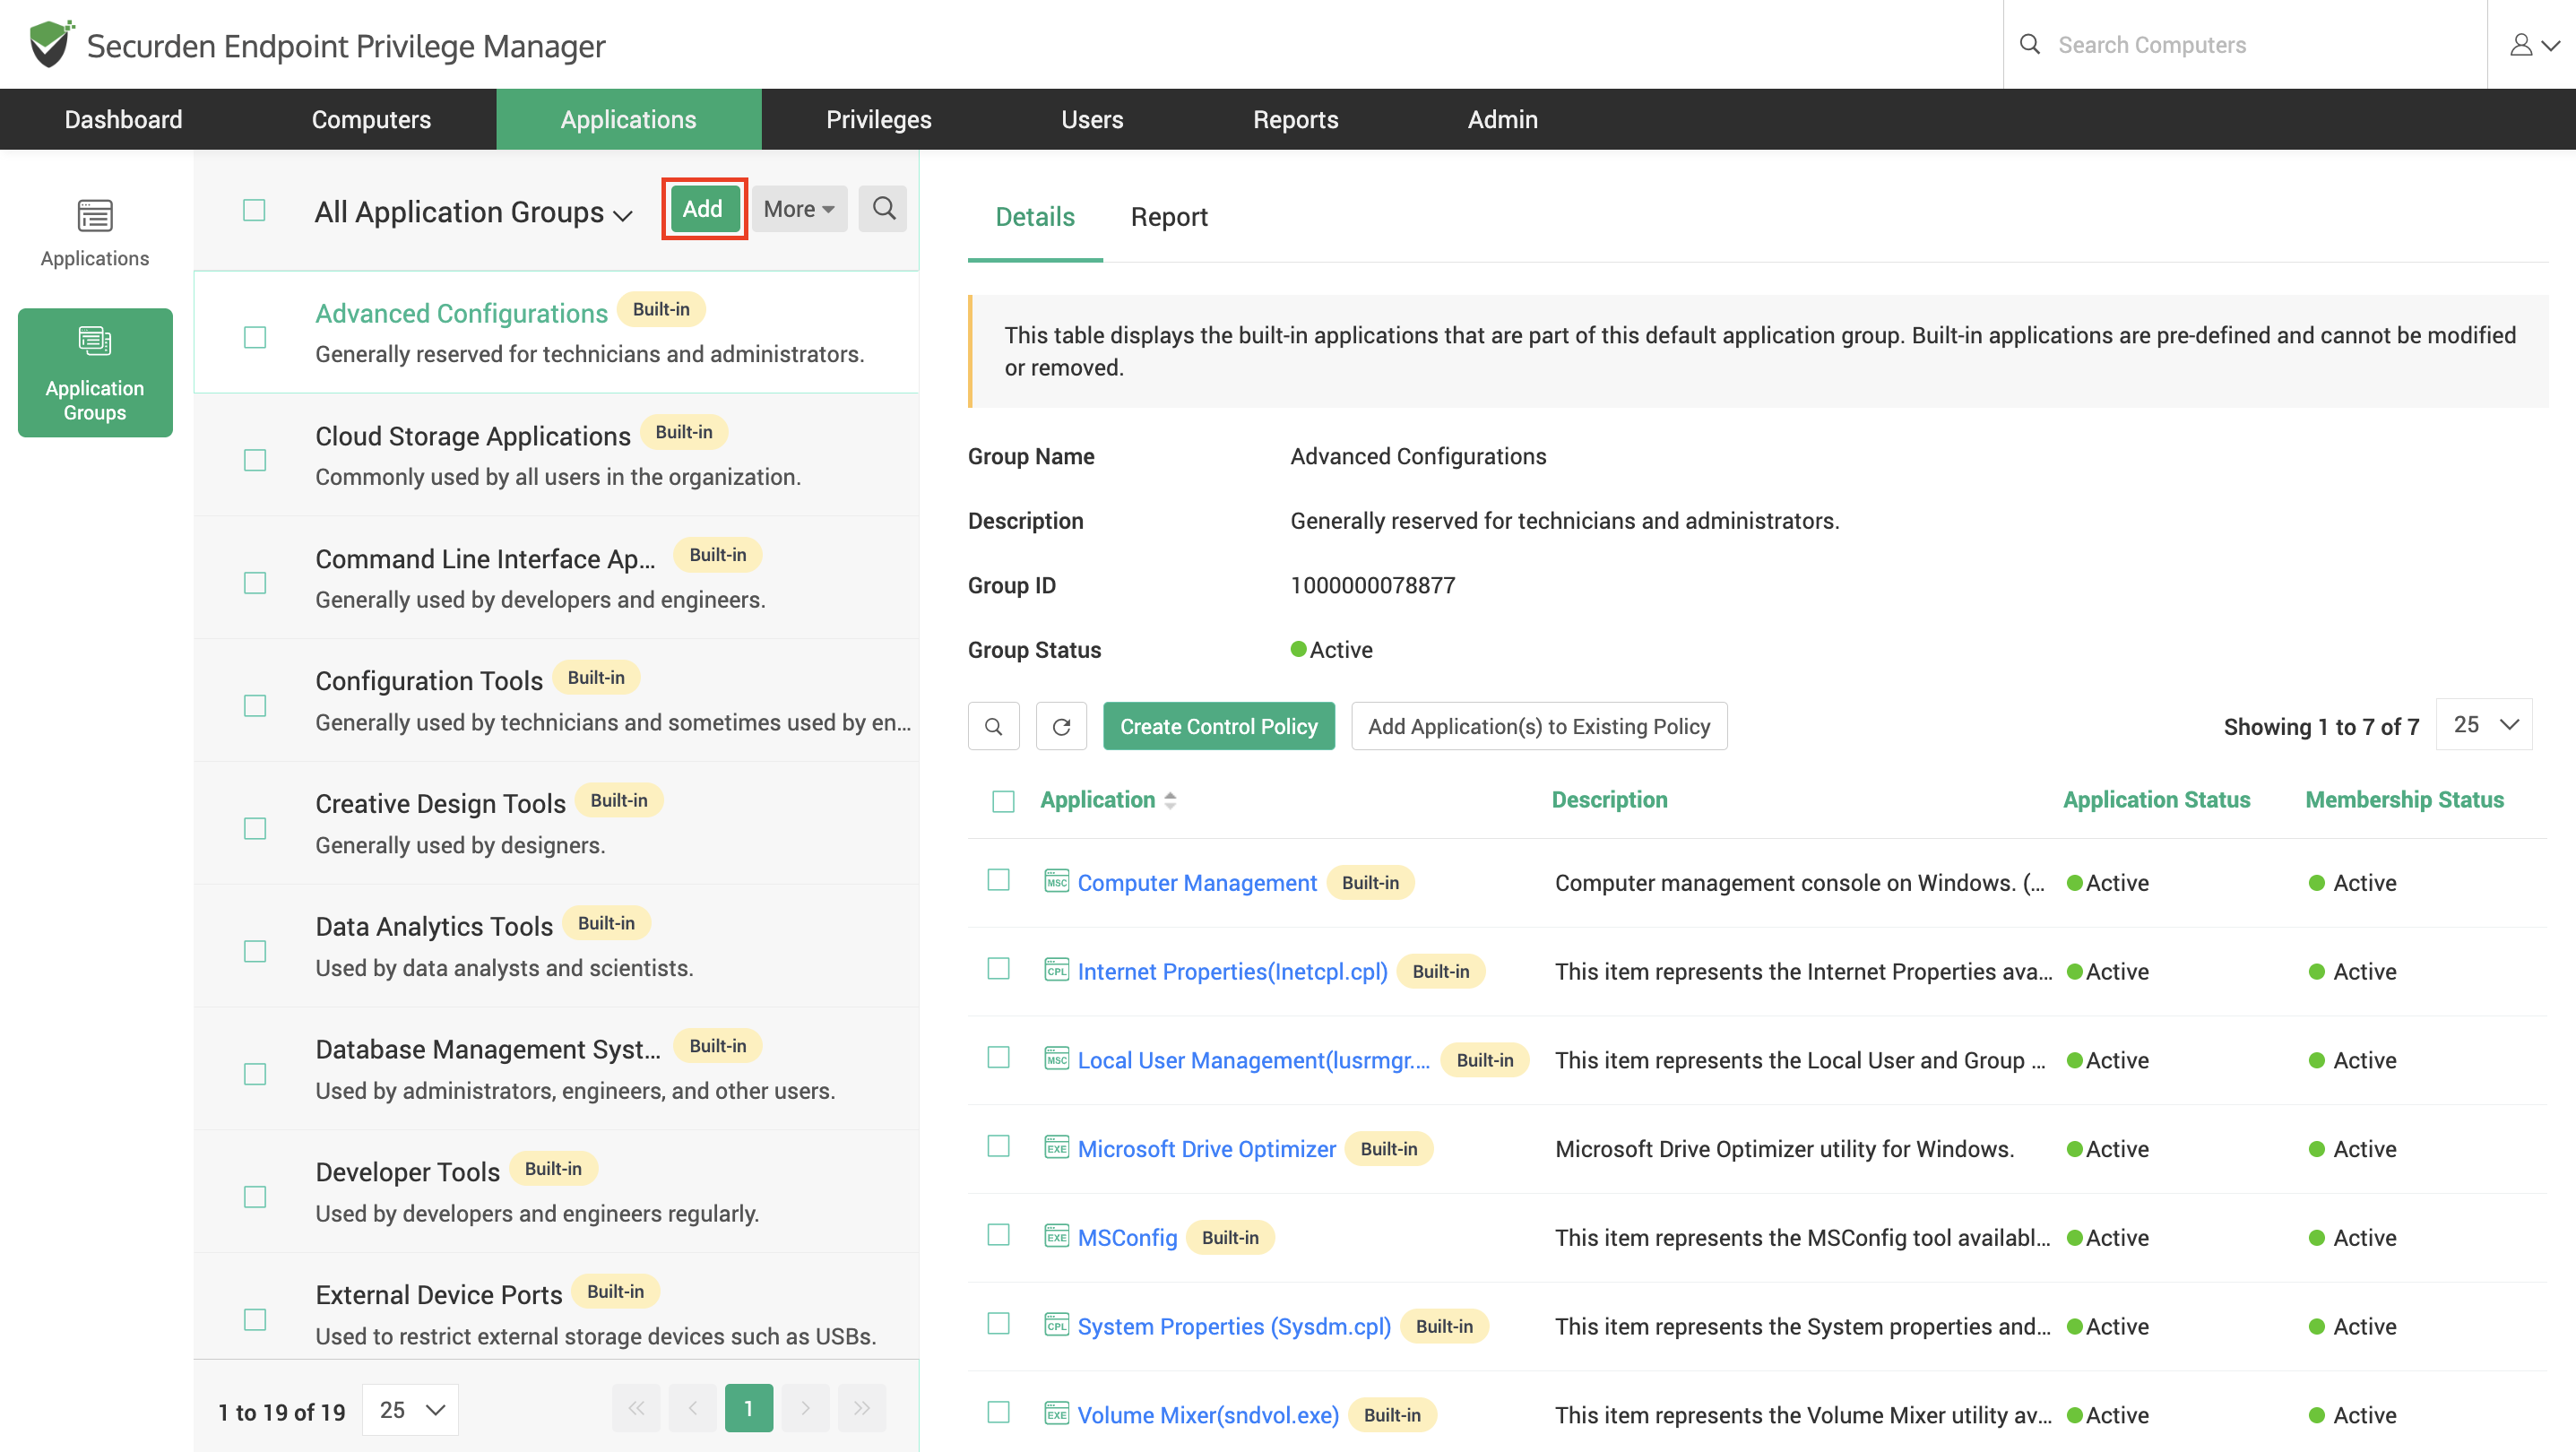
In the window that opens, provide the following information,
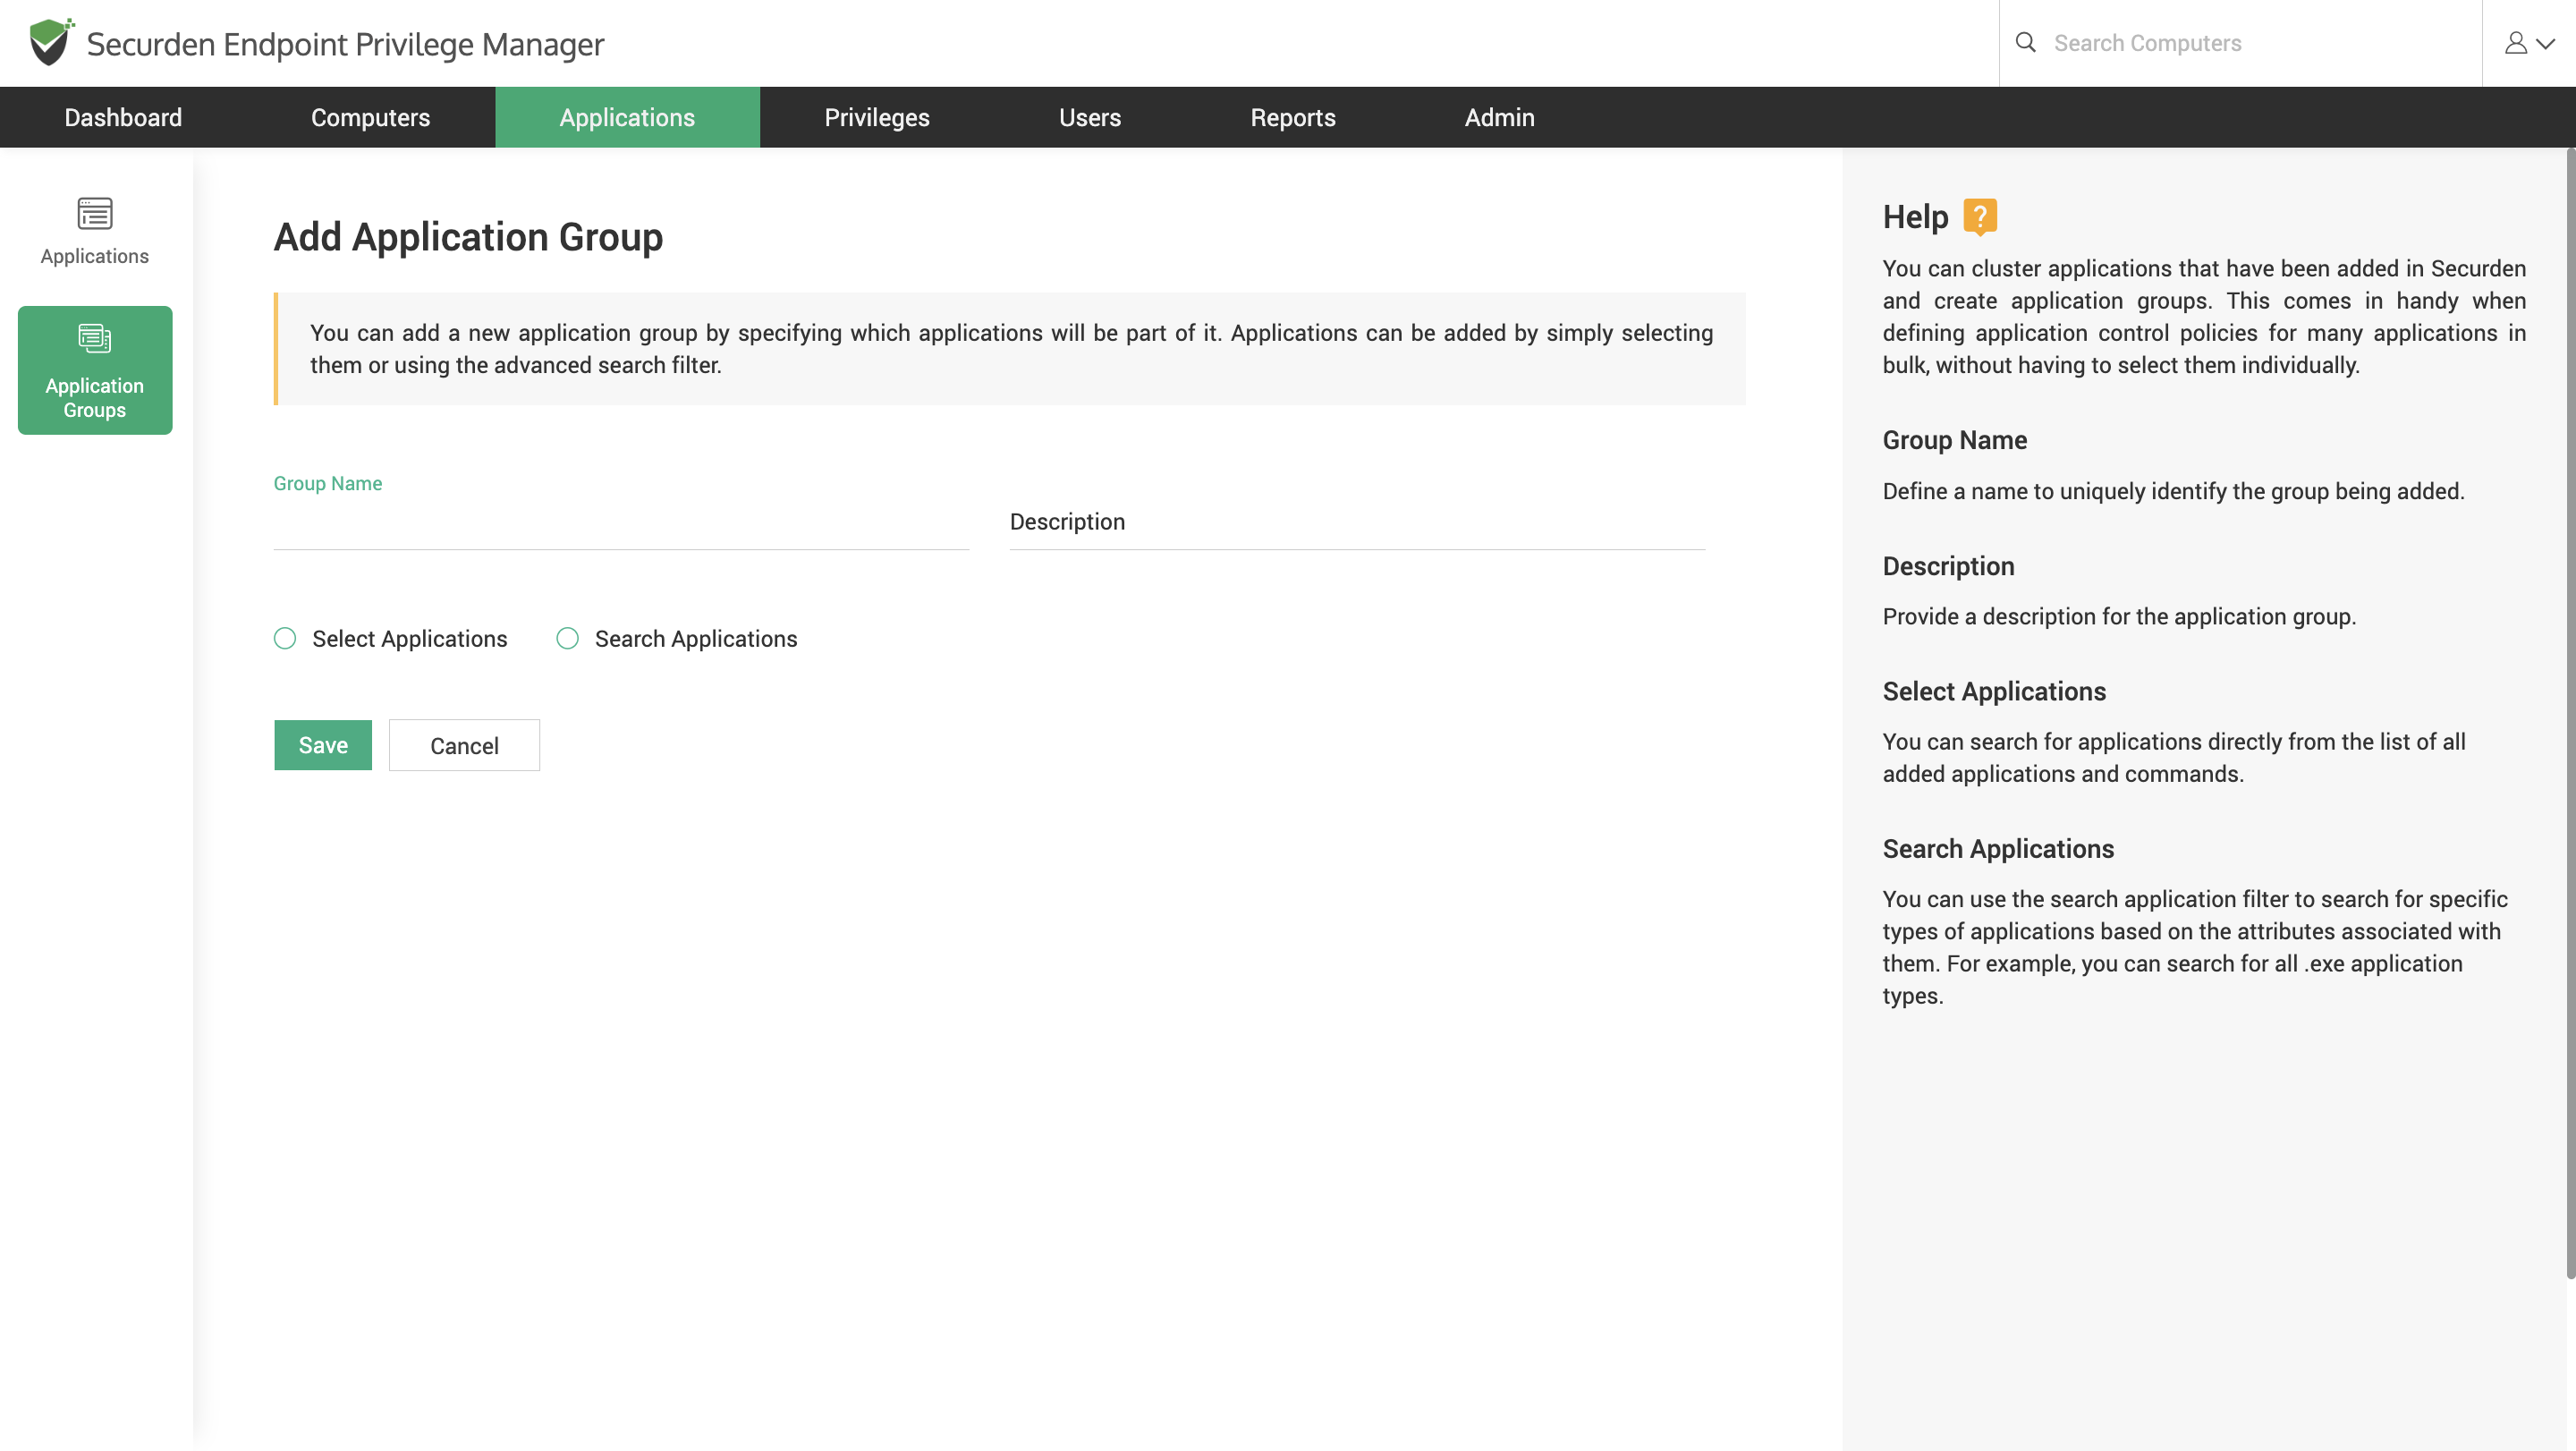
- Provide a name and description of the application group.
- Choose how you want to add the required applications. You can either search or select the application from the dropdown.
- To search for applications, you can specify the application attributes and the value and choose from the search result.
Once all the required applications are added, click Save.
How to Create Control Policies from the Applications Tab
You can select the applications for which a control policy must exist. You have the option to create a new policy or add the selected applications to an existing policy.
To create a new control policy,
- Select all the required applications and go to More Actions >> Create Control Policy.
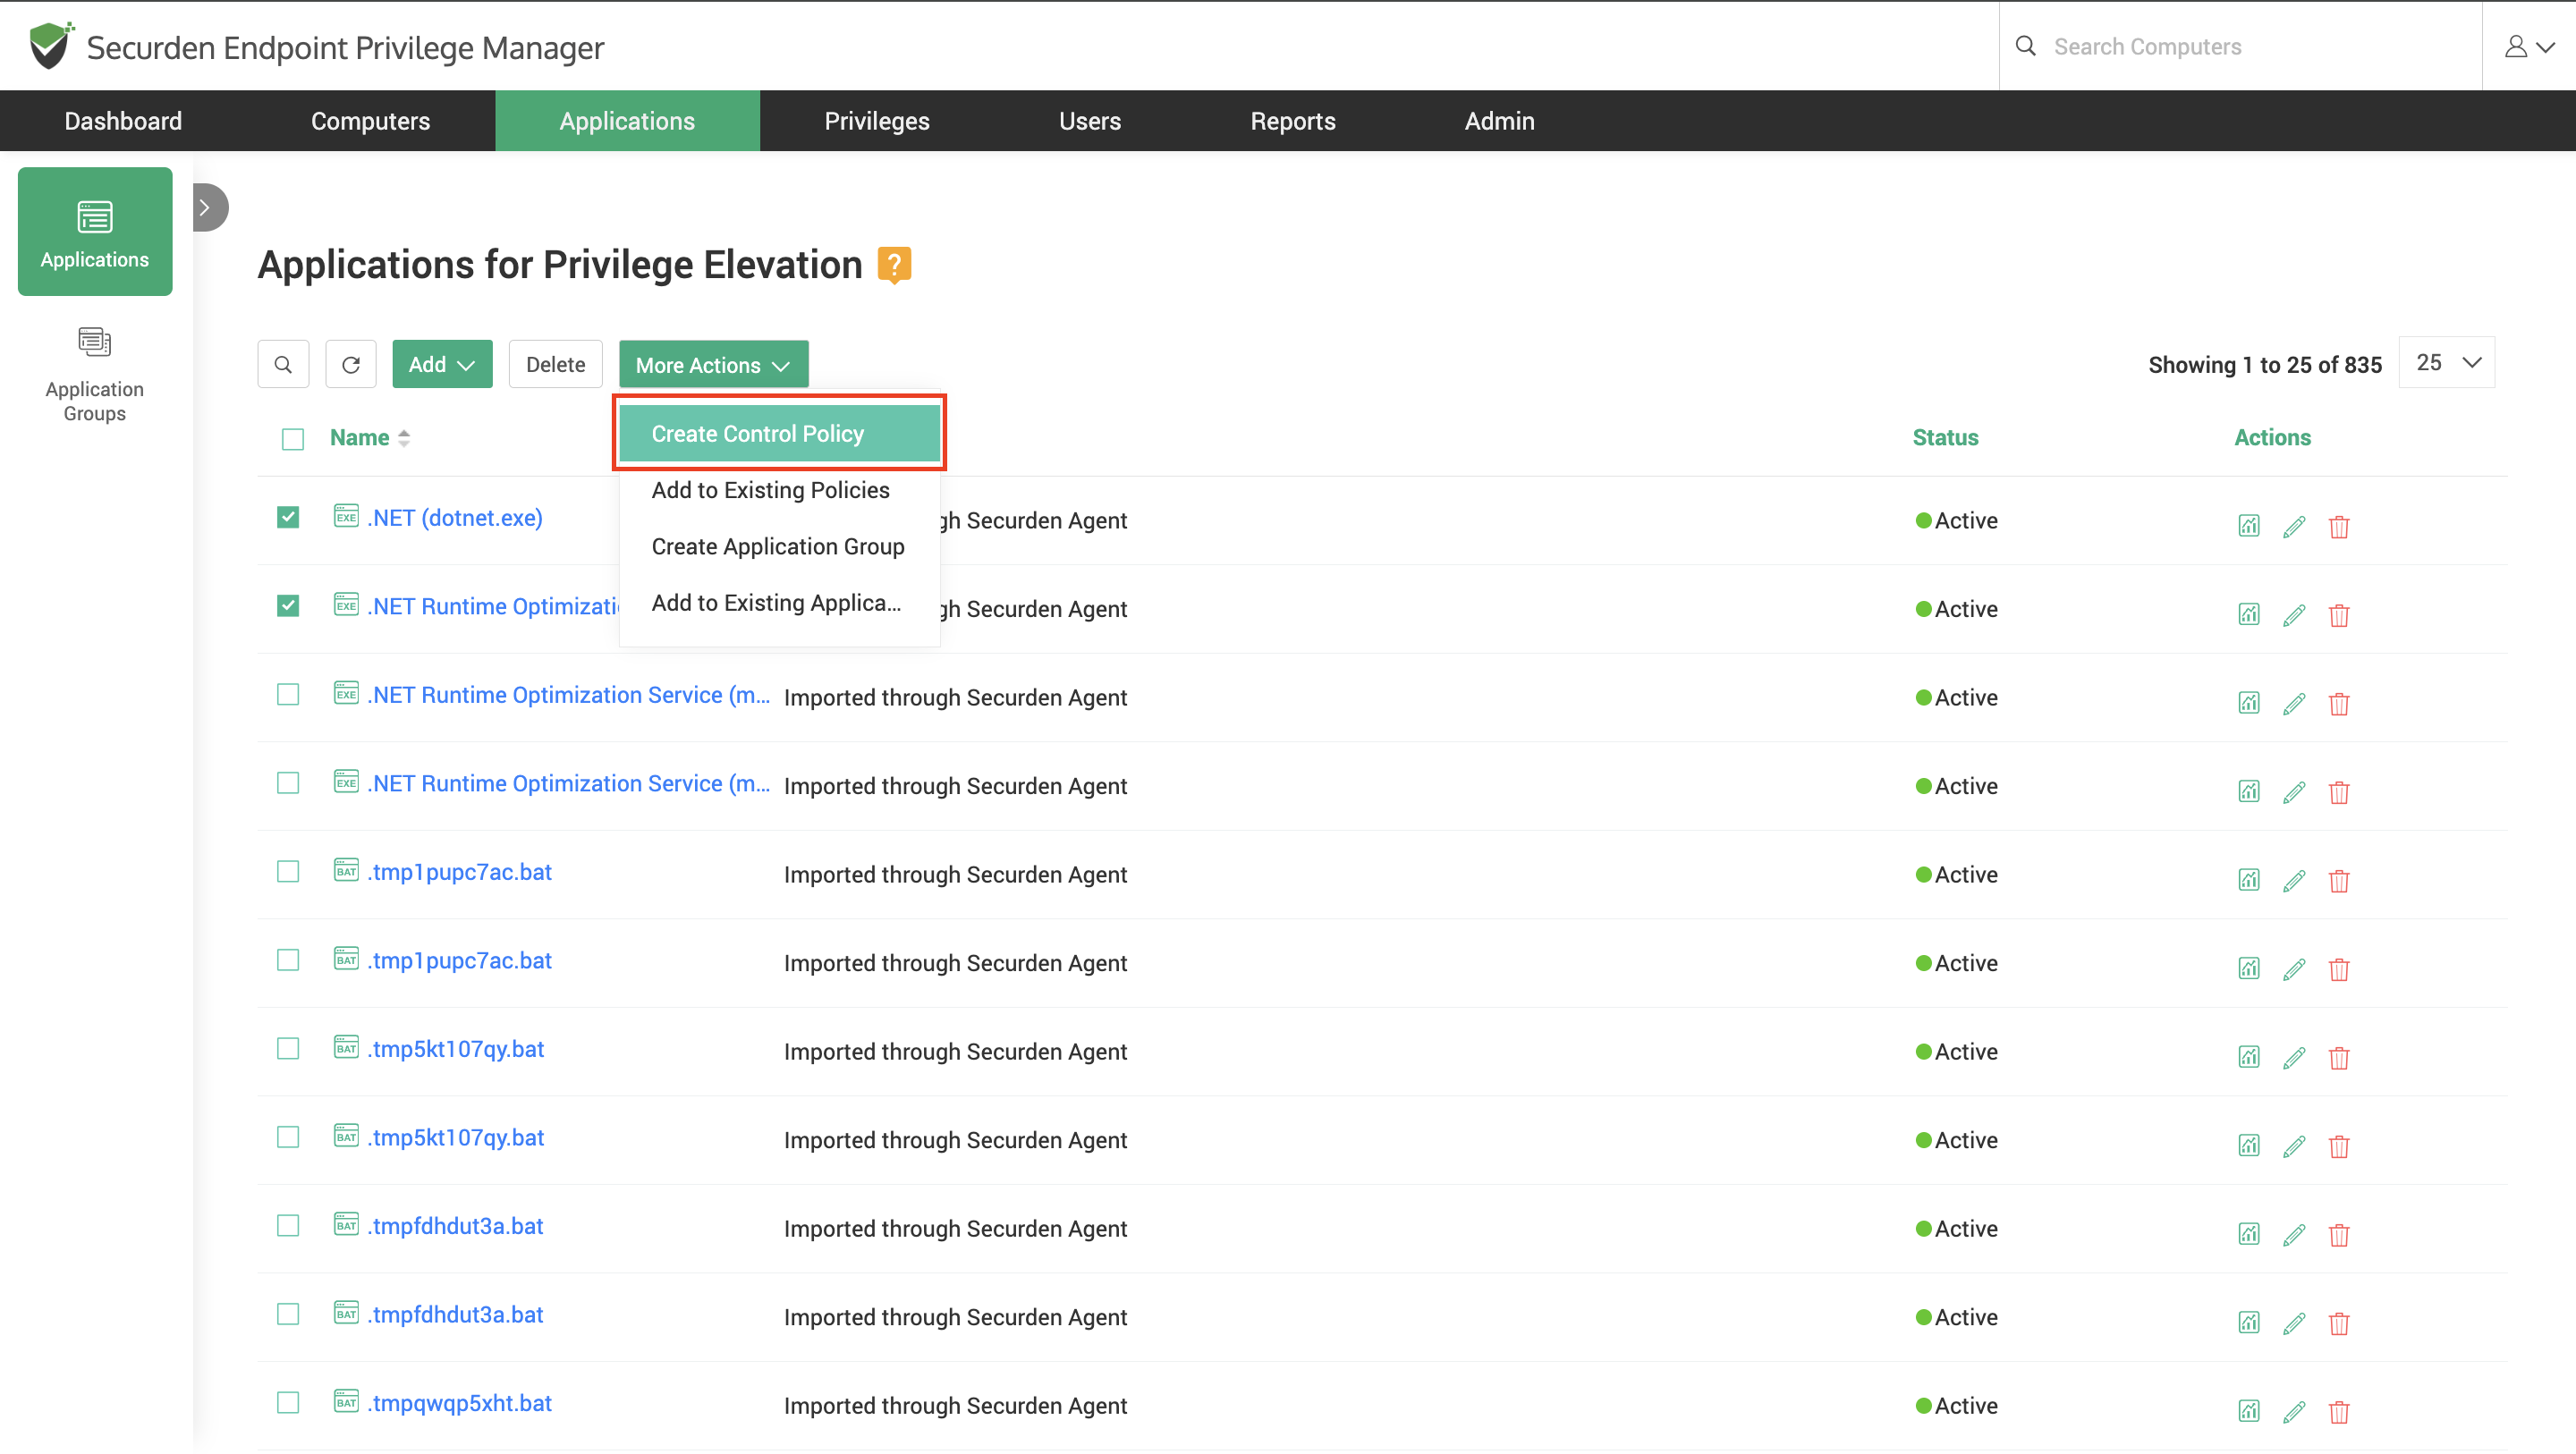
- In this window, select the operating system for which the policy is being created.
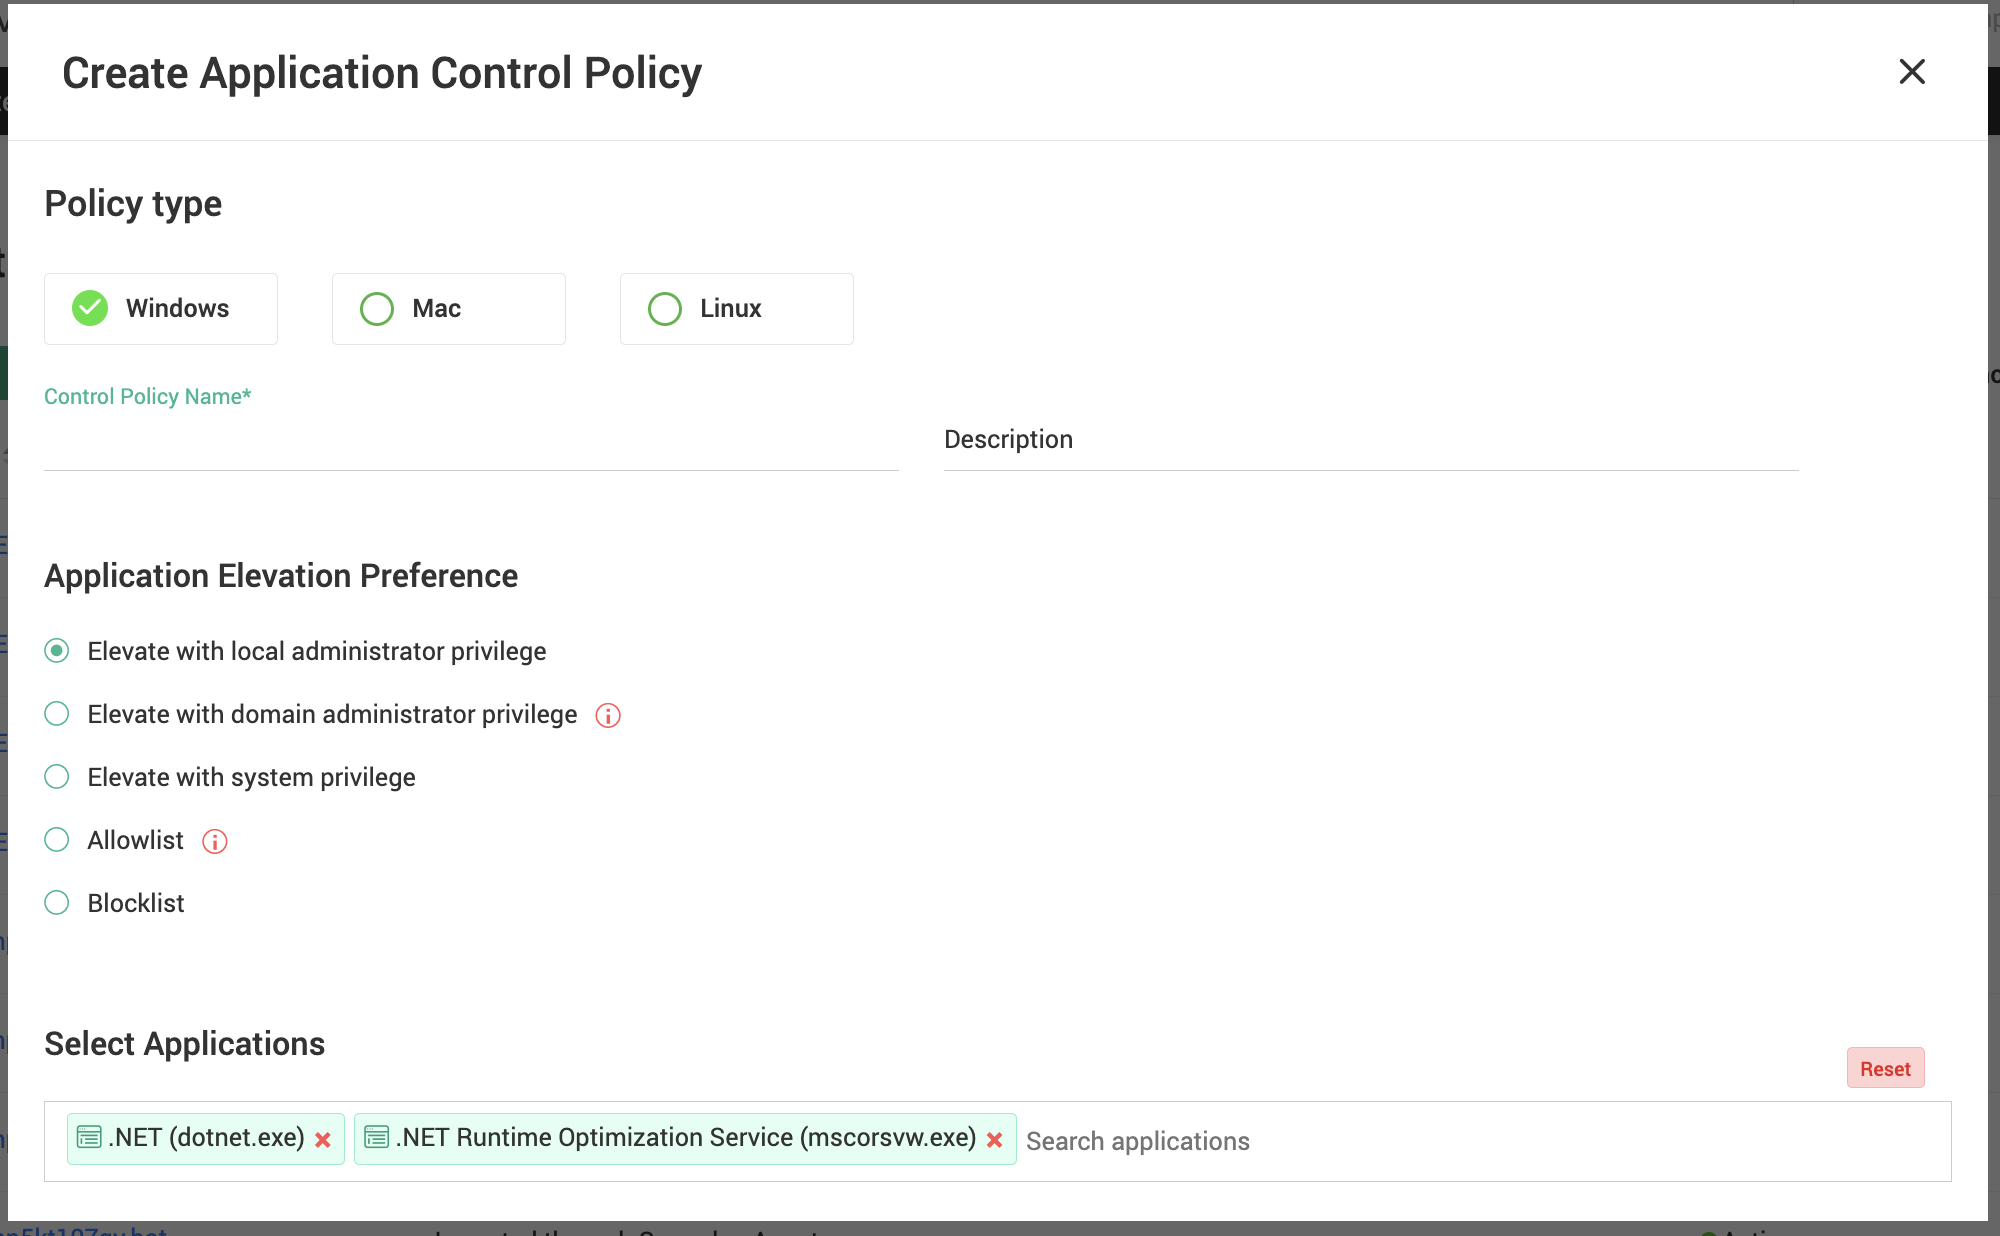
- Provide a name and description for this policy.
- Select the level of permissions granted through the policy.
For Windows, you have the option to grant Local Admin, Domain Admin, System privileges, and create an allowlist or blocklist.
For Mac, you have the option to grant Local Admin, System privileges, create allowlists and blocklists, and grant or deny SUDO privileges.
For Linux, you can grant or deny SUDO privileges for commands, grant read and write permissions for specific files.
Once the level of permissions is defined, you can associate the selected applications with specific computers/computer groups and users/usergroups.
Note
Because child processes automatically inherit the privilege level and action assigned to their parent application, you don't need to add them to the policy separately — selecting the parent application is sufficient to govern its entire process tree.
To add the applications to an existing policy,
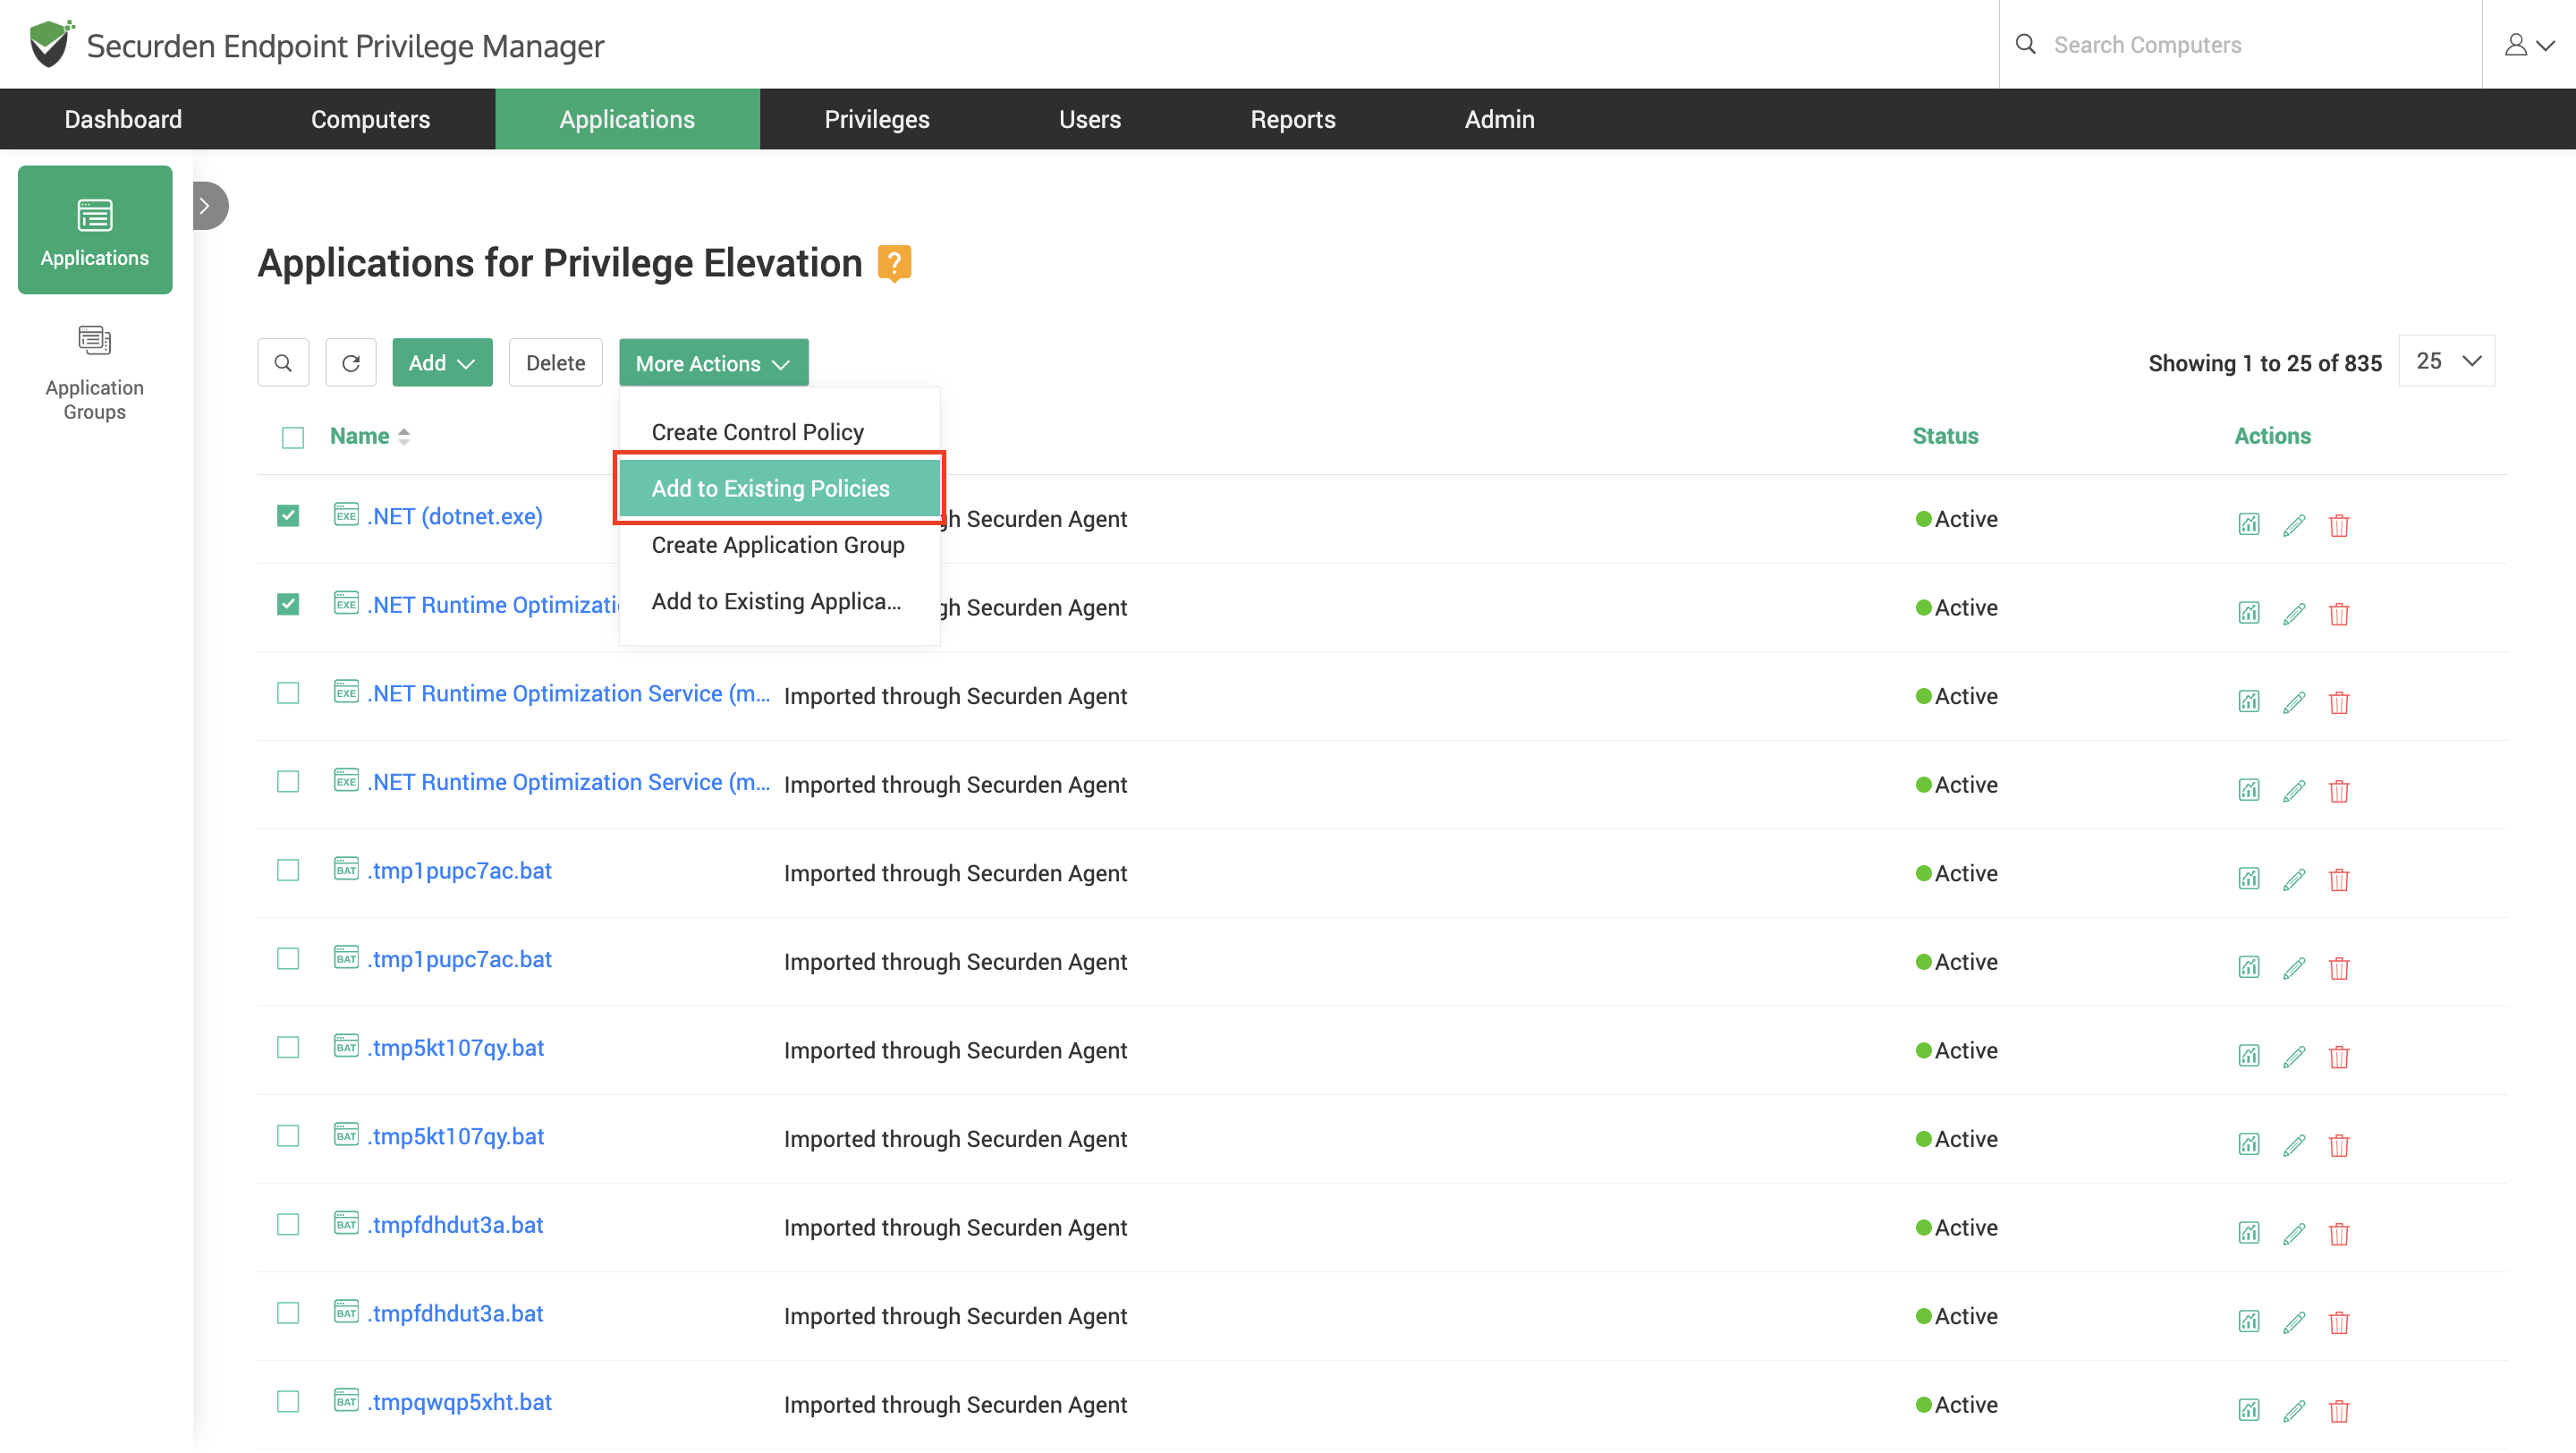
Select the required applications and go to More Actions >> Add to Existing Policy.
- Select the operating system type of the desired policy.
- Search and select the policy from the list of applicable policies.
- Once the policy is selected, click Save.
The same can be done from the Application Groups window as well.


