Skip to content

Configure Single Sign-On for Okta

To integrate Okta with Securden, you need to follow these steps:

  • Log in to your Okta account using your admin credentials.
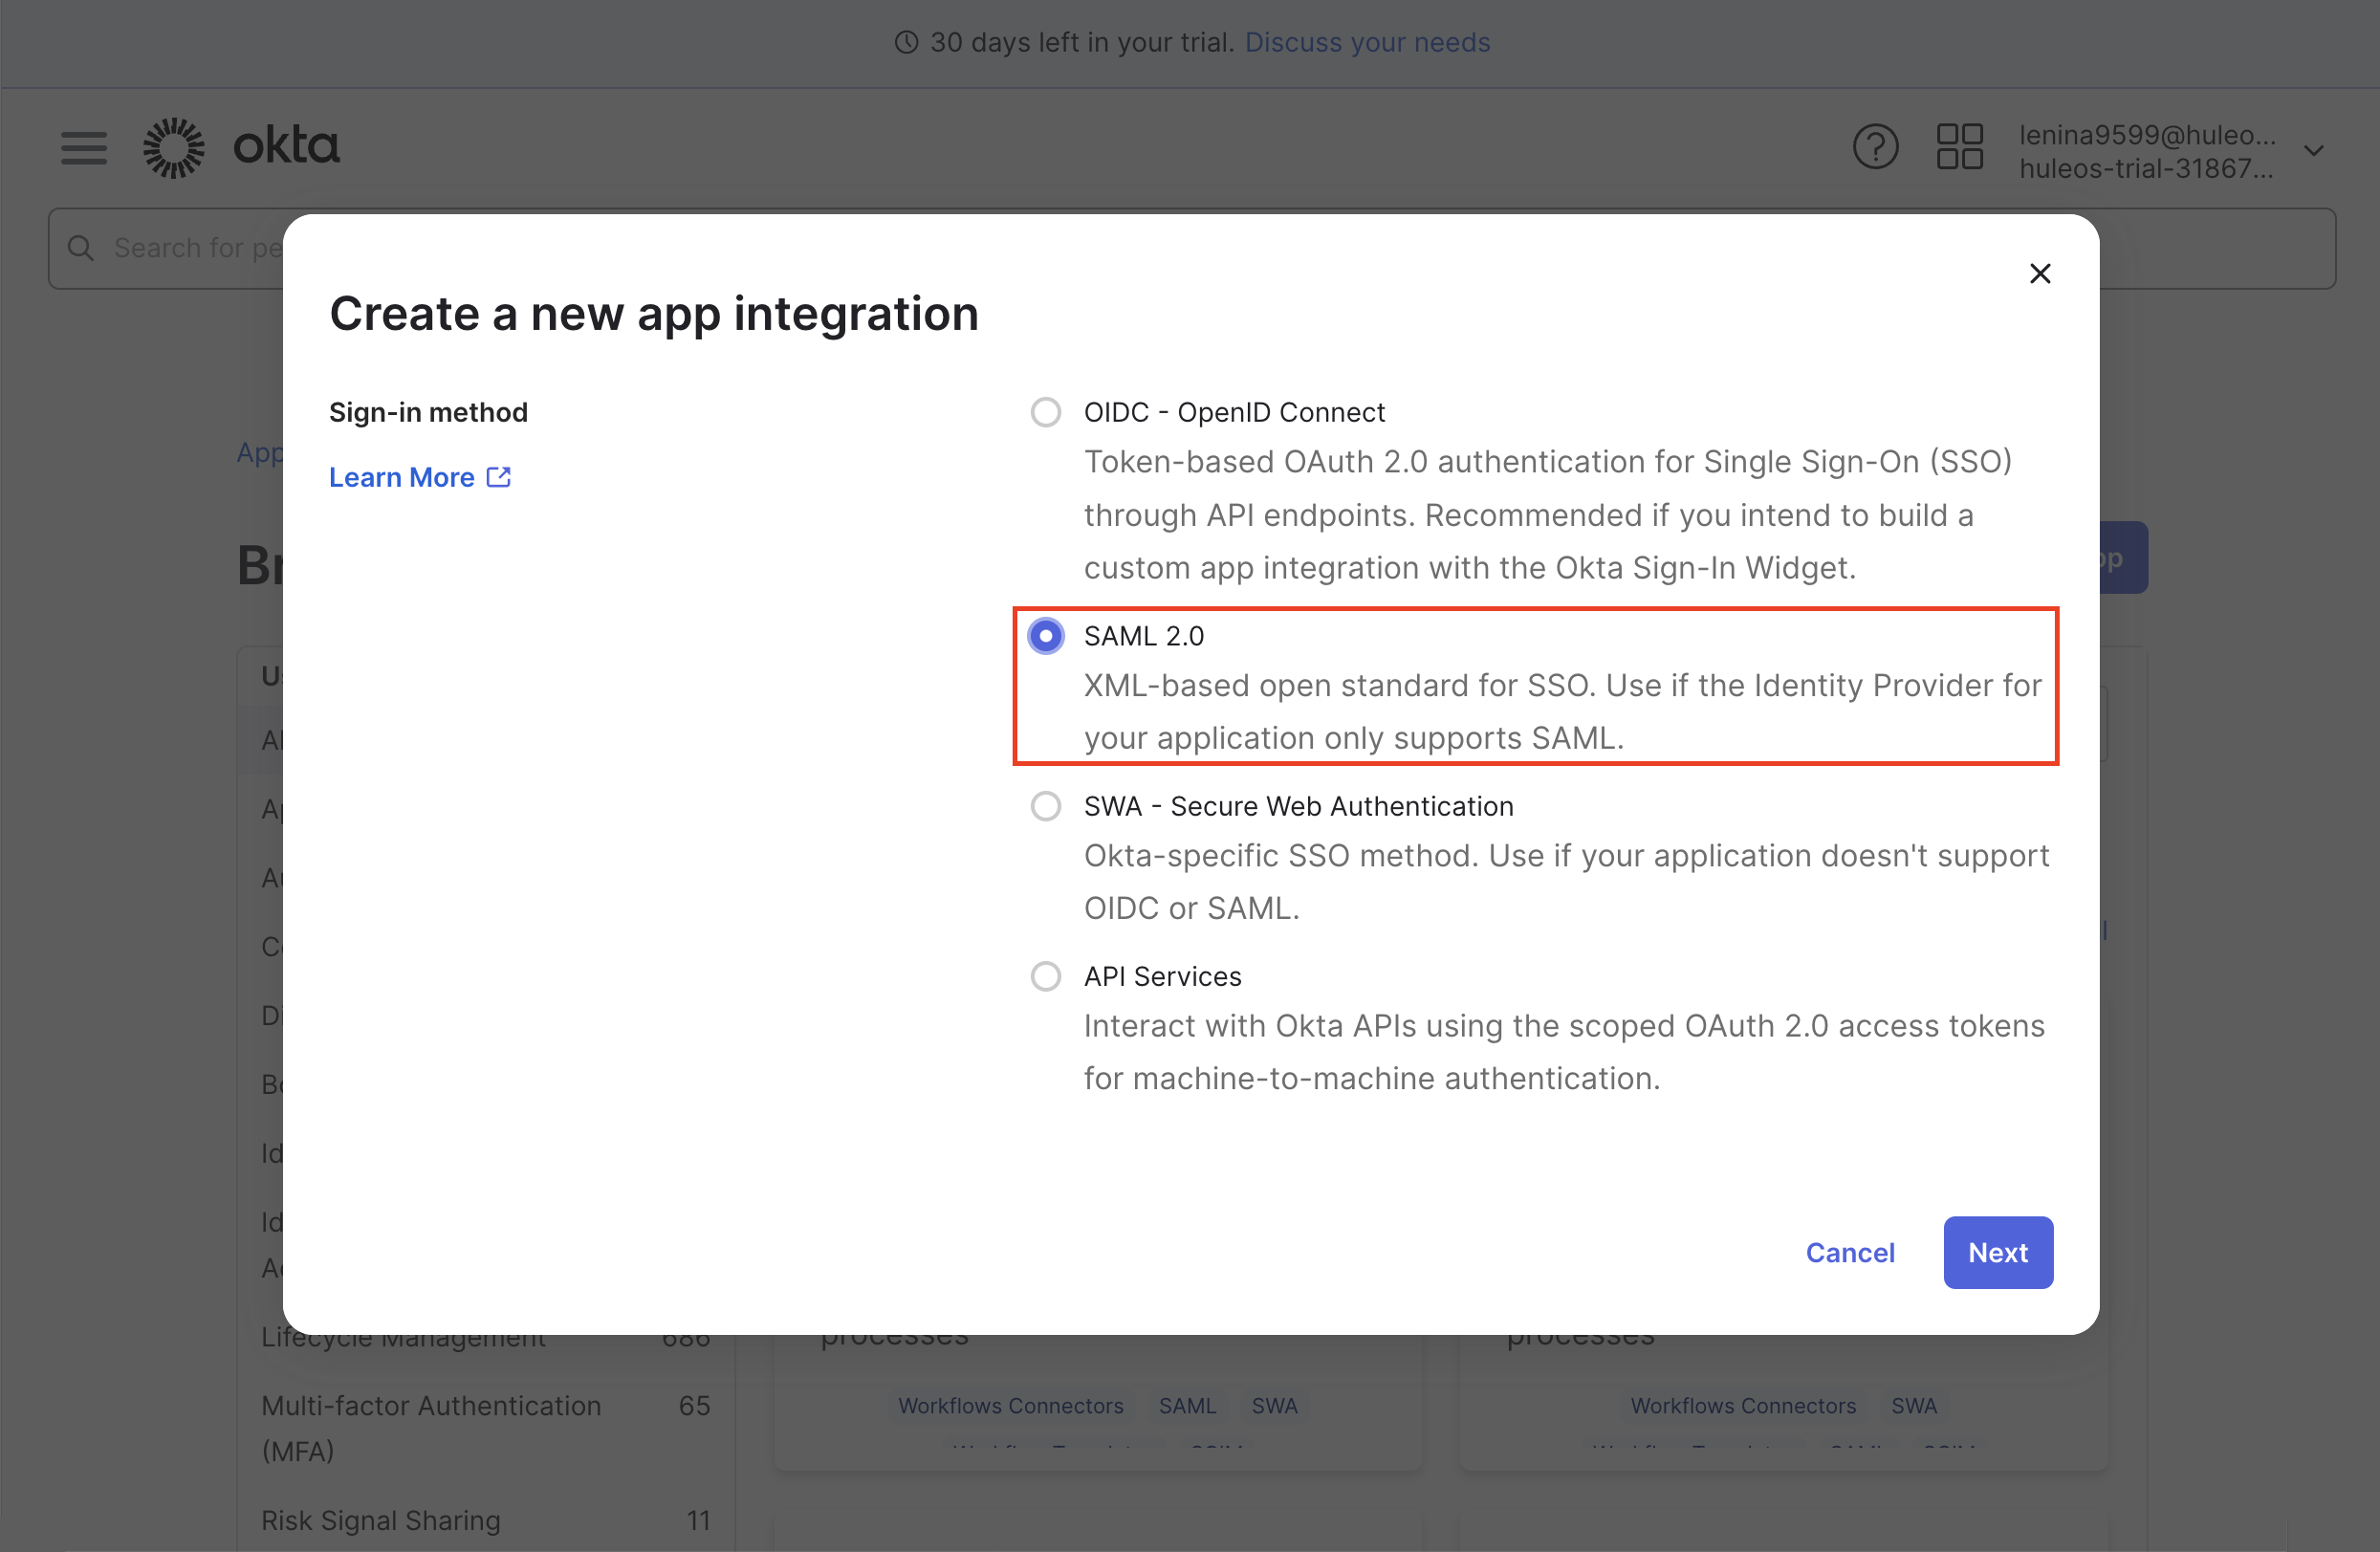
  • Navigate to Applications >> Add Applications >> Create New App.

create a new app in okta for pam

  • In the pop-up window, choose SAML 2.0 as your sign-on method and click Create.

select saml 2.0 as the method for securden pam

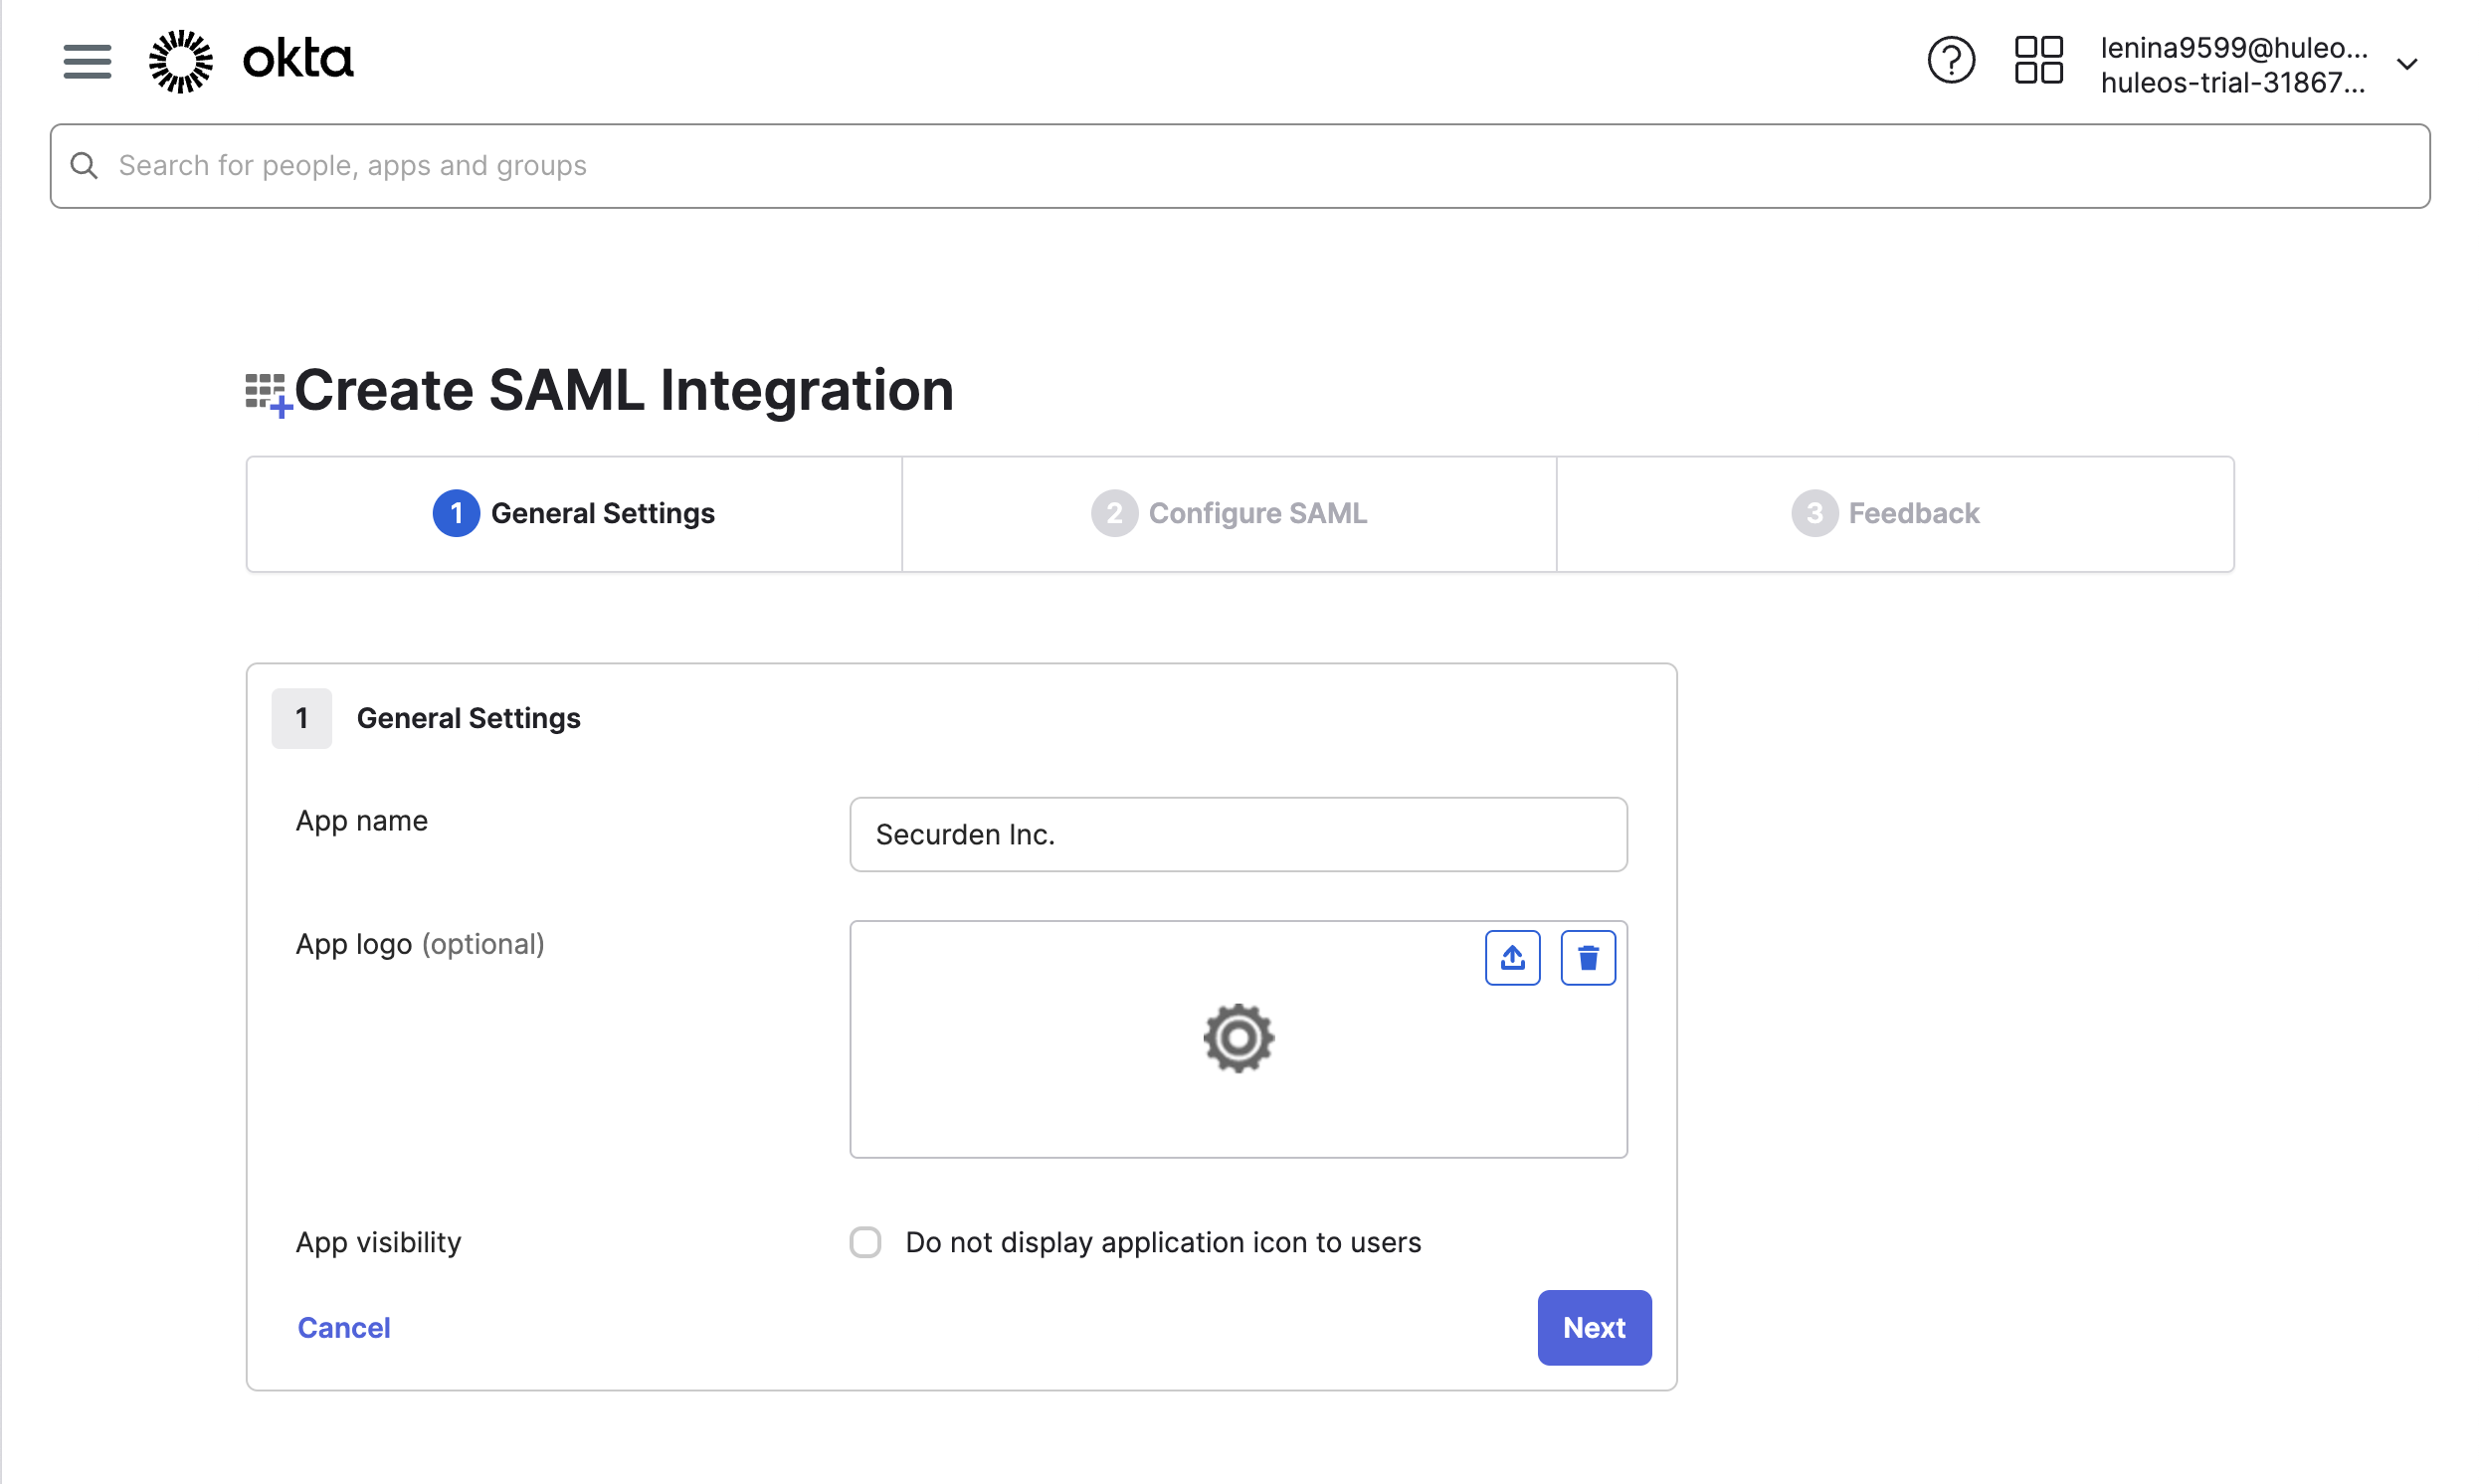
  • In the Create SAML Integration window, enter the application name, and if you want, you can add the application logo as well. Then, click on Next.

specify the name for privileged access manager

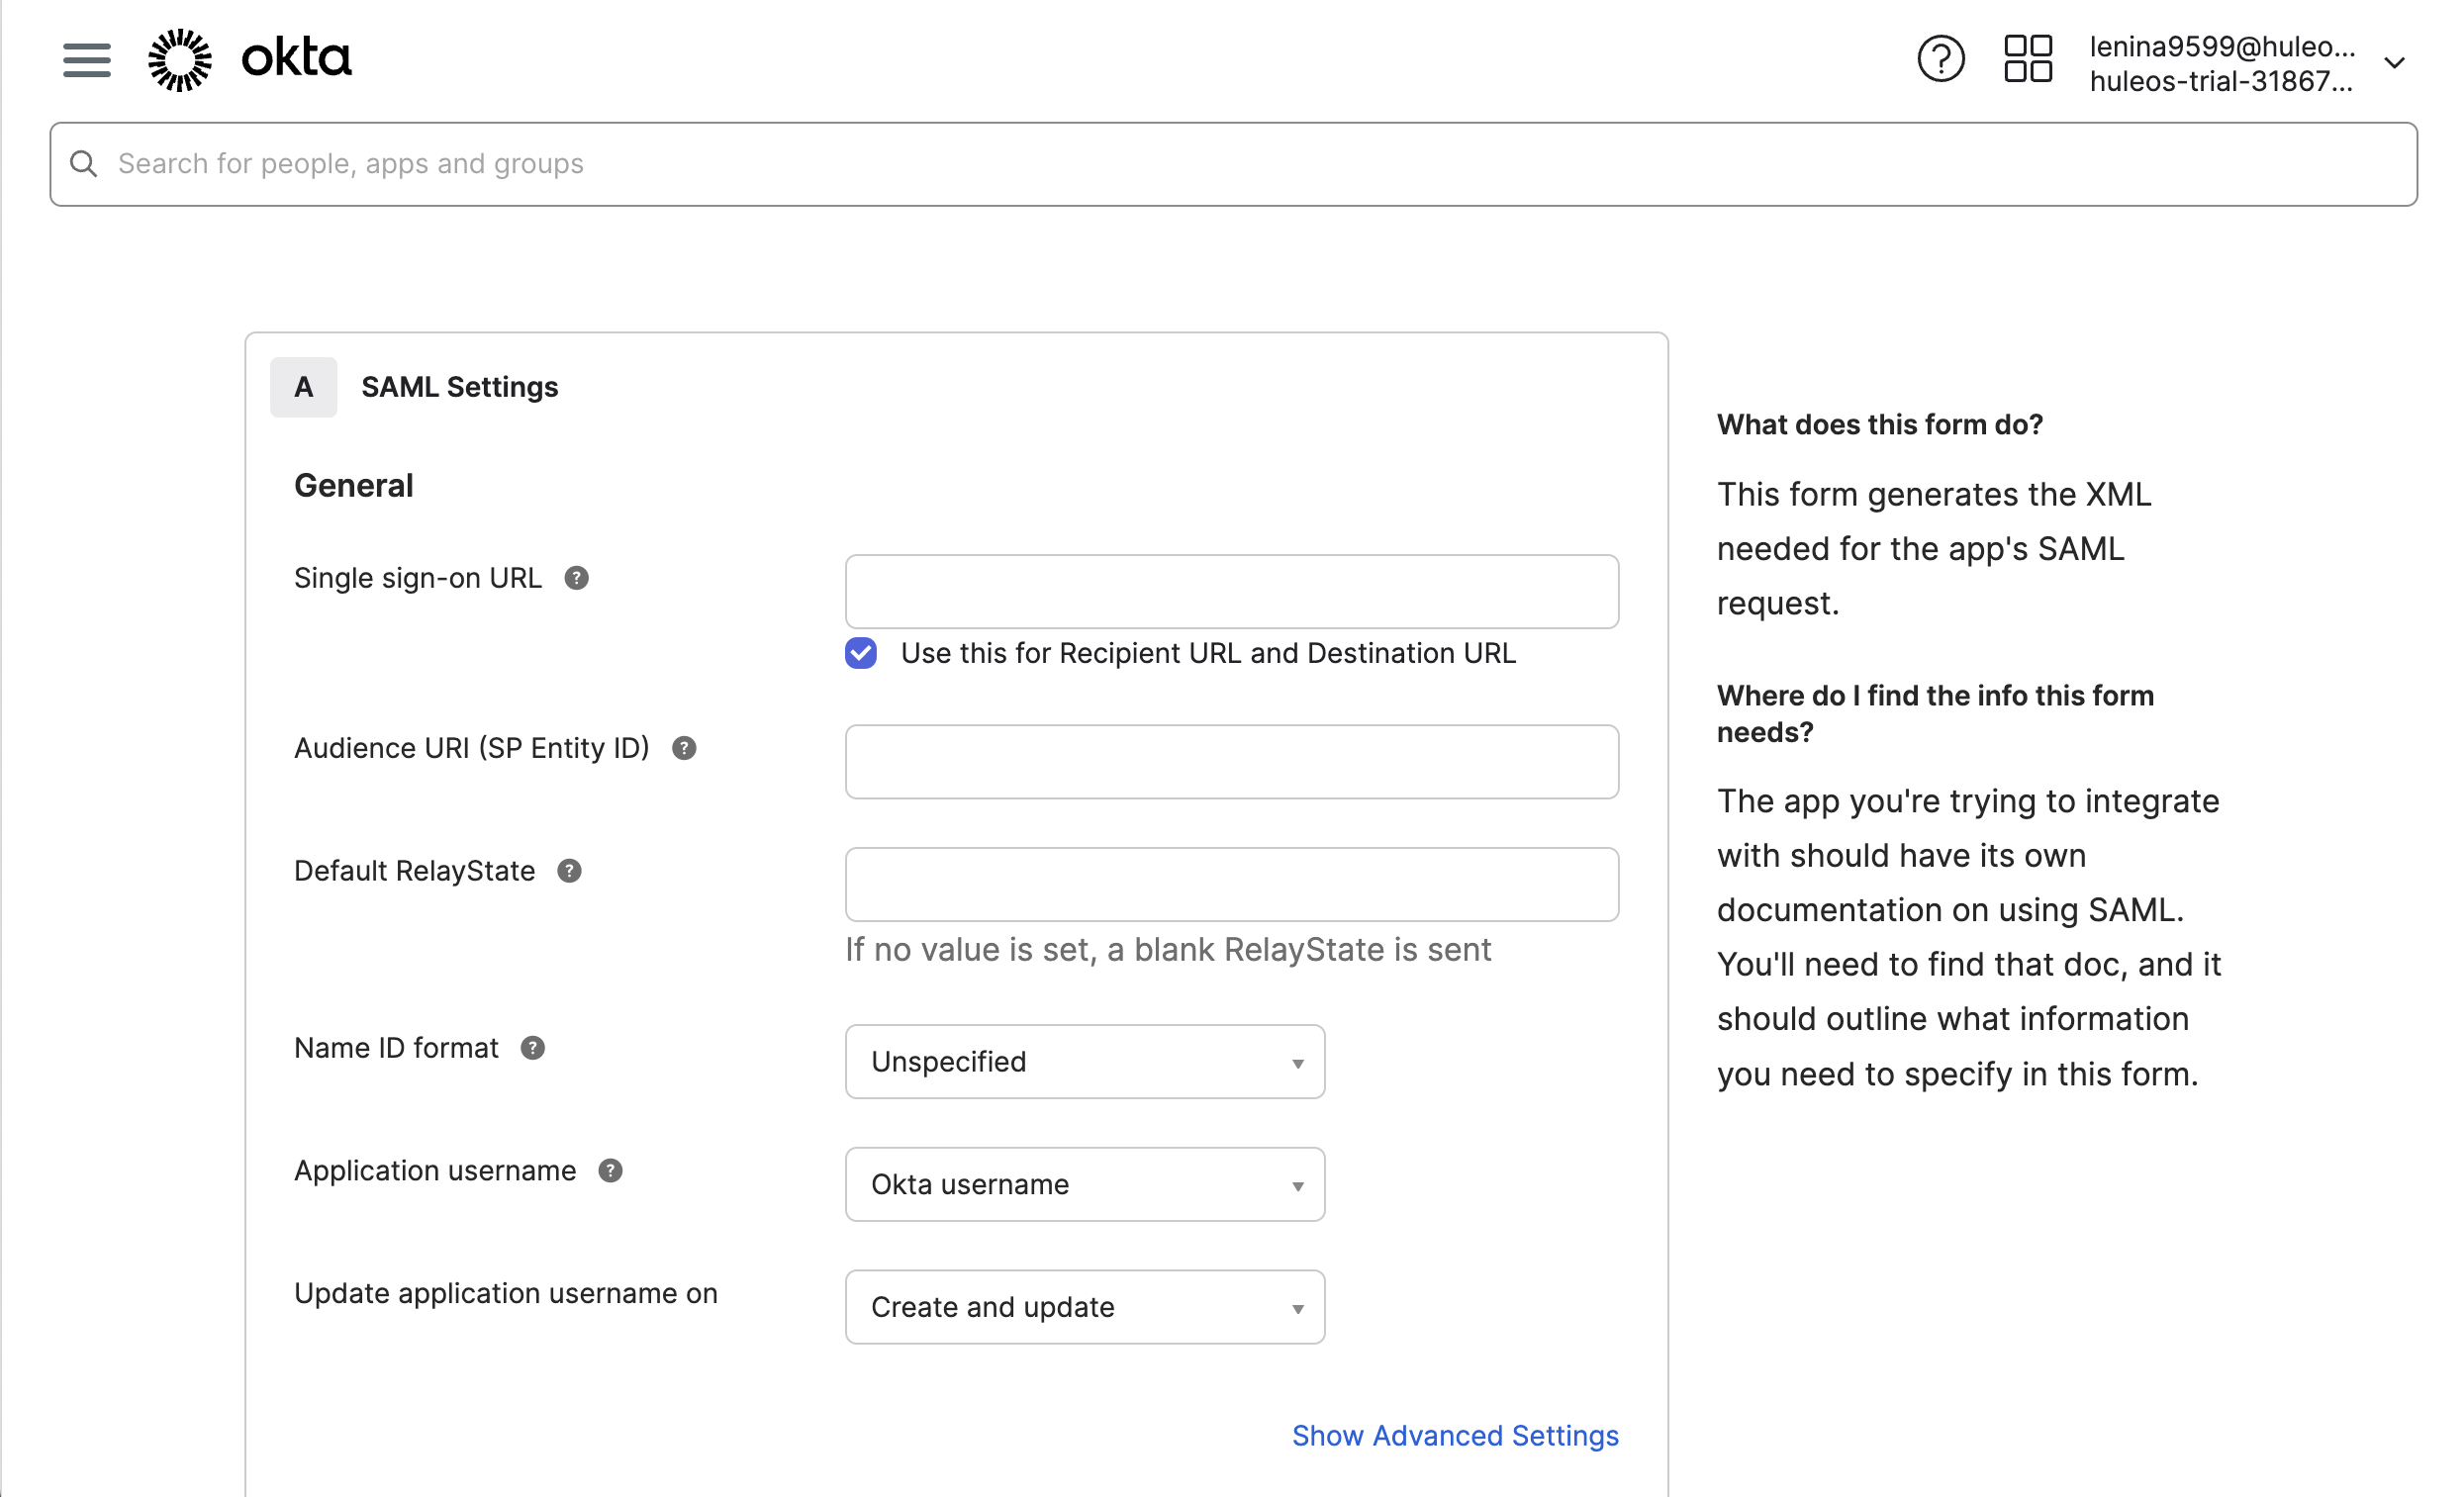
  • In the window that opens, you need to provide the Service Provider’s, a.k.a. Securden’s details for which you have to navigate to Admin >> Integrations >> SAML SSO. Use the provided details to integrate Securden with Okta.
  • Navigate to the Okta SAML settings page. Enter the Securden Service Provider details in Okta’s Configure SAML settings page.

specify securden details in okta

  • If you have used AD to import users, choose the Custom option for Name ID Format. Specify the following custom format:
toUpperCase(substringBefore( substringAfter(user.email, "@"), ".")) + "\" + substringBefore( user.email, "@"). 
  • If you did not use AD for user import, you can choose the Okta Username Prefix option.

  • Click on the Finish button to complete the SAML creation process. Navigate to the Sign On tab and click on View Setup Instructions button.

  • Navigate to Securden >> Admin >> Integrations >> SAML SSO.

  • Click on the Configure IdP Details option to display the IdP options. Here, you need to enter details of your SAML IdP. You can add the details manually or choose to import them from the IdP Metadata file.

Configuring Single Logout (SLO) for Okta

Once Single Sign-On (SSO) is configured, you can also optionally enable Single Logout (SLO) to ensure that user sessions are terminated consistently across both Securden Password Vault and Okta interface.

With SLO enabled, logging out of Securden will also log the user out of Okta, preventing orphaned identity sessions.

Prerequisites:

  • Okta SSO must already be configured and working.
  • The same Okta SAML application used for SSO must be reused for SLO.
  • Ensure you have administrator access to both Securden Password Vault and Okta Admin Console.

Follow the steps below to successfully configure Single Logout (SLO) for Okta users.

Step 1: Enable Single Logout (SLO) in the Okta Interface

  • Login to the Okta interface using your Okta administrator credentials
  • Once logged in, click on Admin Console from the left navigation menu.
  • Navigate to Applications → Applications
  • Click on the application created for Securden Password Vault for SSO.

Okta Admin Console

Once inside the application,

  • Navigate to the General tab.
  • Scroll down to SAML Settings and click Edit.
  • There are no changes required here. Click Next to continue.
  • Under SAML Settings, click Show Advanced Settings.
  • Locate the Signature Certificate, field and upload the certificate used for SAML authentication. click Browse Files and upload the certificate for user authentication. This should typically be a certificate signed by your internal Certificate Authority (CA)(.pem file).
  • Enable the option Allow application to initiate Single Logout.

Okta Initiate Single Logout

Once you’ve provided the above details, you also need to provide the Single Logout URL and SP Issuer details from Securden Password Vault.

  • Login to Securden Password Vault with your administrator credentials.
  • Navigate to Admin → Integrations → SAML SSO
  • Locate your Okta SAML SSO configuration and click the Edit icon beside it.
  • Copy the SP Logout URL.
  • Return to the Okta interface and paste this value in the field Single Logout URL.
  • Go back to the Securden Password Vault interface and copy the SP Entity ID.
  • Paste this value to SP Issuer field in the Okta interface.

Configure Single Logout URL

Once both these values are provided,

  • Scroll down and click Next.
  • Click Finish to complete the configuration.

Step 2: Update Securden and IdP Metadata

After configuring the authentication certificate and Single Logout settings in Okta using the above steps, you must update both the IdP (Okta) metadata and the Securden (SP) metadata to complete the Single Logout (SLO) configuration.

To update the IdP (Okta) metadata in Securden Password Vault,

  • Login to the Okta Admin Console and open the application configured for Securden Password Vault for SSO.
  • Navigate to the Sign On tab.
  • Beside the field Meta Data Details, locate the Metadata URL.
  • This URL reflects the updated metadata after enabling Single Logout.
  • Copy the Metadata URL, open it in a new browser tab, and download the file (Ctrl + S / Cmd + S).
  • Now login to Securden Password Vault as administrator and navigate to Okta SAML SSO configuration.
  • Under Enter IdP Details, enable Upload IdP Metadata.
  • In the Upload Metadata field, upload the downloaded metadata file (in .xml format).

Update Idp Okta Metadata

To update Securden (SP) metadata,

  • In the same SAML SSO configuration page in Securden Password Vault, locate the SP Metadata section.
  • Click Customize Certificates.
  • For SP Certificate, upload the same authentication certificate (.pem) that was configured in Okta for Single Logout.
  • For SP Key, paste the private key (.key) corresponding to the uploaded SAML authentication certificate.
  • Ensure that the SAML Validation Attribute remains unchanged and matches the value used for Okta SSO.
  • Click Save to apply the changes.

Update Securden(SP) Metadata

Once saved, Okta Single Logout is successfully configured for all users who authenticate to Securden Password Vault using Okta SSO.

Securden Help Assistant
What's next?
Request a Demo Get a Price Quote
Thank you message

Thanks for sharing your details.
We will be in touch with you shortly

Thanks for sharing your details.
We will be in touch with you shortly.