Customizing the PAM solution
Tailor the PAM solution to your organization’s unique needs with the customization feature. You can customize the features in a granular manner and also switch them on or off anytime required. The customizable features exercise a lot of flexibility and you can mould them thoroughly according to your business needs.
In some scenarios, the existing features may not be apt to the operations running in your organization. In that case, the additional requirements can be handled with several other features, where you can add roles, modify labels in the user interface, change the logo and the product language.

Navigate to Admin >> Customization. You can model the following features:
- Custom user roles
- Securden agent text customization
- Configurations
- Logo, Theme, and Text
- Product language selection
How to Create, Edit, and Manage Custom User Roles?
The user roles let users perform an action and control access to platform resources. Roles connect them to the application and decide how they interact in the platform. Navigate to Admin >> Customisations >> Custom User roles.
You can create custom user roles assigning specific access permissions to users based on the specific needs of your organization. You can assign features at a granular level by selecting specific features. As an additional security measure, dual controls are enforced for custom role creation. After creating a role, if the permissions are to be modified, the changes will have to be approved by another administrator.
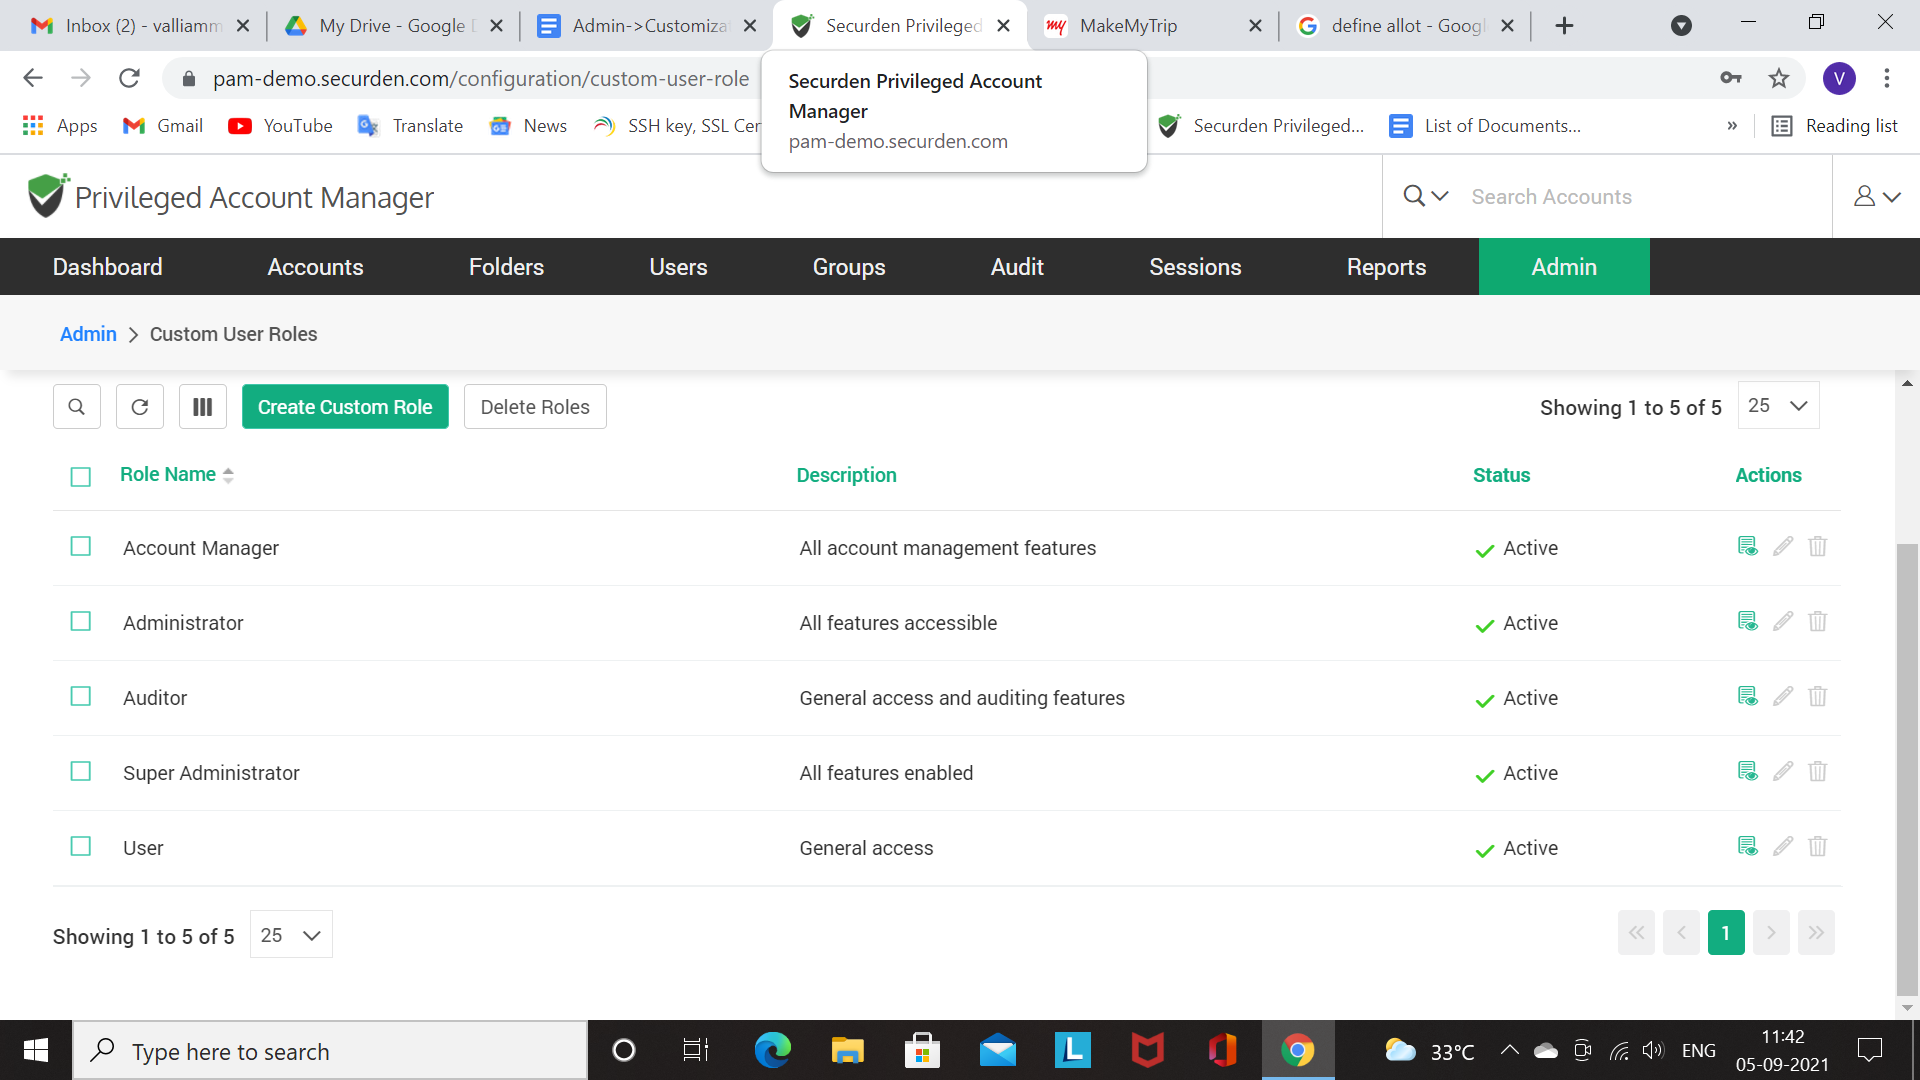
The screen in the above screenshot shows the user roles that are already available in your organization. The Role name, Description, Status, and Actions are displayed in a tabular format. The description column points out the set of features or a particular feature enabled for that user role. The status shows whether that user role is in an Active or Inactive position.
Actions
Under Actions, you can View Role Entitlements, Edit and Delete user roles. Click ‘View role entitlements’ under actions to review the granular permissions assigned to the user. The system-defined roles cannot be edited or deleted.
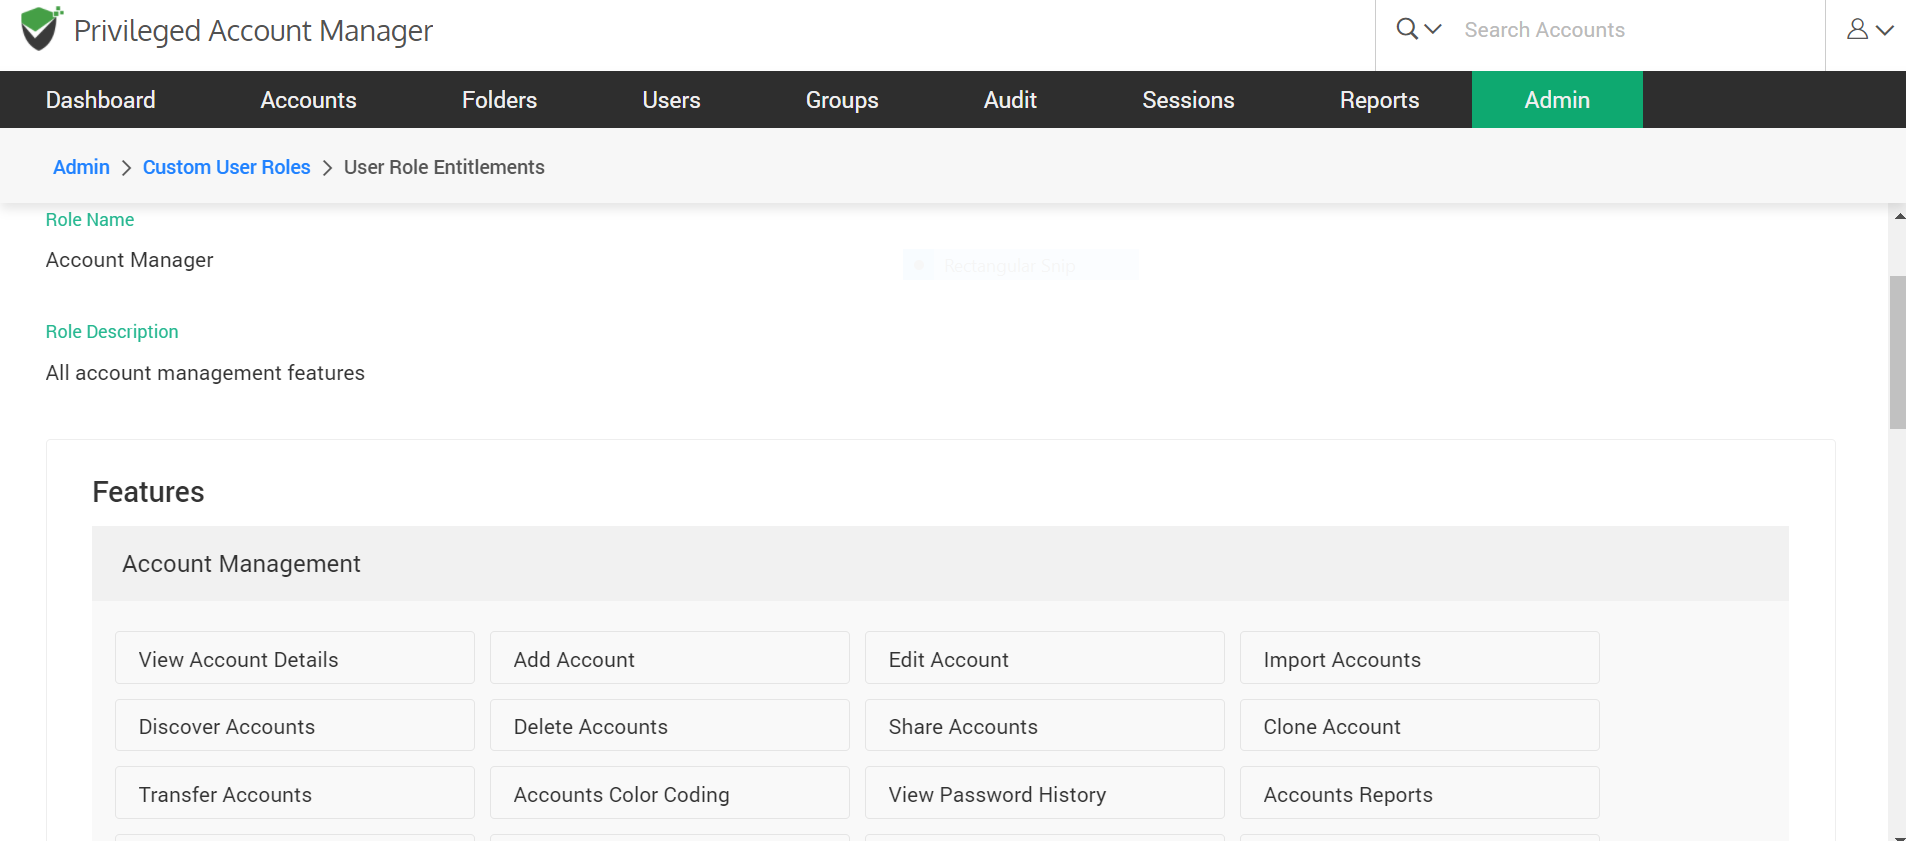
View Role entitlements
This page shows you the list of all permissions granted to the selected user role. It is a overview of all the features that have been enabled for the user role that you have created. You can view the role entitlements for any user role.
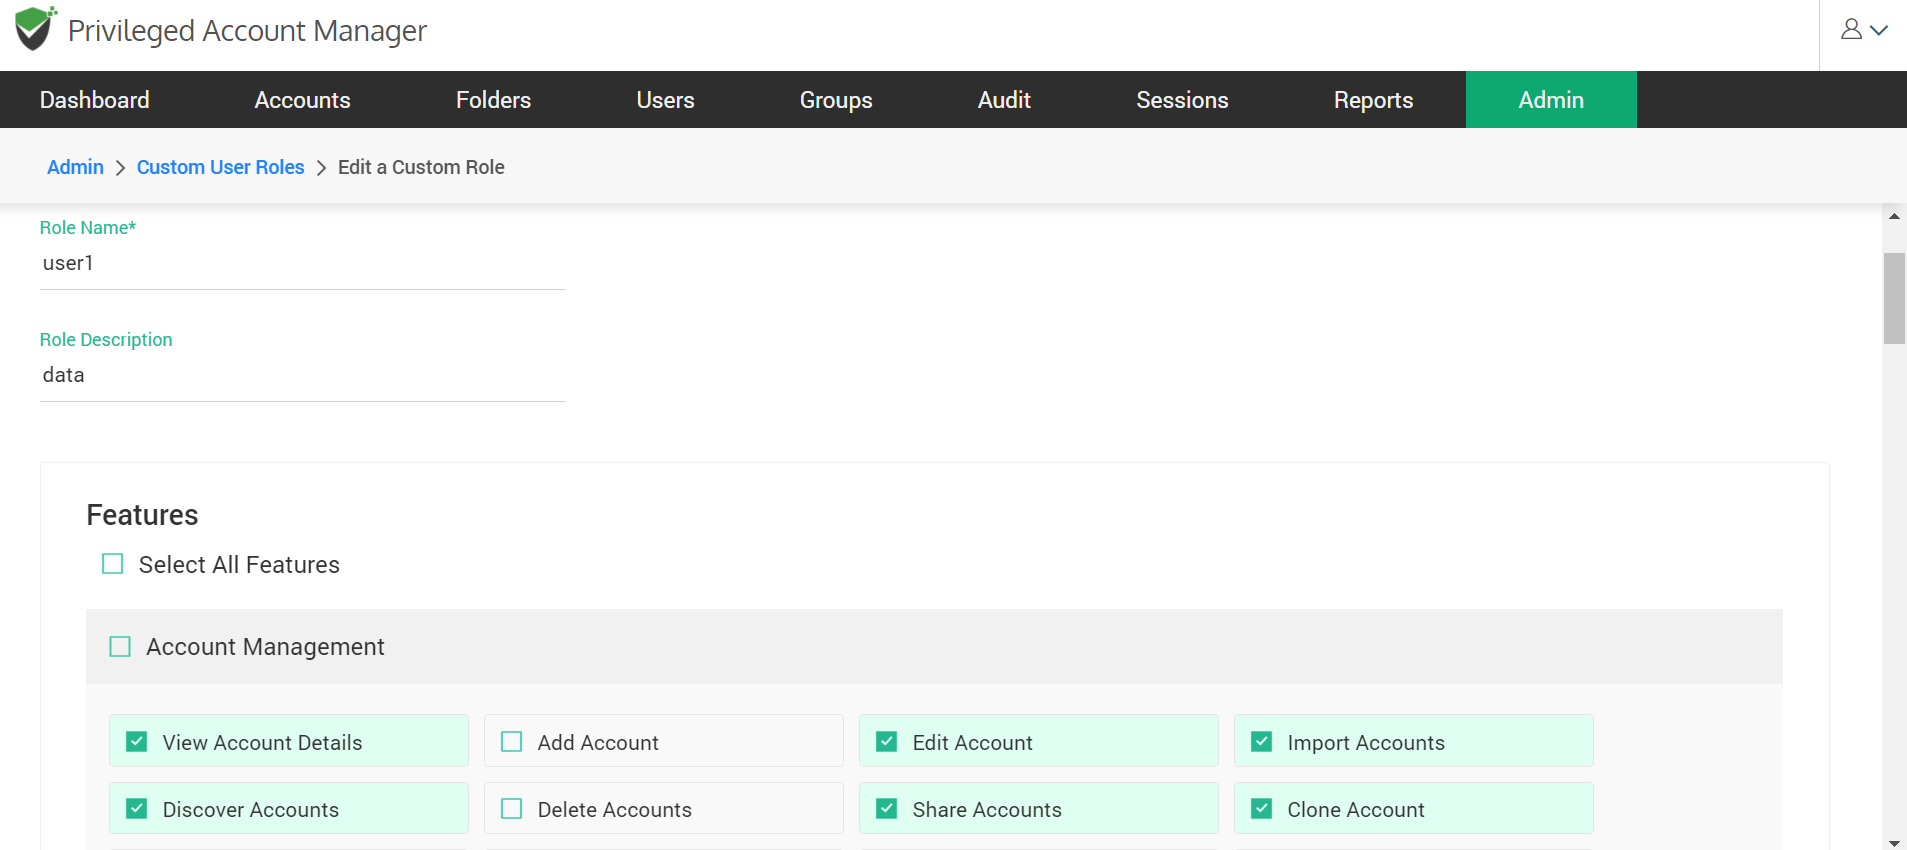
Edit a custom role
You can edit custom user roles from here. You need to select the privileges required for the role from the list below.
Other functionalities
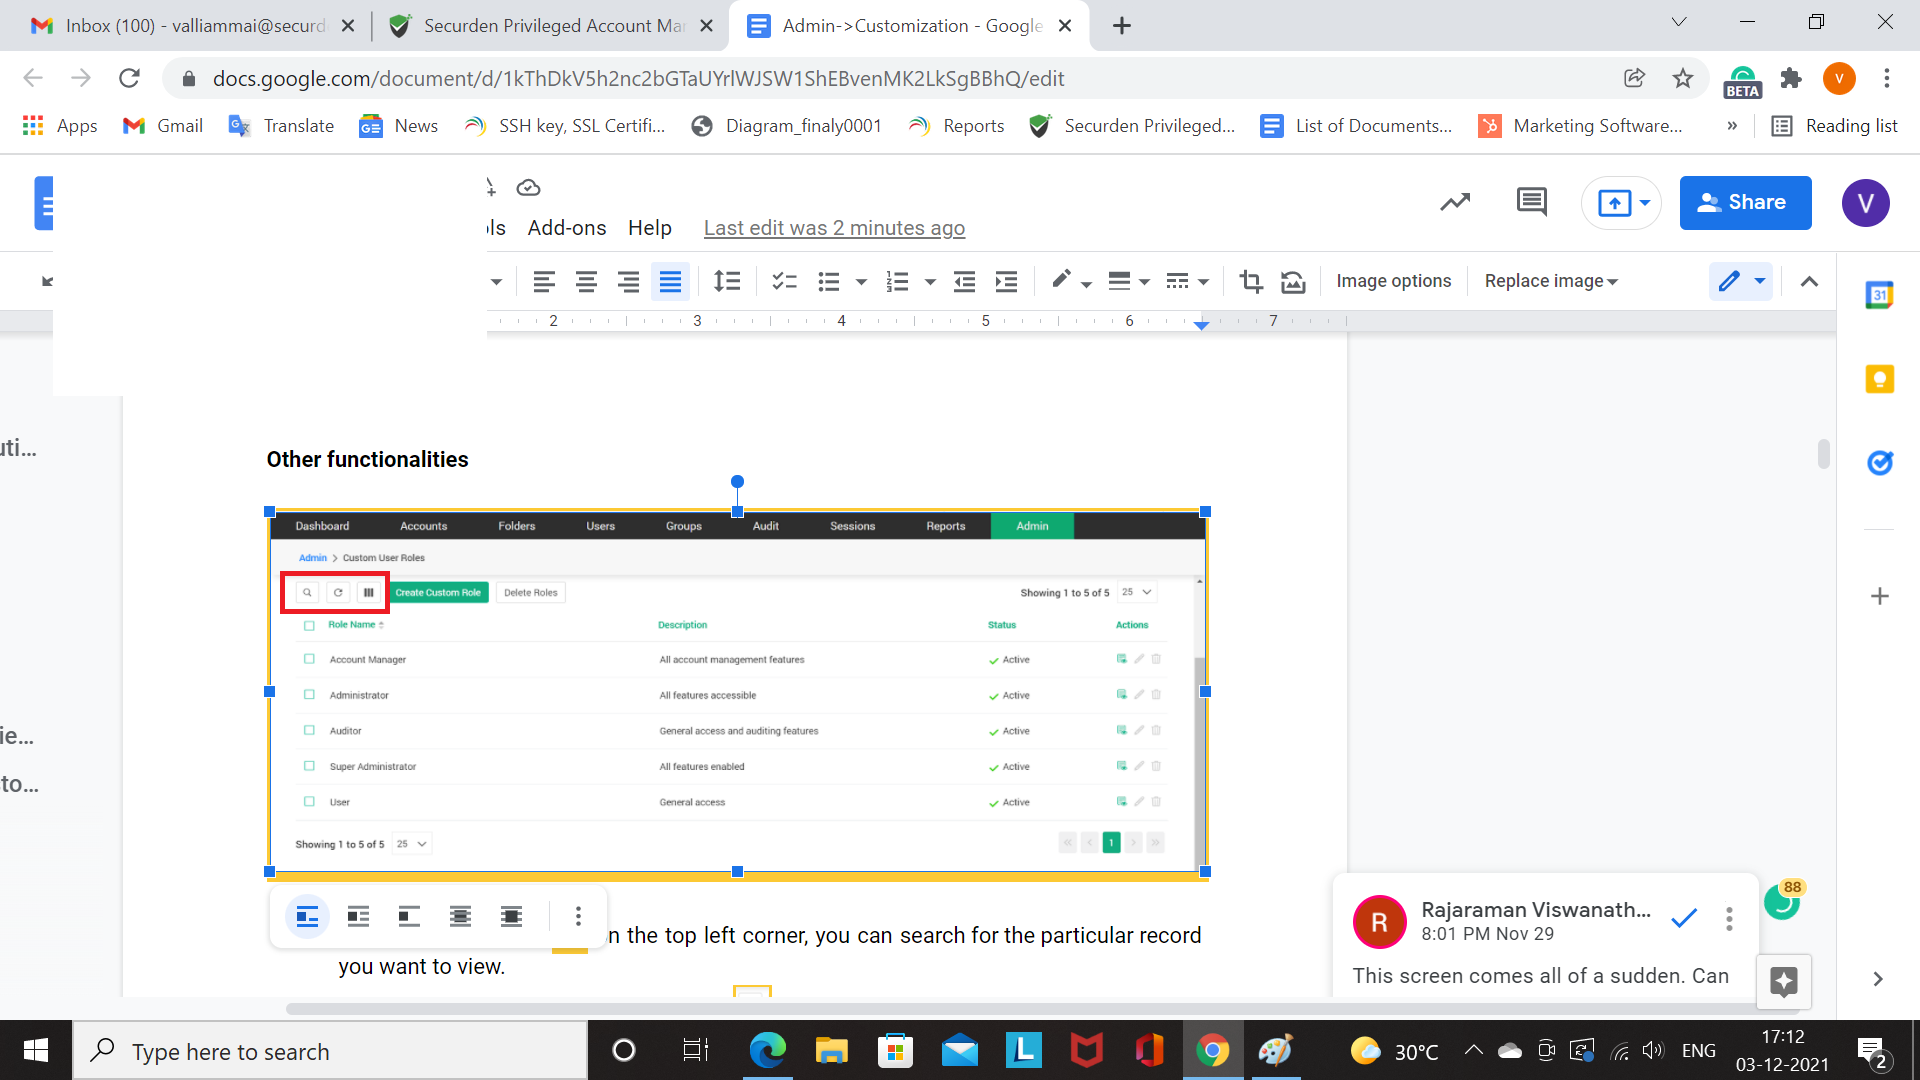
- With the Search icon on the top left corner, you can search for the particular record you want to view.
- Next to that, you have the Refresh icon which will reset the page and show you the updated screen if there were any recent modifications done to the user roles.
- In the Column Chooser, you can select the required column labels, to be displayed in the tabular form.
Create Custom Roles
Navigate to Admin >> Customizations >> Custom User Roles >> Create Custom Role. The user roles differ in every organization according to their unique requirements. Hence, you can customize new roles and select the privileges required for the role from the list available here.
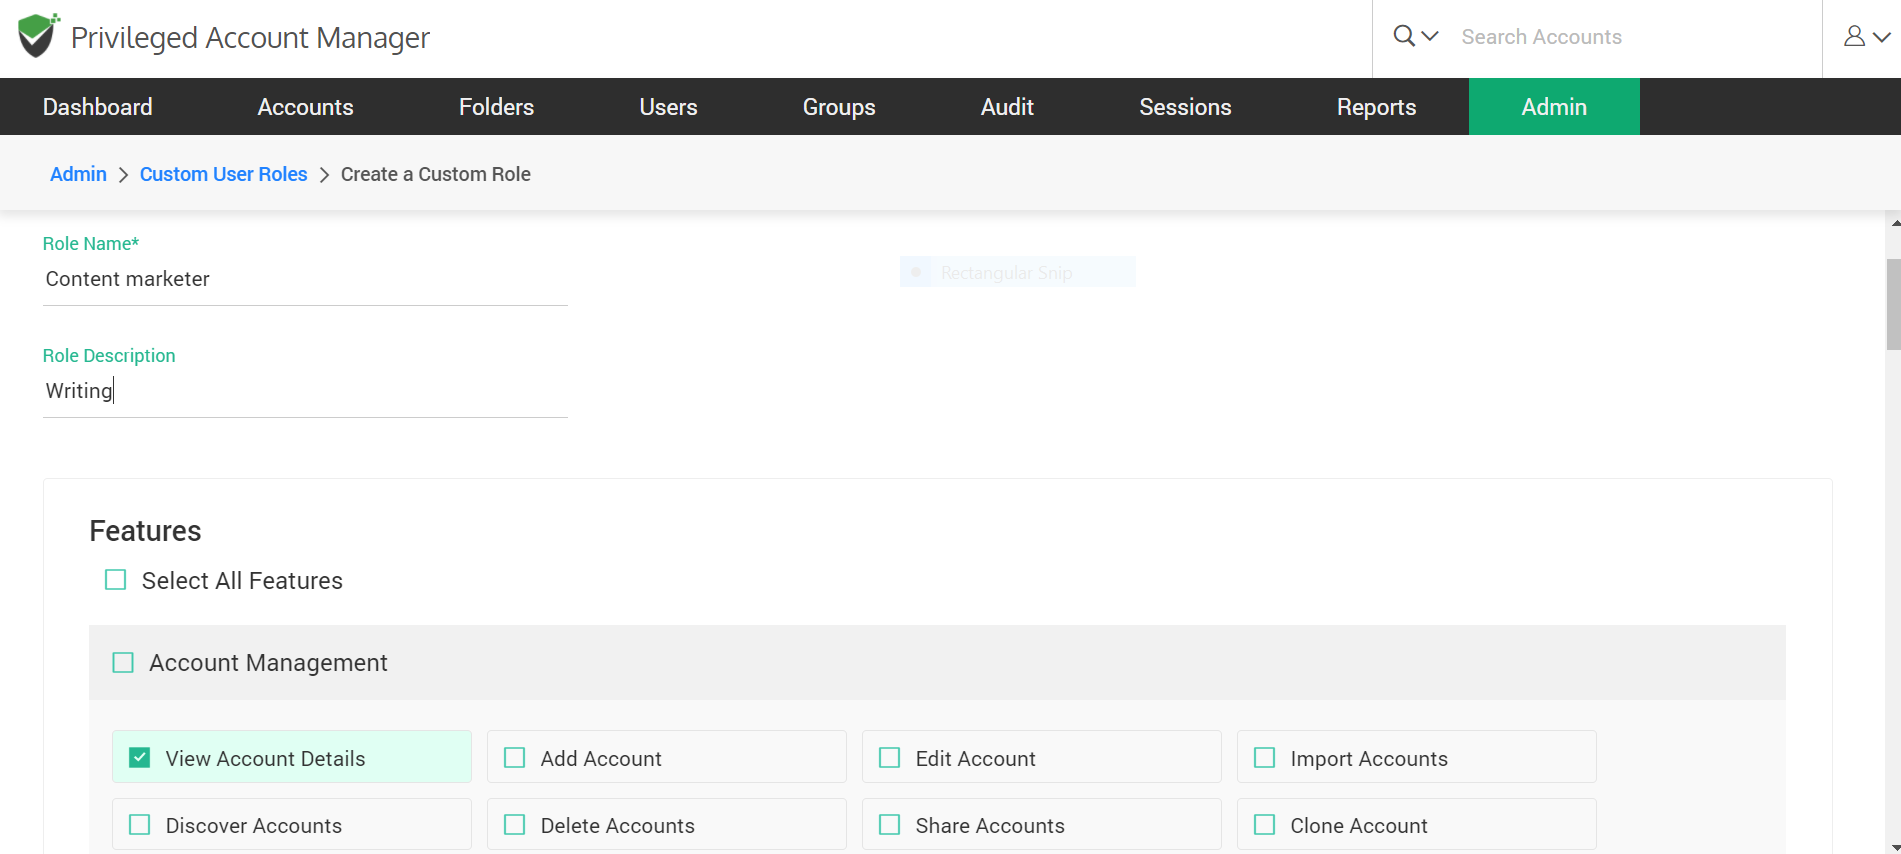
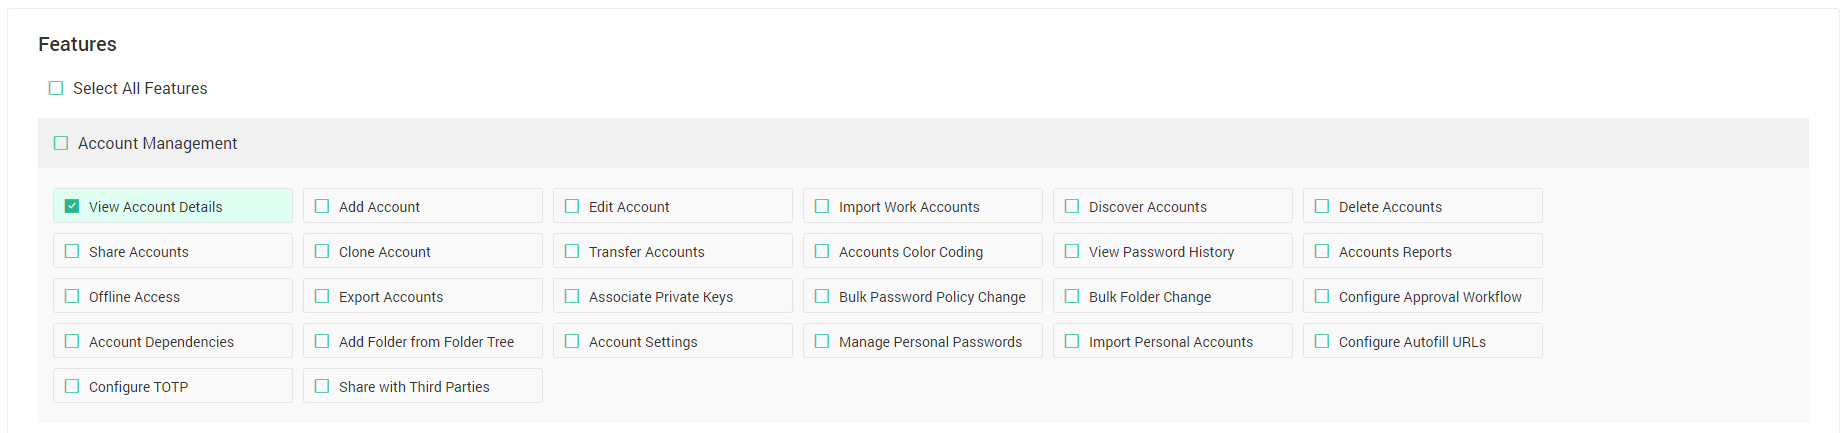
To create a new role, specify the role name and description, then select the privileges required for that specific role from the list. The list contains the following main features:
Account Management (View account details is a mandatory section)
The account management section lists all the features which are related to operations involving accounts. View account details is a mandatory section for all the user roles in your organization. This includes all the activities right from creating accounts, modifying and deleting them.
Folder Management
The folder management section lists all the features which are related to operations involving folders. This includes all the activities right from creating folders, modifying and deleting them.

User Management
The user management section lists all the features which are related to operations involving users. This includes all the activities right from creating users, modifying and deleting them.

Group Management
The group management section lists all the features which are related to operations involving groups.

Audit
The audit section lists the features that enable users to view account and user activity trails.

Reports
The report section lists the features that enable users to view the five different types of reports given below in the screenshot.

Sessions
The sessions section lists the features that enable users to view the two different types of sessions given below in the screenshot.

Admin Operations
The admin section consists of all the admin related operations listed in the below screenshot.

Miscellaneous
The miscellaneous section includes access browser extensions and the use of windows remote launcher.

All these main features contain multiple sub-features which can be enabled according to the needs of the role. After selecting the features, click on the Save button. A message “Custom Role created successfully” will be displayed on top of the screen if the features you select are enabled properly.

Delete Roles
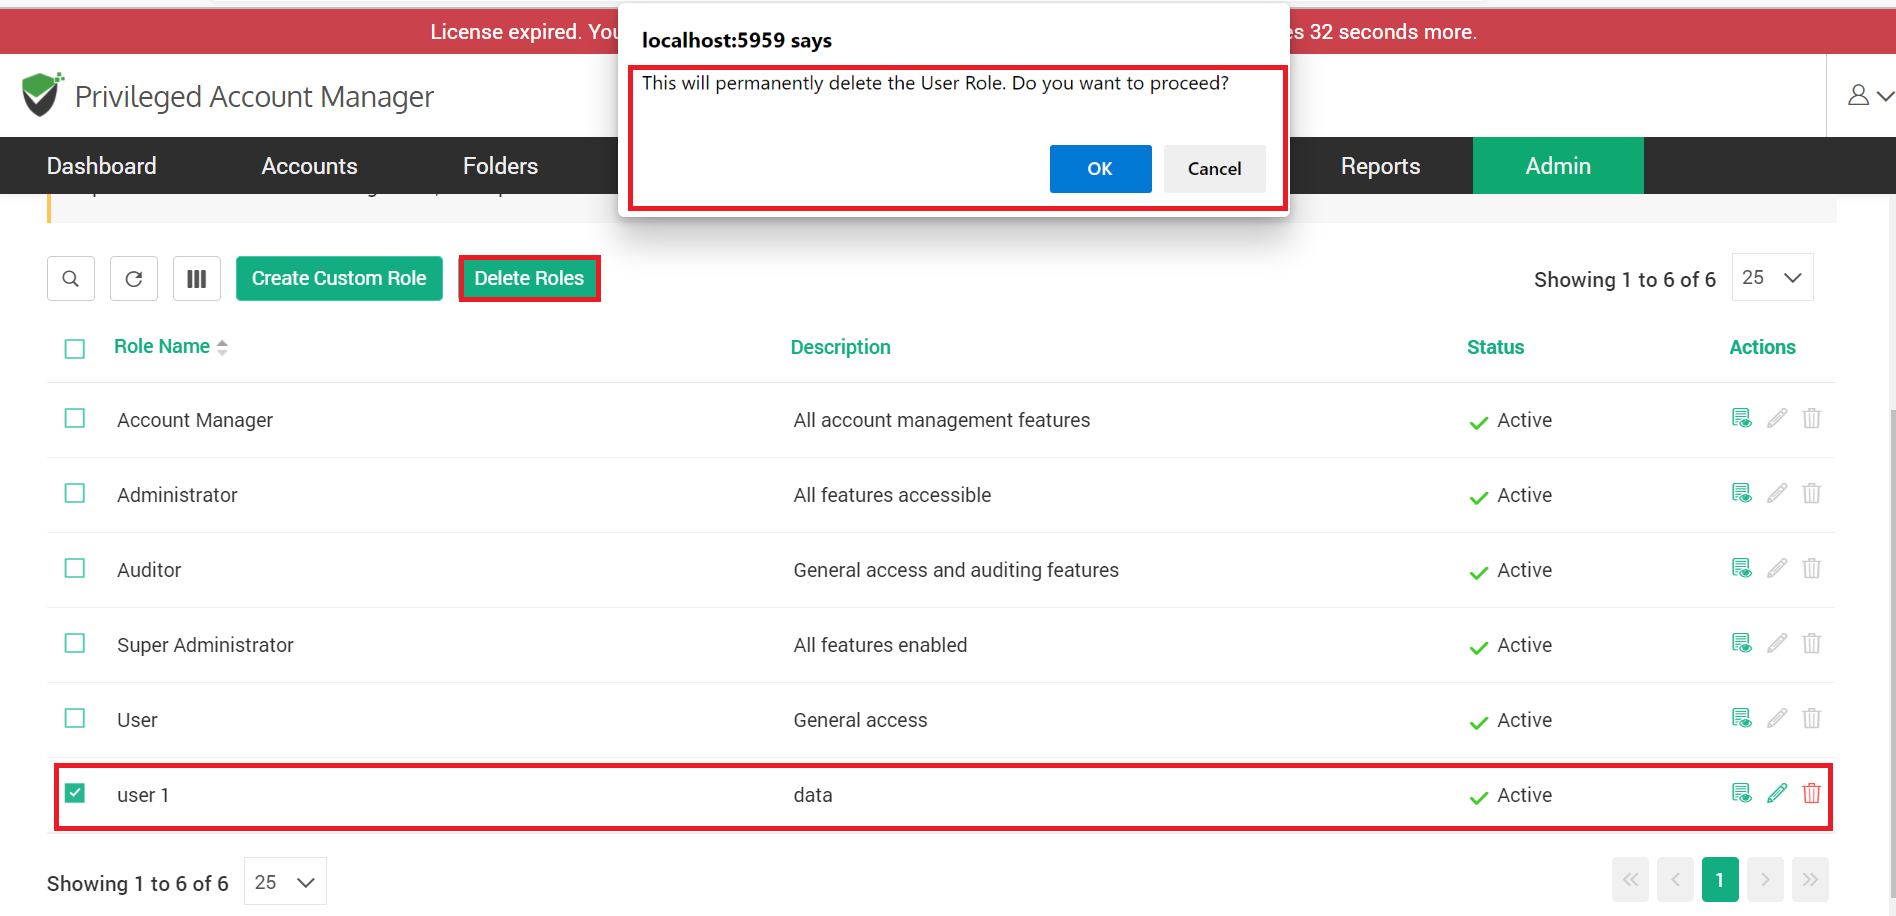
The roles can be deleted by clicking on the Delete Roles button in the GUI. Another way to delete the user role is to select the particular role name and use the delete icon under the Actions column. A message “The selected custom role(s) deleted successfully” will be displayed when you hit the delete button. The user role will be removed permanently.
How to Customize Securden Agent Text?
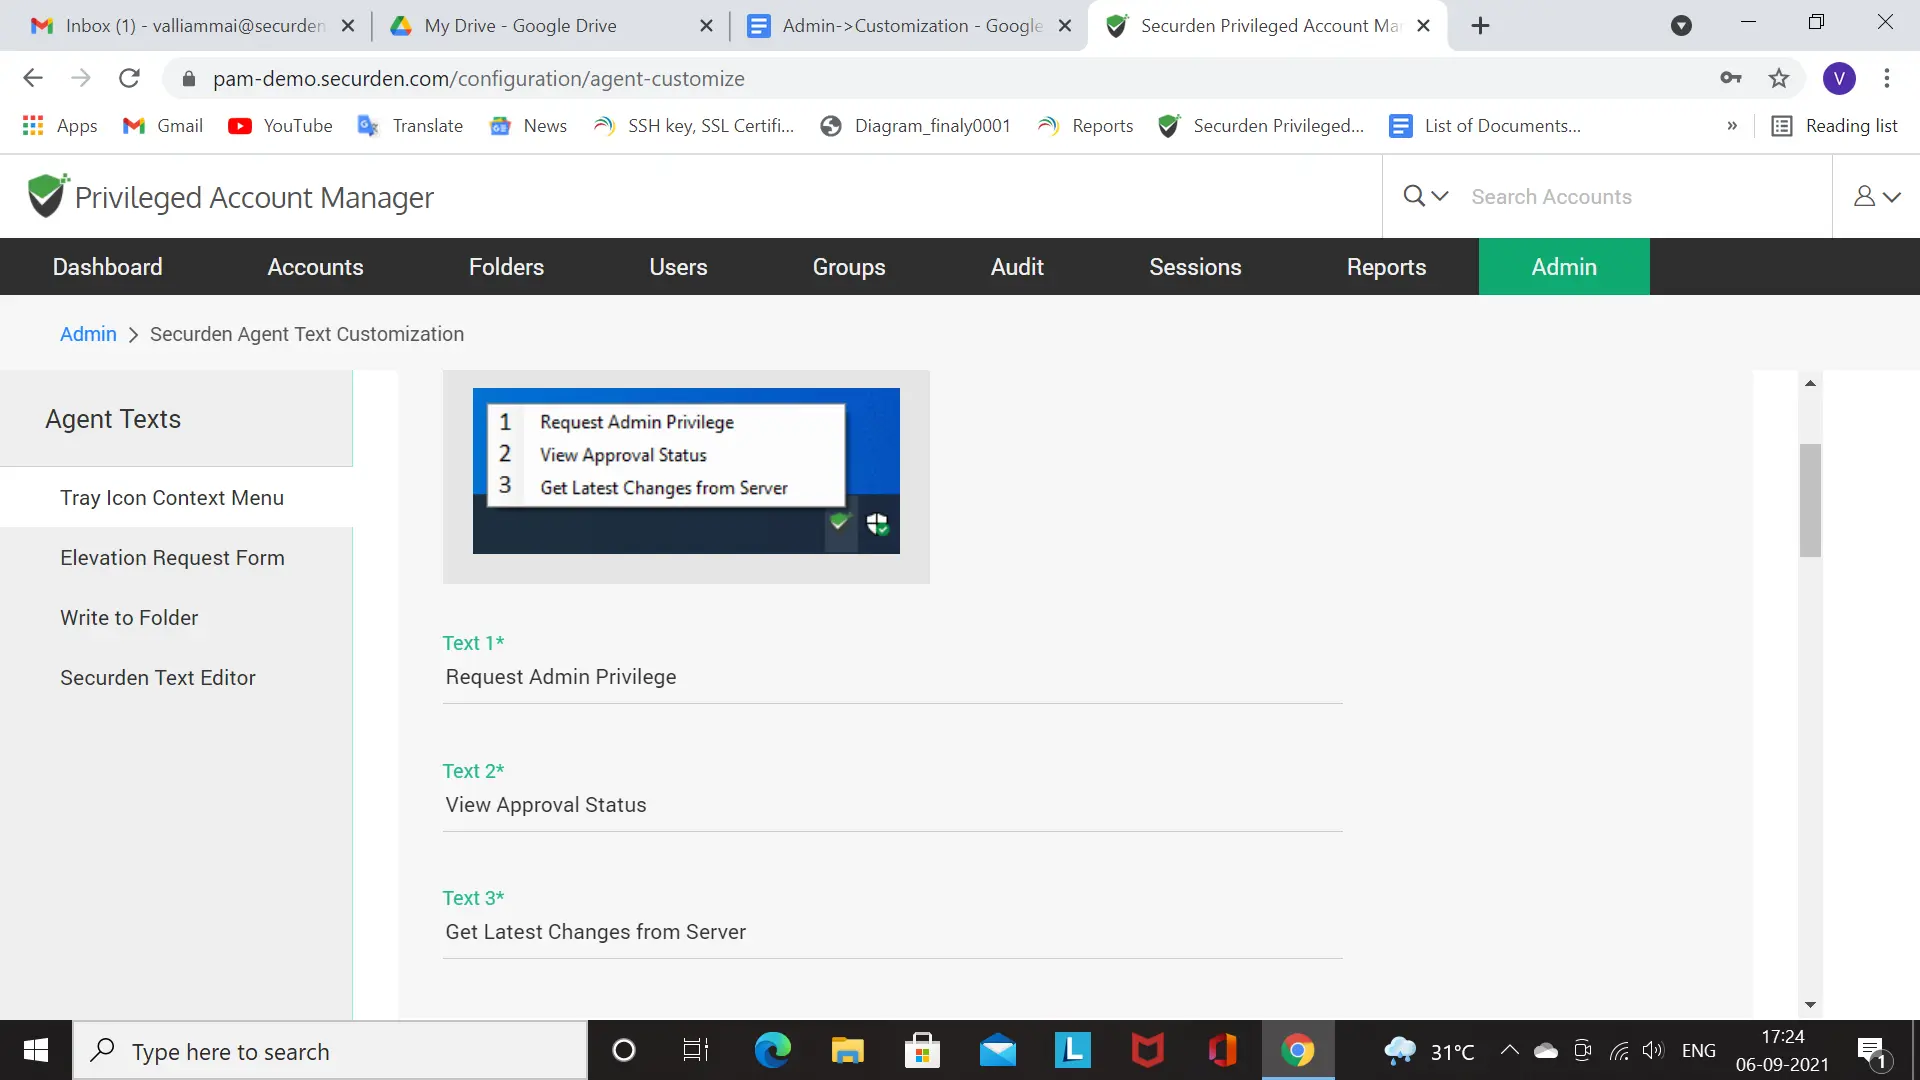
You can customize the message text and labels in the Securden PAM agent interface. It can be tailor-made to be on par with your business needs. You can change the labels in the tray icon context menu, elevation request form, and others. Select the required feature, refer to the preview on top of the page, and carry out the change in the edit section below.
Click Admin >> Customization >> Securden Agent Text Customization to explore various options.
-
Tray Icon Context Menu
- Privilege requests
- Approval status
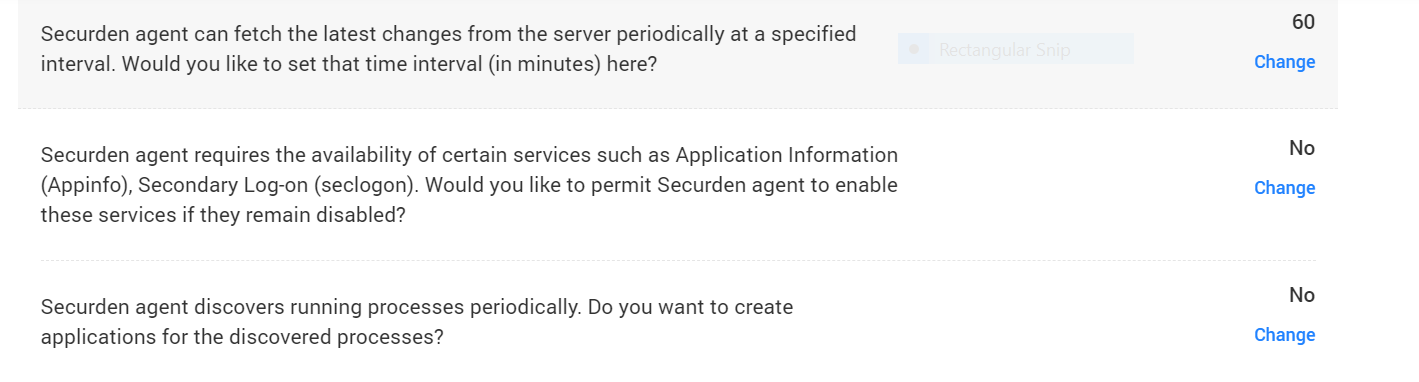
- Latest changes from the server
The tray icon menu consists of:
When the user clicks any of the above options, the message will be displayed accordingly. The message can be customized in a line or two, depending on the requests, status, and retrieval of the latest changes.
The main three labels and messages can be altered to suit your organization’s requirements and fit.
-
Elevation Request Form
The elevation request feature is related to the information regarding applications not marked with elevated privileges, requesting admin privileges for files/folders which fall out of the permission criteria.
The other scenarios include the malfunction of agents in connecting servers, passing the name or location of the application as an argument, and another elevation request in progress.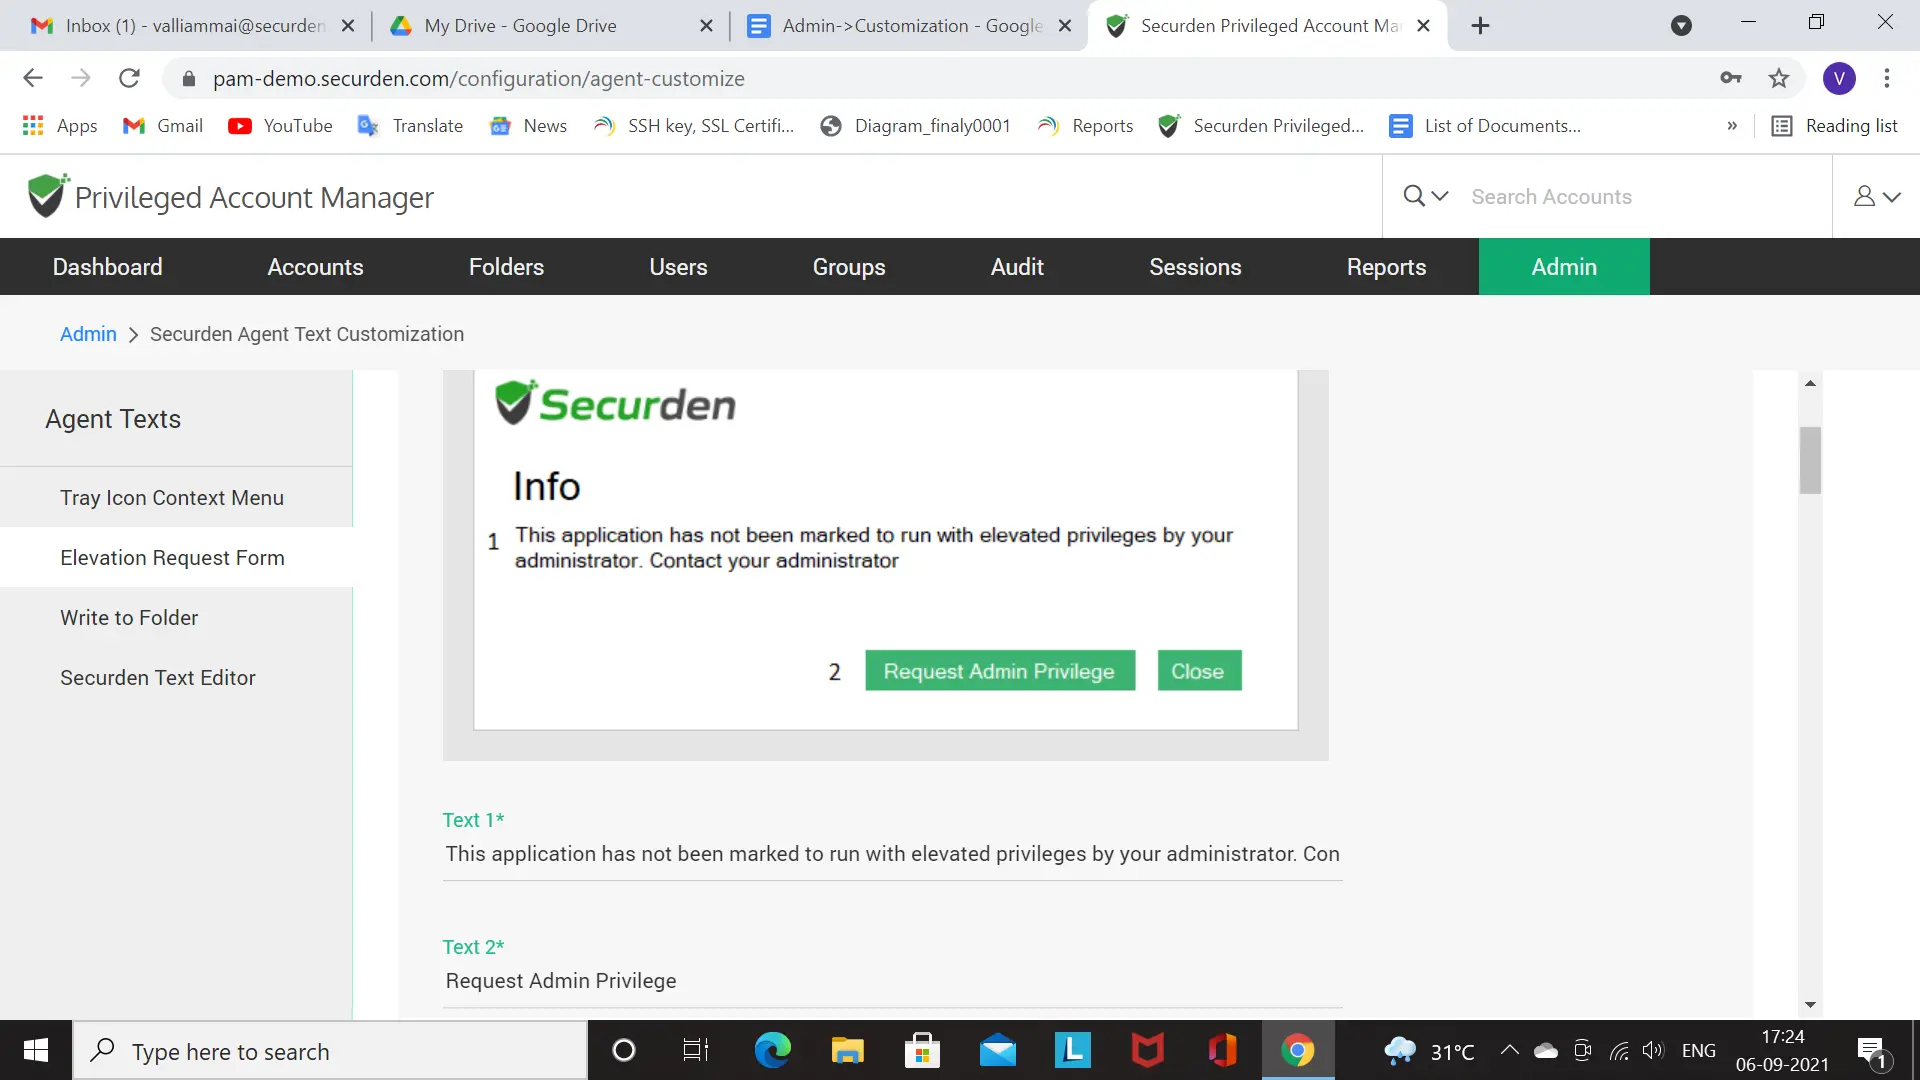
-
Write to Folder
The errors in the form of invalid folder paths or clipboard content are displayed. Another line can also be appended to suggest the necessary actions to overcome the errors or to brief about it.

-
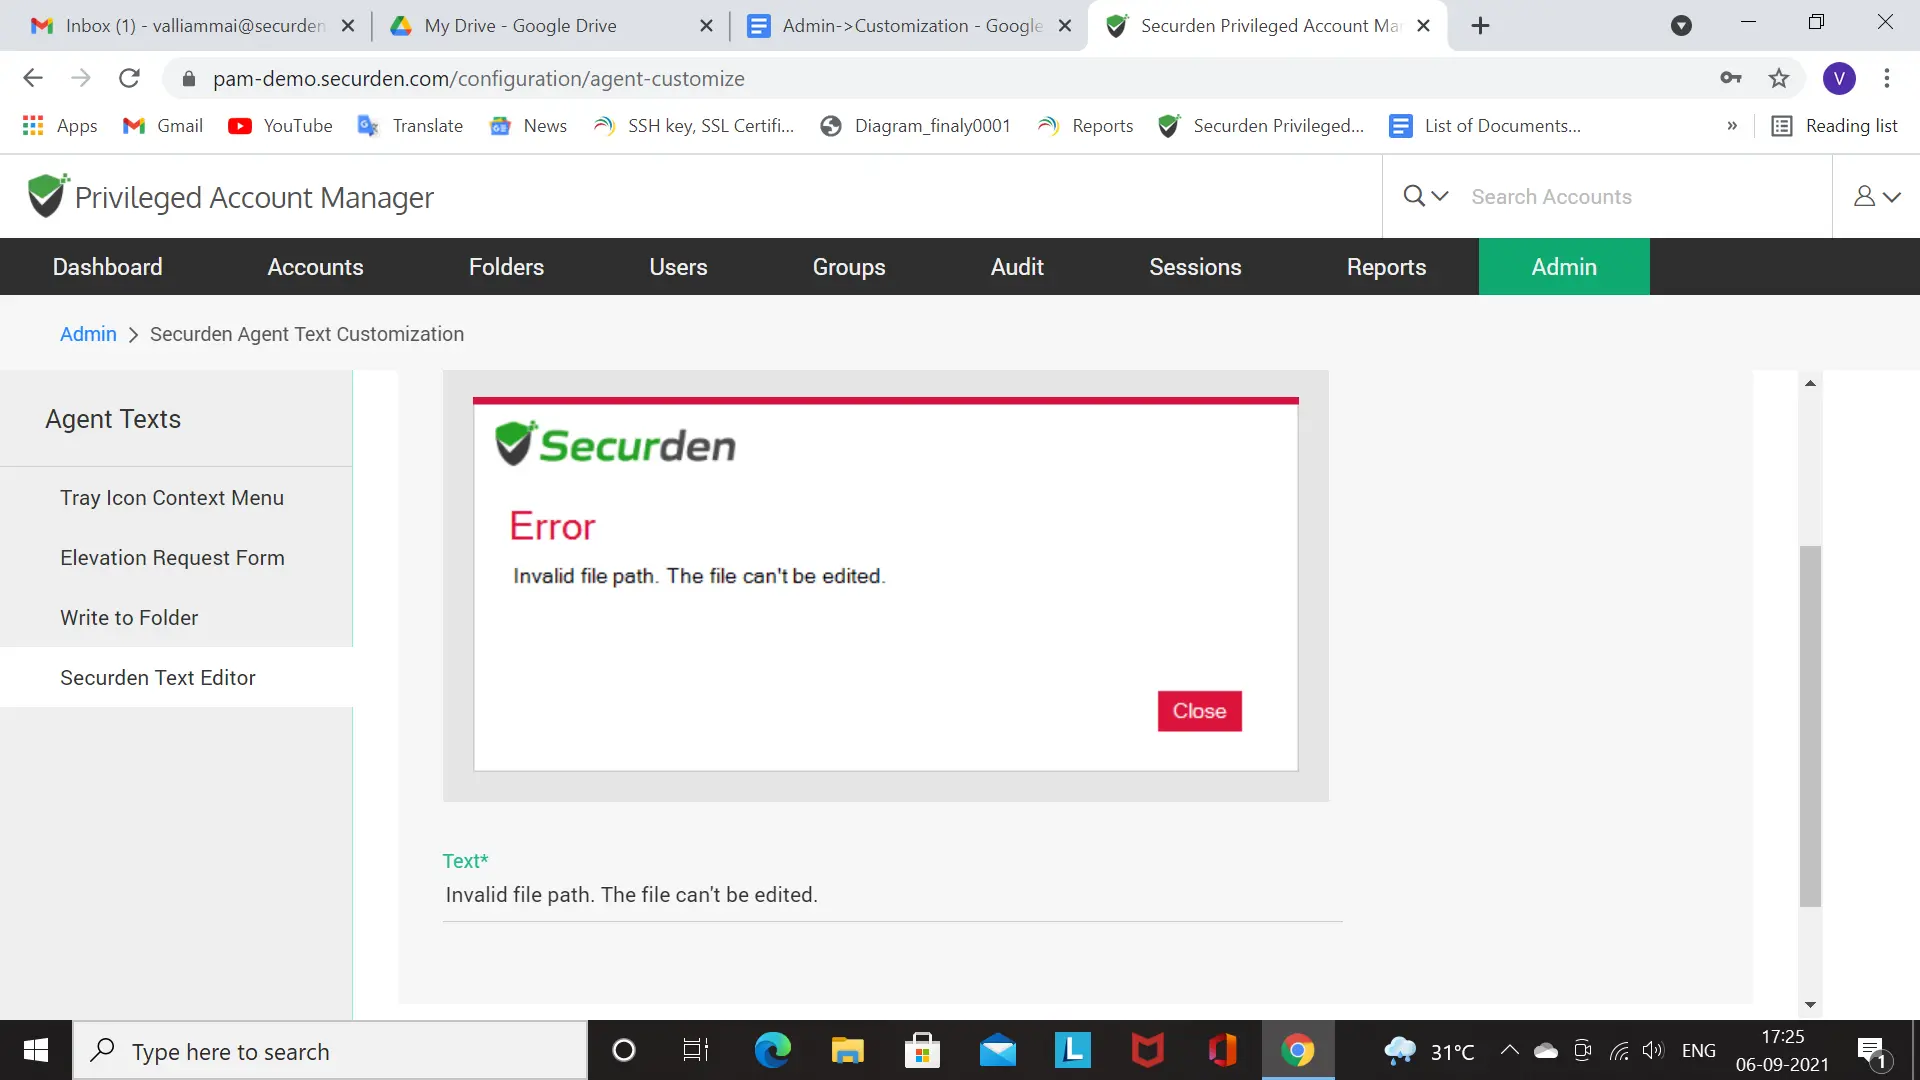
Securden Text Editor
The Securden text editor displays messages about invalid files and which cannot be edited.
In this way some desired and customized text lines can be included in the interface. The text inserted here will be reflected while installing and using Securden Agent.
How to Make Changes in Configurations Across the Organization?
Configuration feature is intended to facilitate organizational changes, to enhance user capabilities along with applications and system performance. The overall configuration settings improve visibility with tracking and maintaining the arrangement of various applications which brings control over the organization’s important assets. Navigate to Admin >> Customization >> Configurations section to exercise the customization options.
-
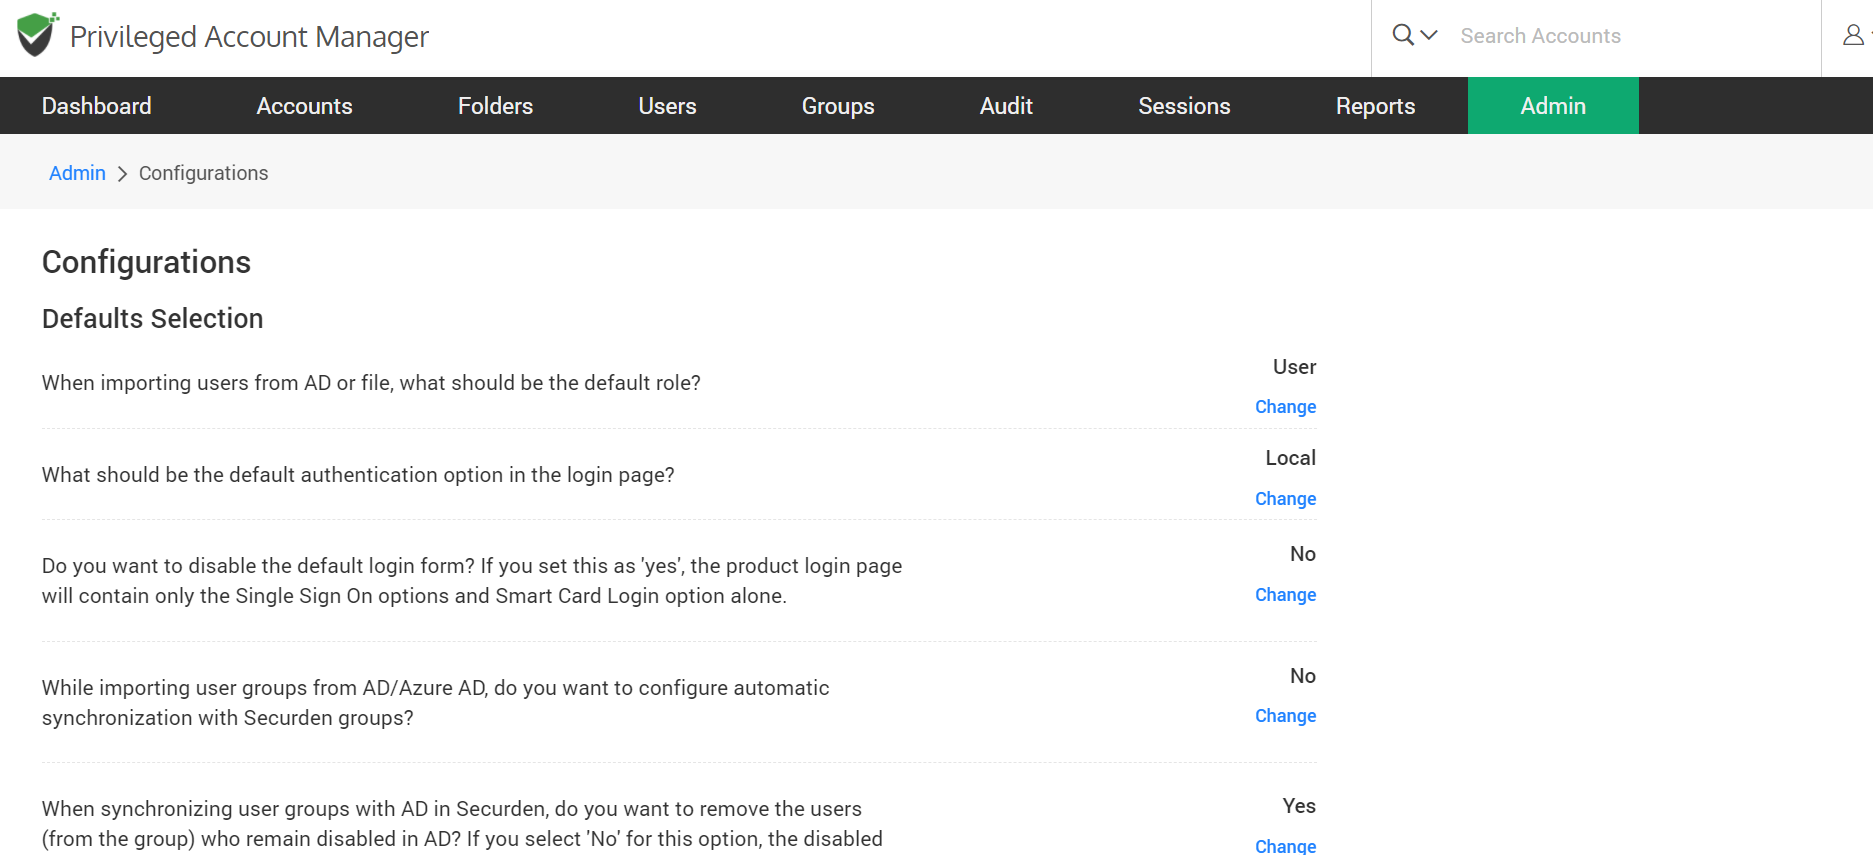
Defaults Selection
The defaults section includes all the settings which are modified to an option and set at the beginning of their configuration. They are not changed often and applies to all the users. You can set it as per the organizational requirements.

-
Password Policy
The password policies are usually enforced in certain activities like account addition and local password rests.So that they comply with the regulatory requirements.

-
Account Dependent Services
The account-dependent services get affected when a password is changed.

-
RESTful API
The API access can be allowed or denied for users with certain roles and you can customize it too.

-
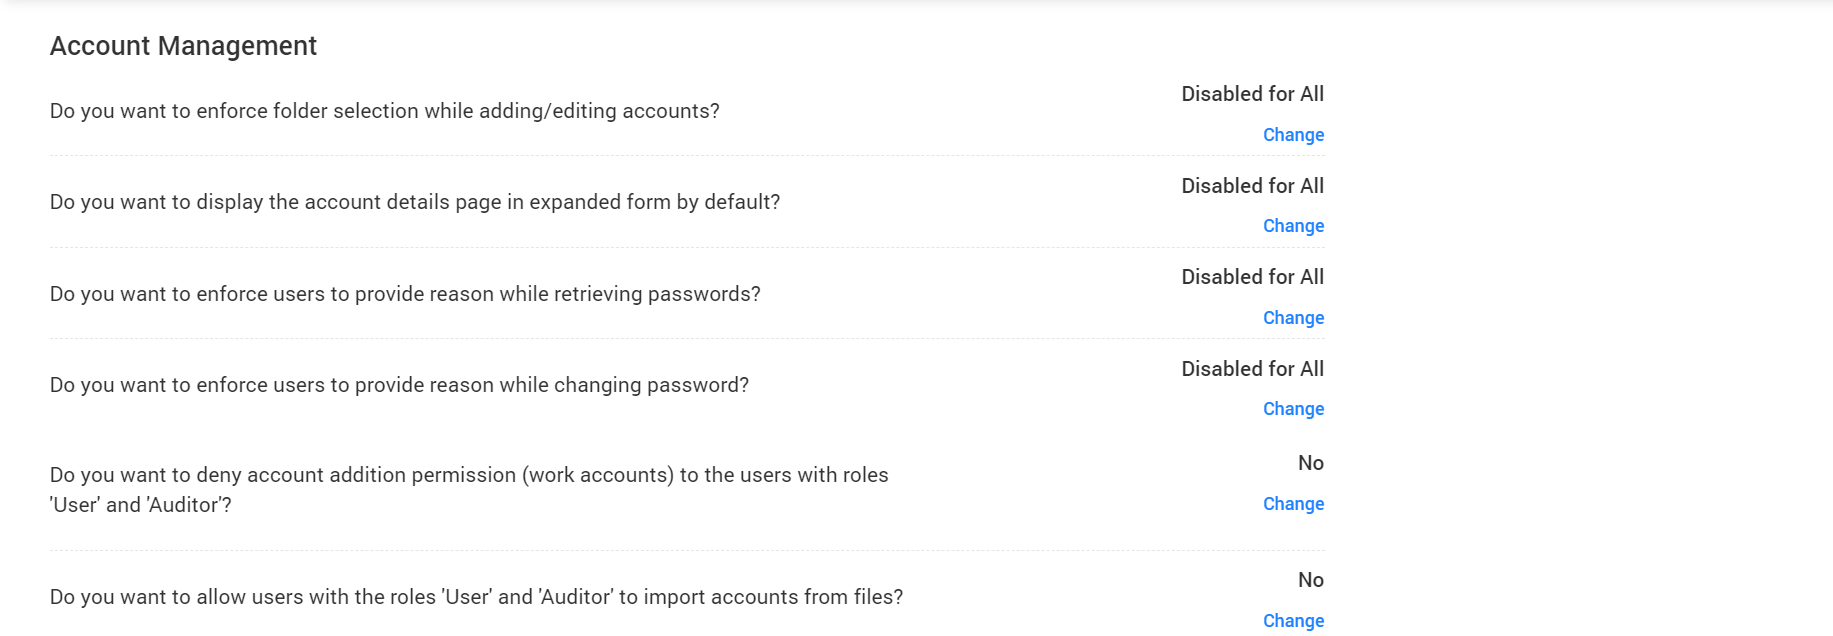
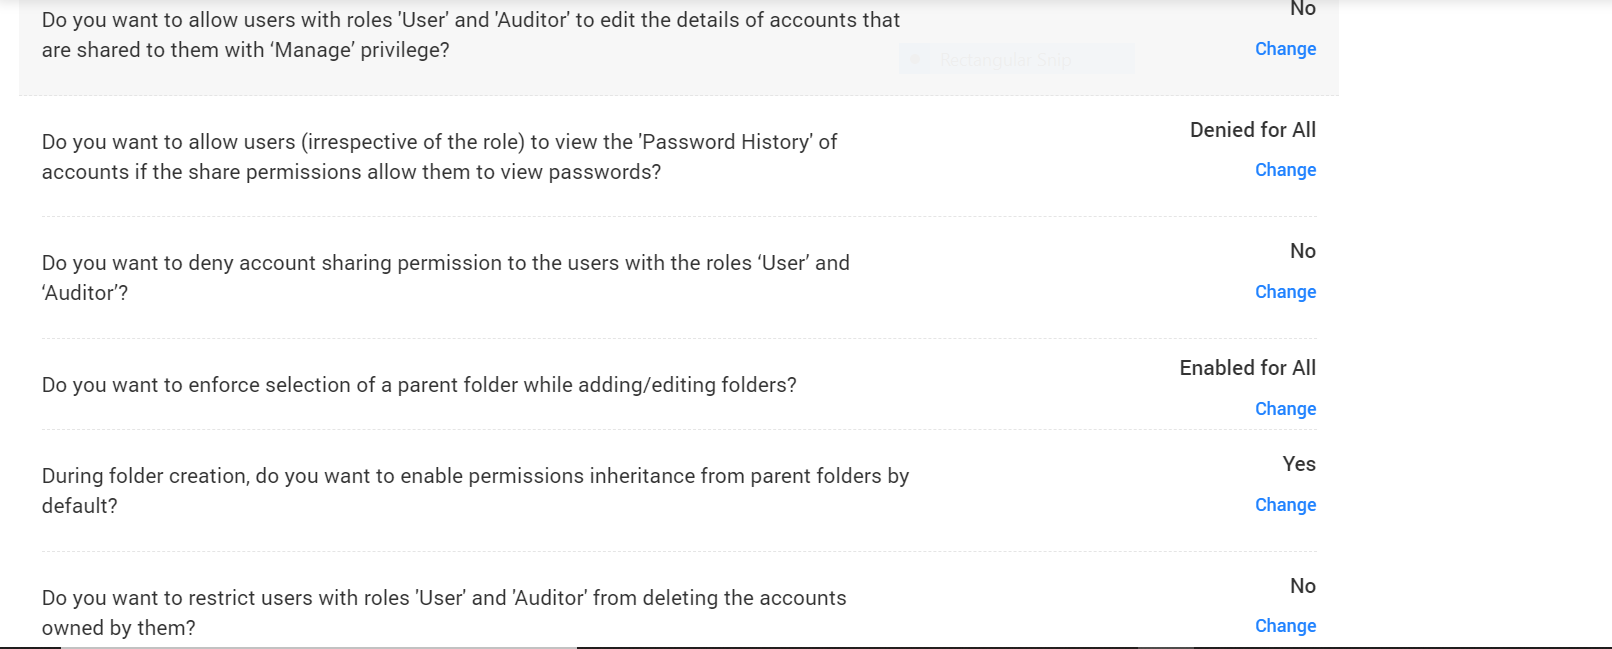
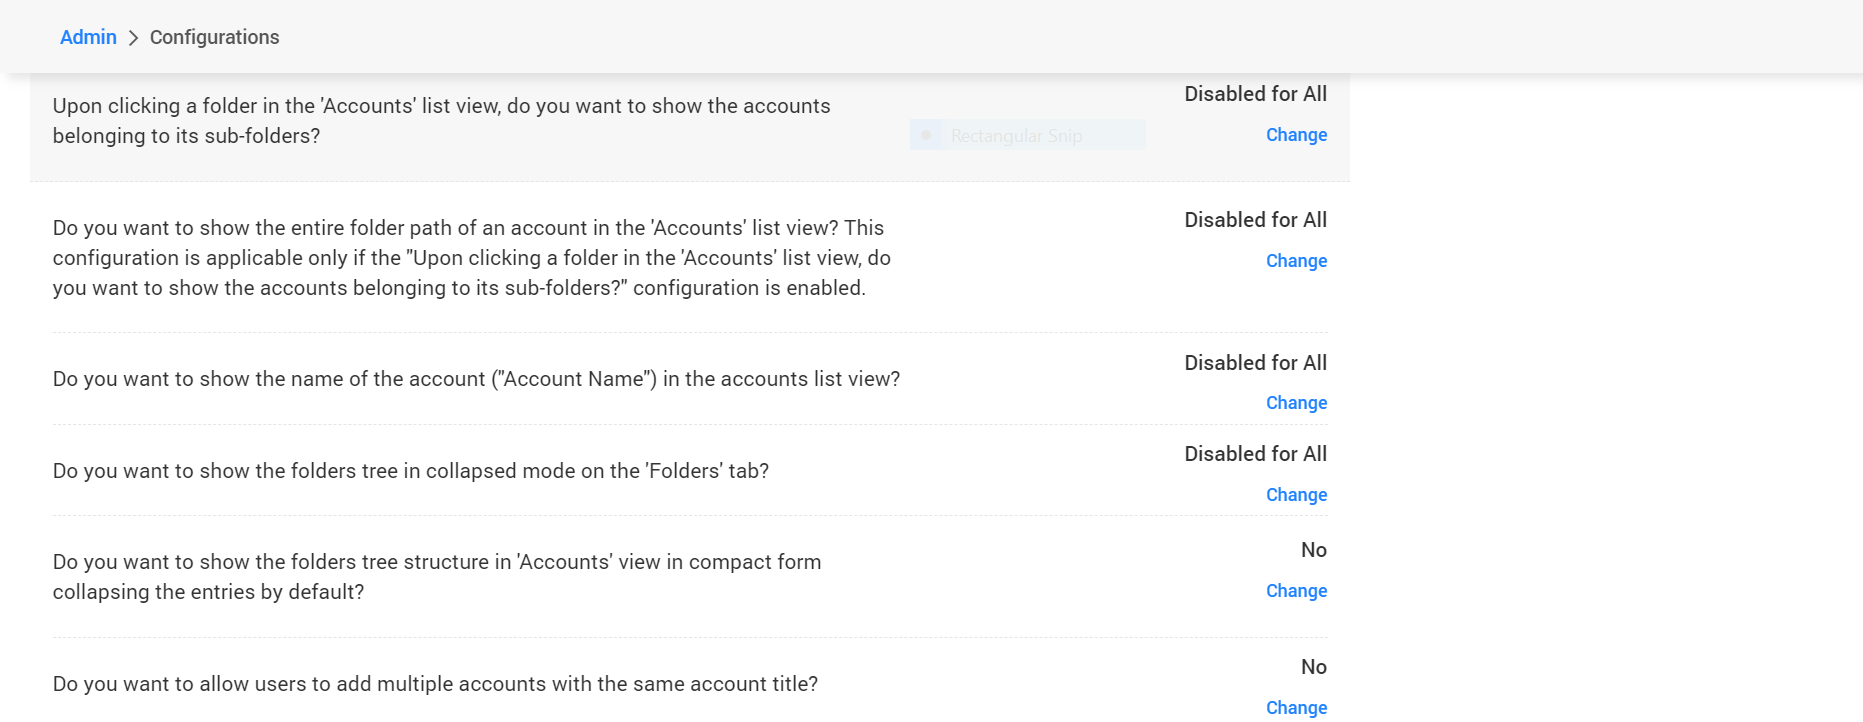
Account Management
The accounts management deals with all the permissions/access within the “Accounts” tab.
-
Remote Connections (using domain account)
The remote connections section deals with access permissions related to the launching of different types of connection modes.

-
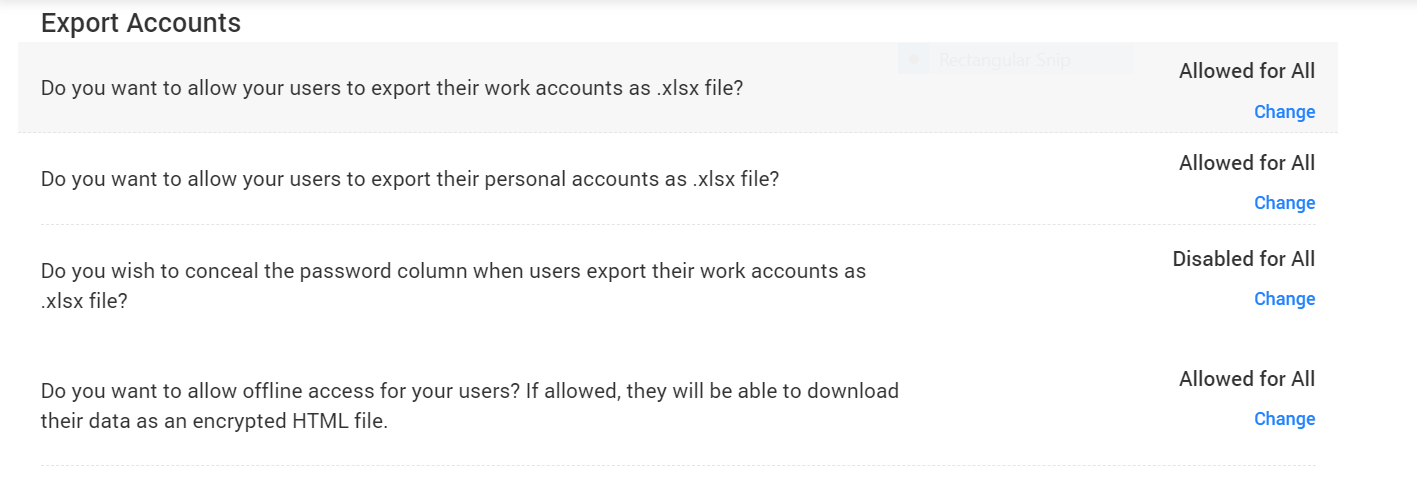
Export Accounts
The export account deals with the transport of data in files and offline access.
-
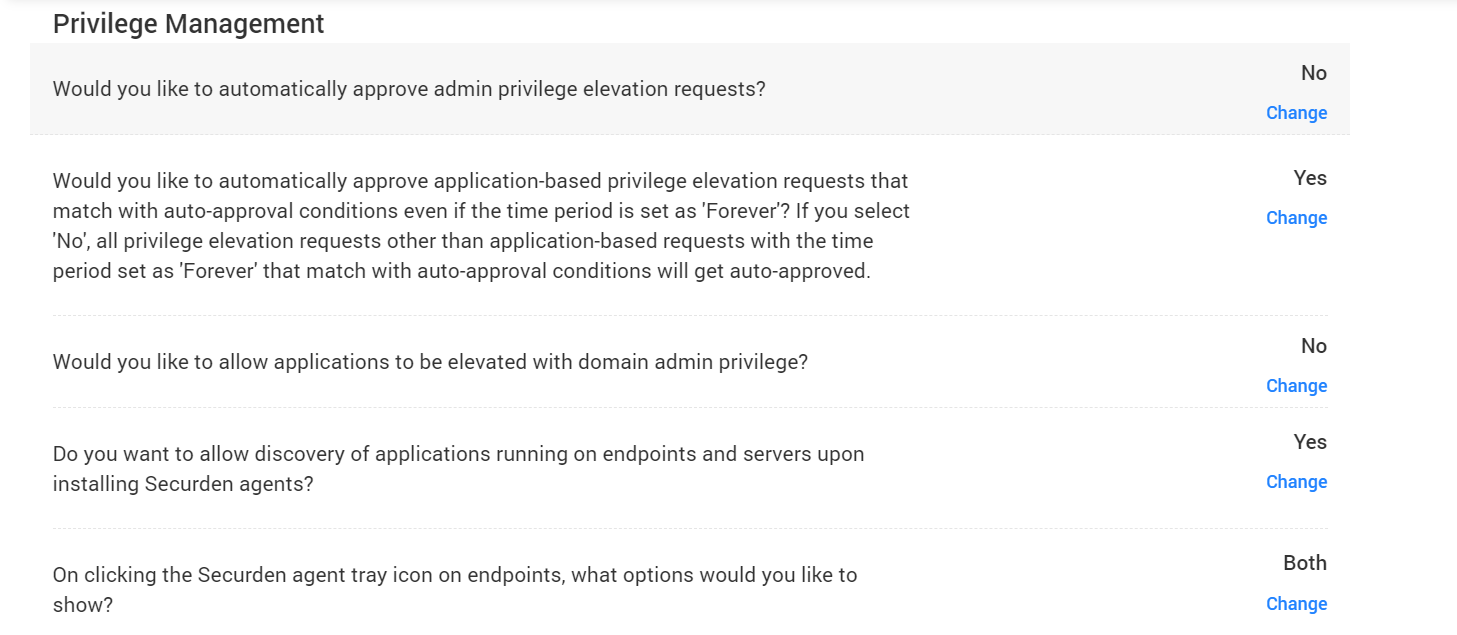
Privilege Management
The admin privileges carry high risk and hence require a lot of access requests to gain entry to critical assets.
-
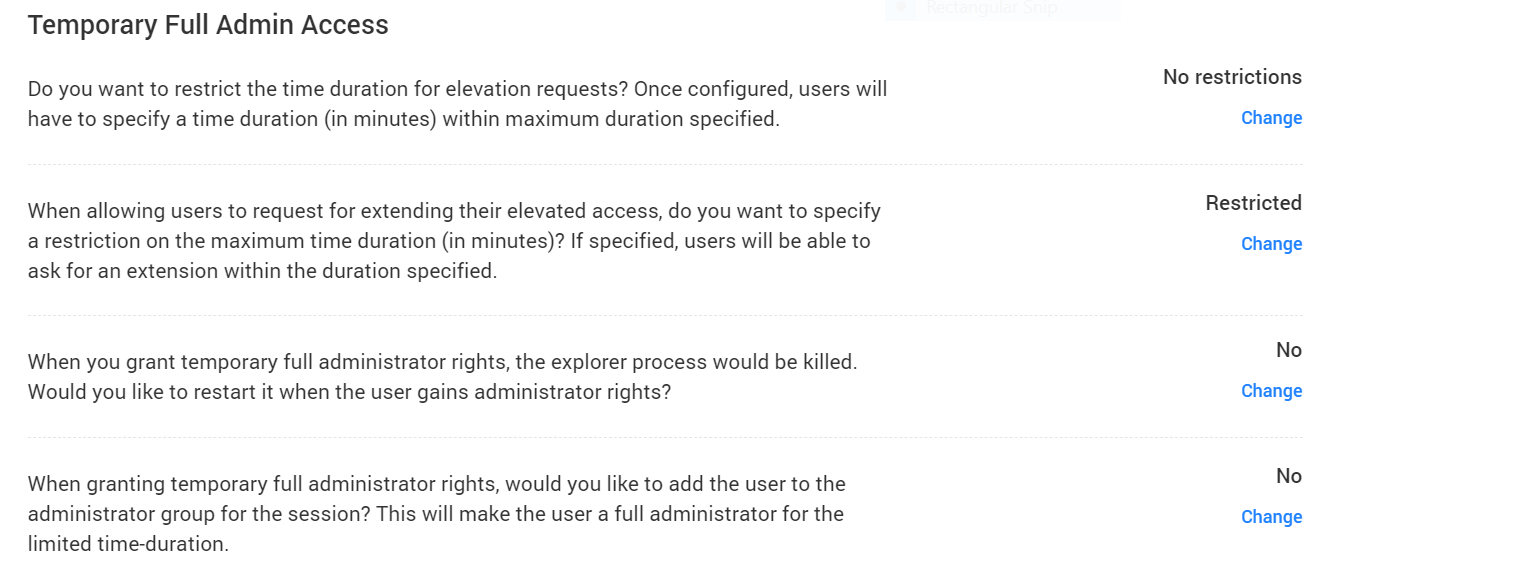
Temporary Full Admin Access
The temporary full admin access grants high privileges for a restricted duration and hence most of the settings require time limits.
-
Personal
This section involves the usage of personal accounts by the users.

-
Browser Extension
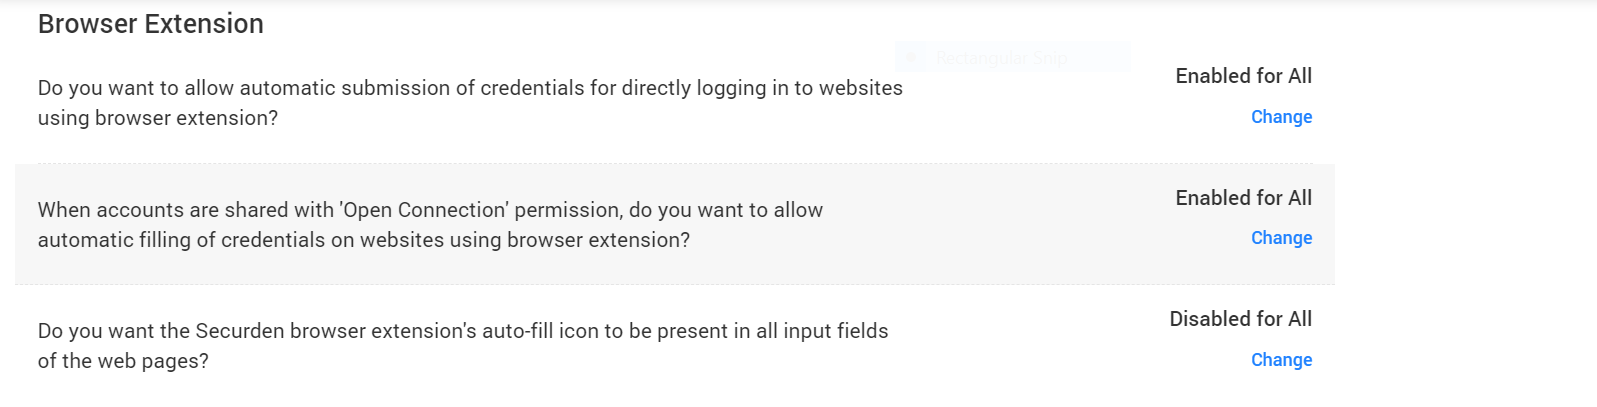
The browser extensions ease the process of filling credentials in websites and applications by the auto-fill provision.
-
Mobile App
To enhance the security in the Securden mobile app, the MFA can be enabled.

-
General
The general section deals with the overall application settings and routine features can be preset for easy daily access.


Under all these sections, you have the flexibility to turn on or off all the settings based on the needs of your organization.
How to Customize the Logo, Theme, and Text of the UI?
Logo
You can replace the Securden logo that appears in the login page and throughout the GUI with your own logo. Navigate to Admin >> Customization >> Logo, Theme and Text.
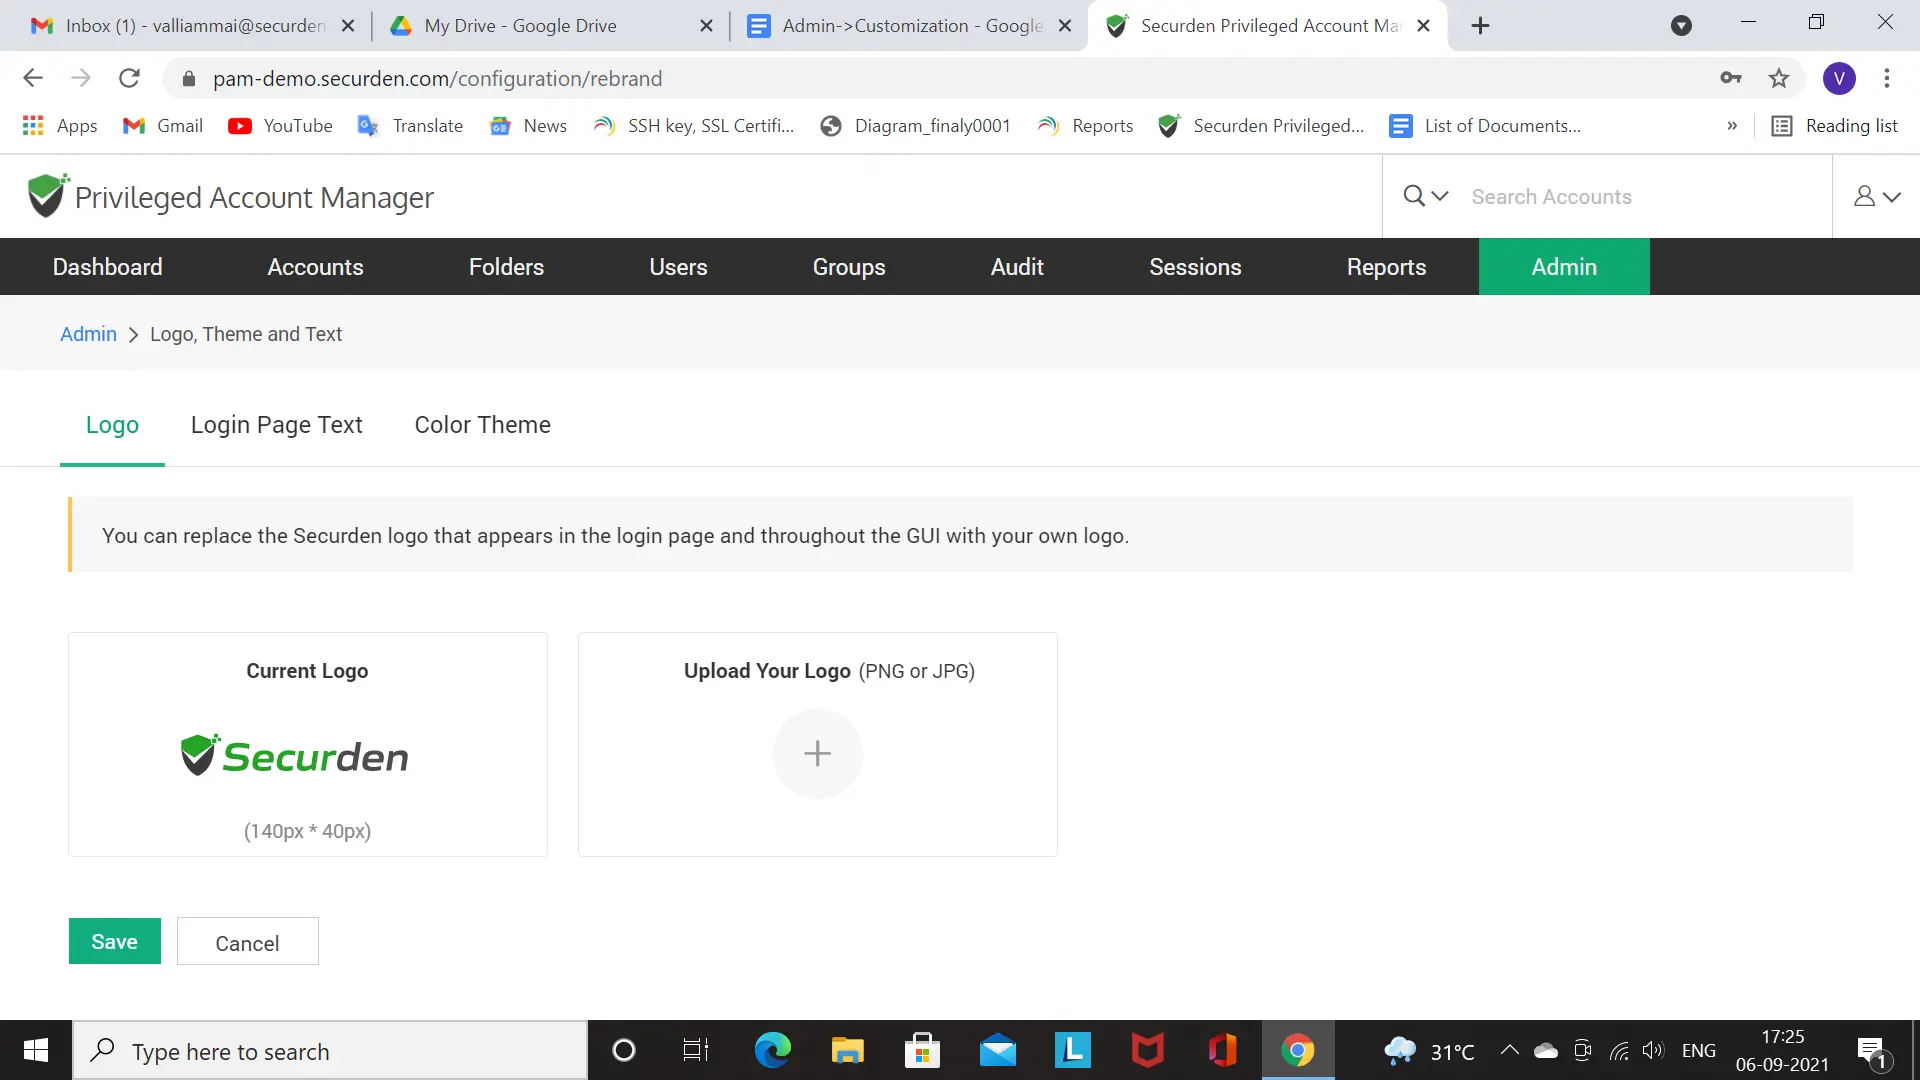
Click on Logo and you can upload your logo which will replace the Securden logo that appears throughout the GUI. The logo can be uploaded in the PNG or JPG format. Click on the ‘+’ symbol under Upload Your Logo and upload your logo. Then click on the Save button. After this, “Logo changed successfully” will be displayed on top of the screen.
Login Page Text
You can change the text that appears on the Securden login screen, including the product name and description. If you want to display any information or instructions on the login screen for your end-users or prompt them to agree for certain terms and conditions related to the usage of the product, you may do so from here. Click the Admin >> Customization >> Logo, Theme and Text >> Login Page Text.
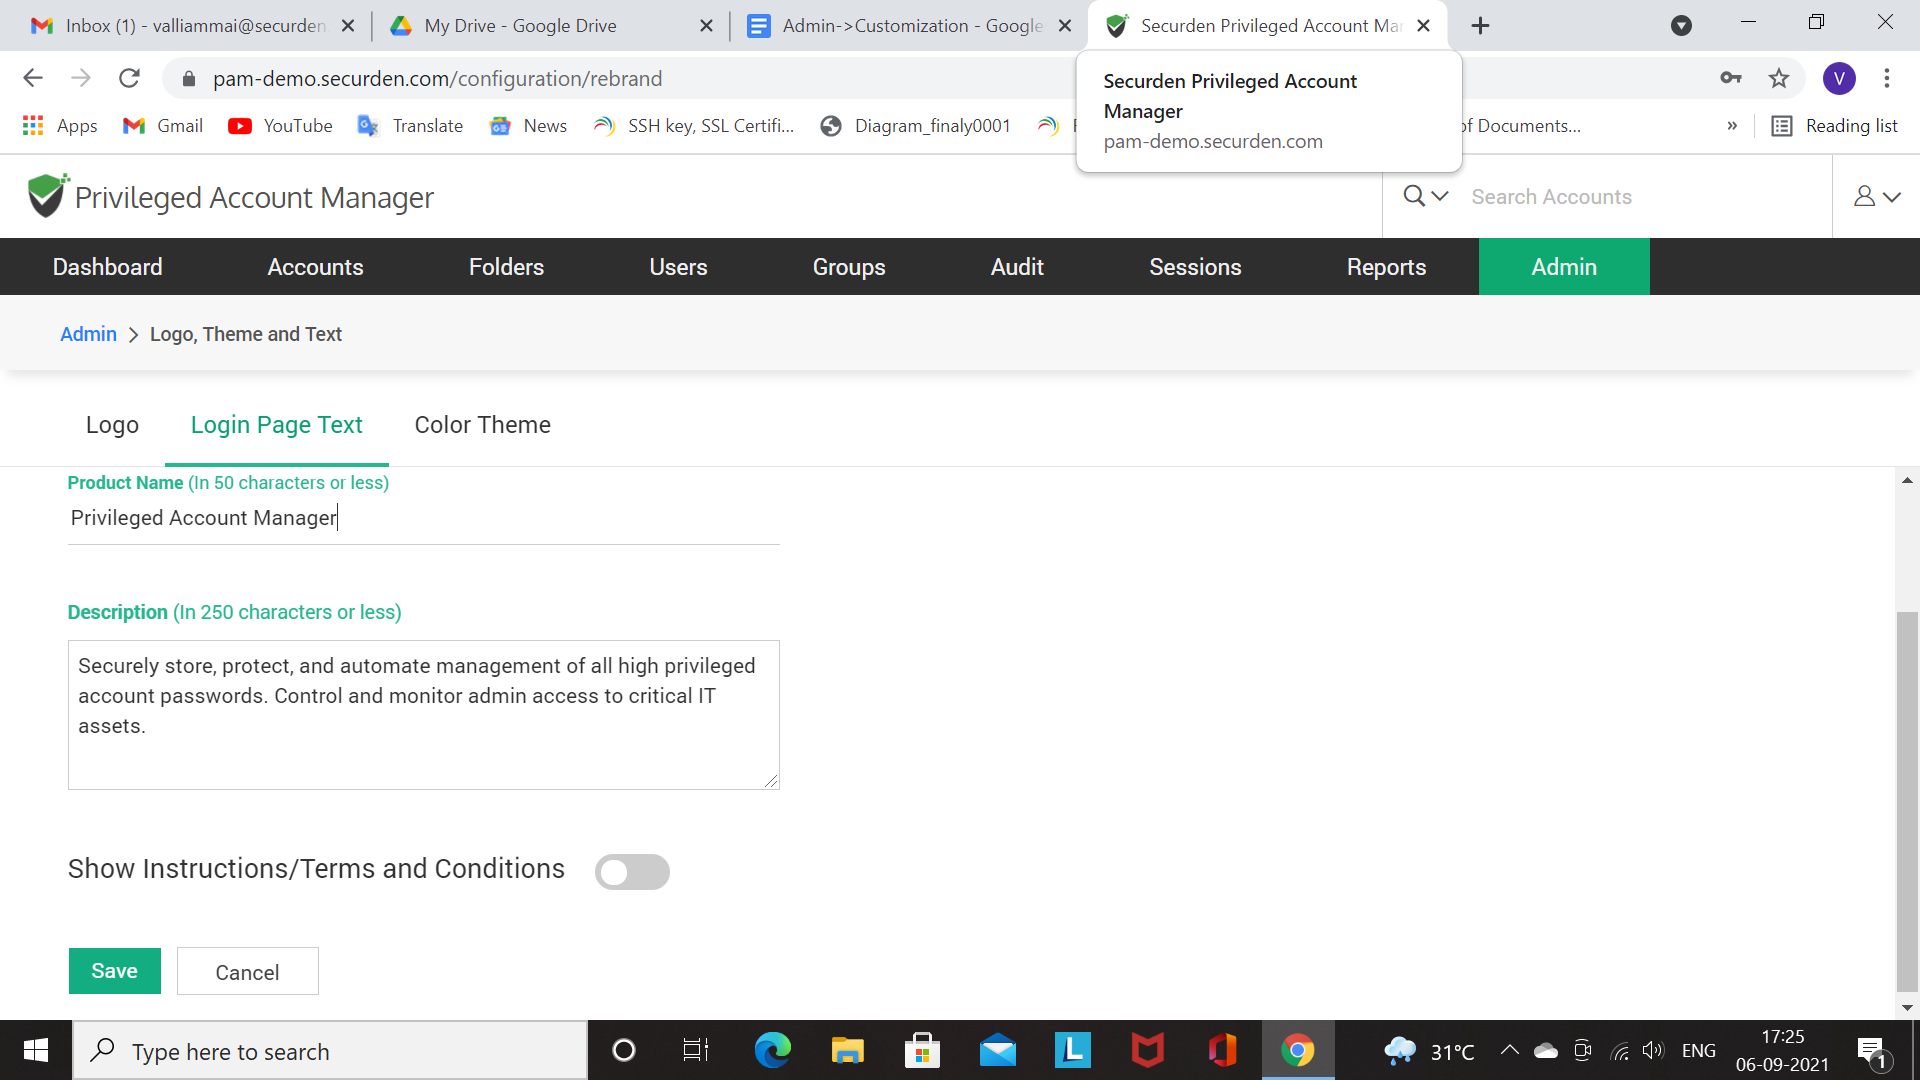
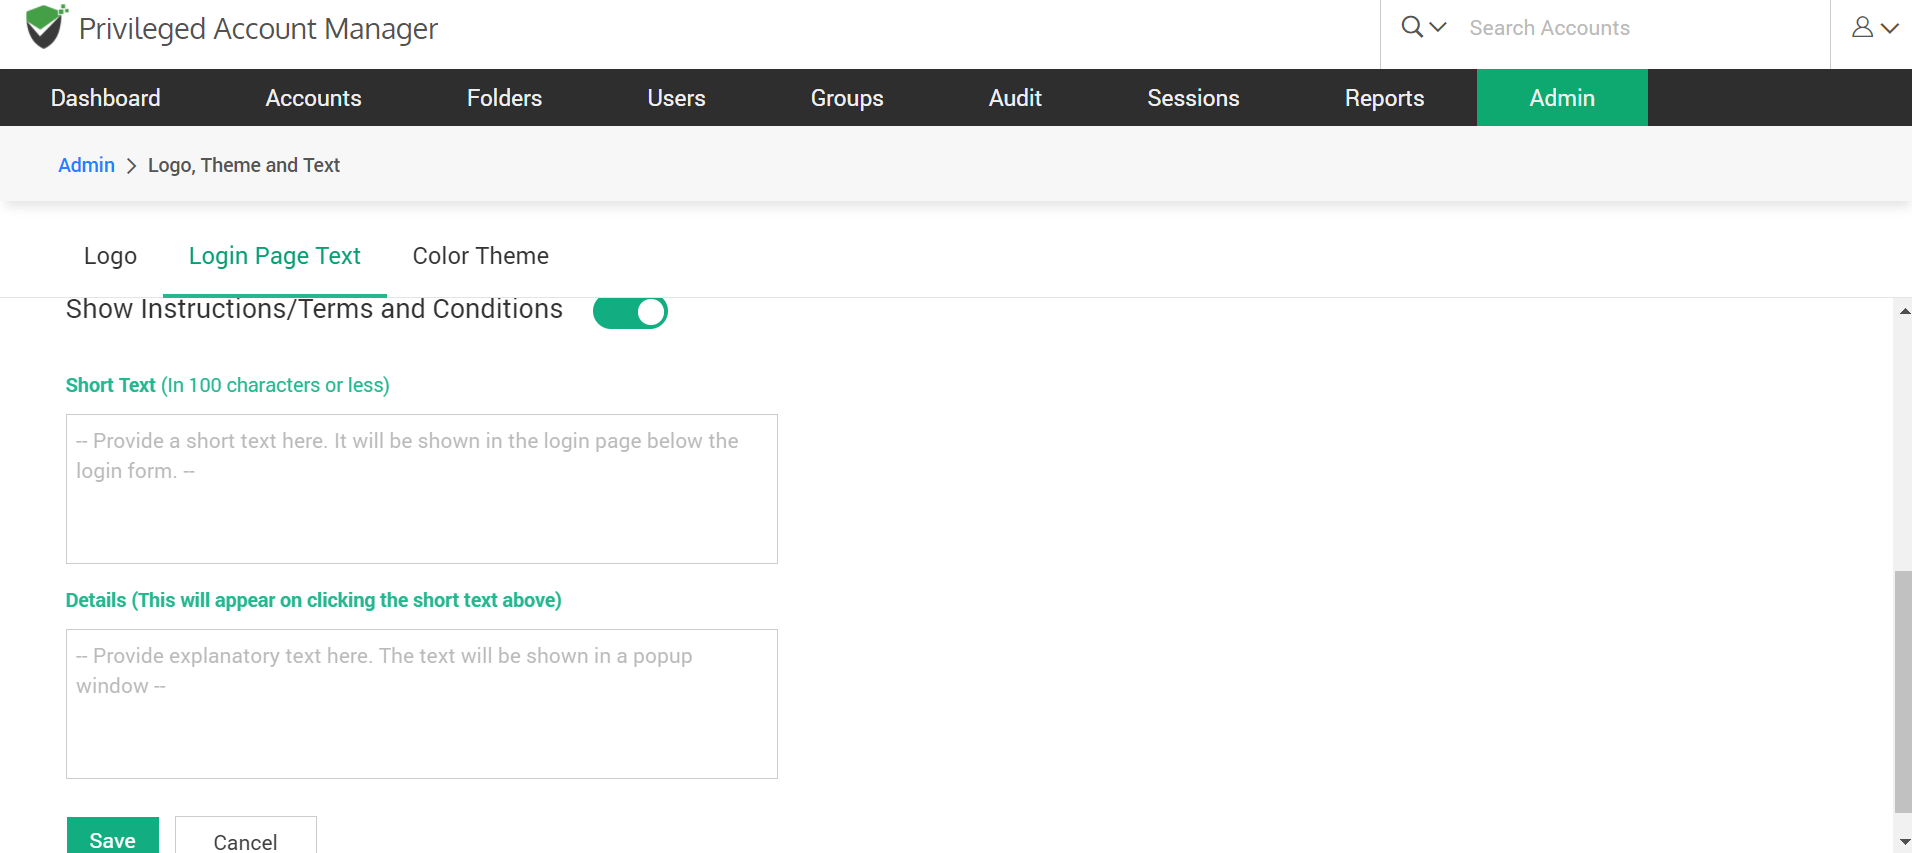
The product name (50 characters or less) and the description (250 characters or less) can be mentioned, along with that the Terms/Conditions can also be enabled if required. When enabled, a short text (100 characters or less) can be curated which will be shown on the login page below the login form. When you click on the short text, a popup window will display the details of the explanatory text provided. Then click on the Save button when you have specified the text. “Product details changed successfully” will be displayed on top of the screen after it is saved.
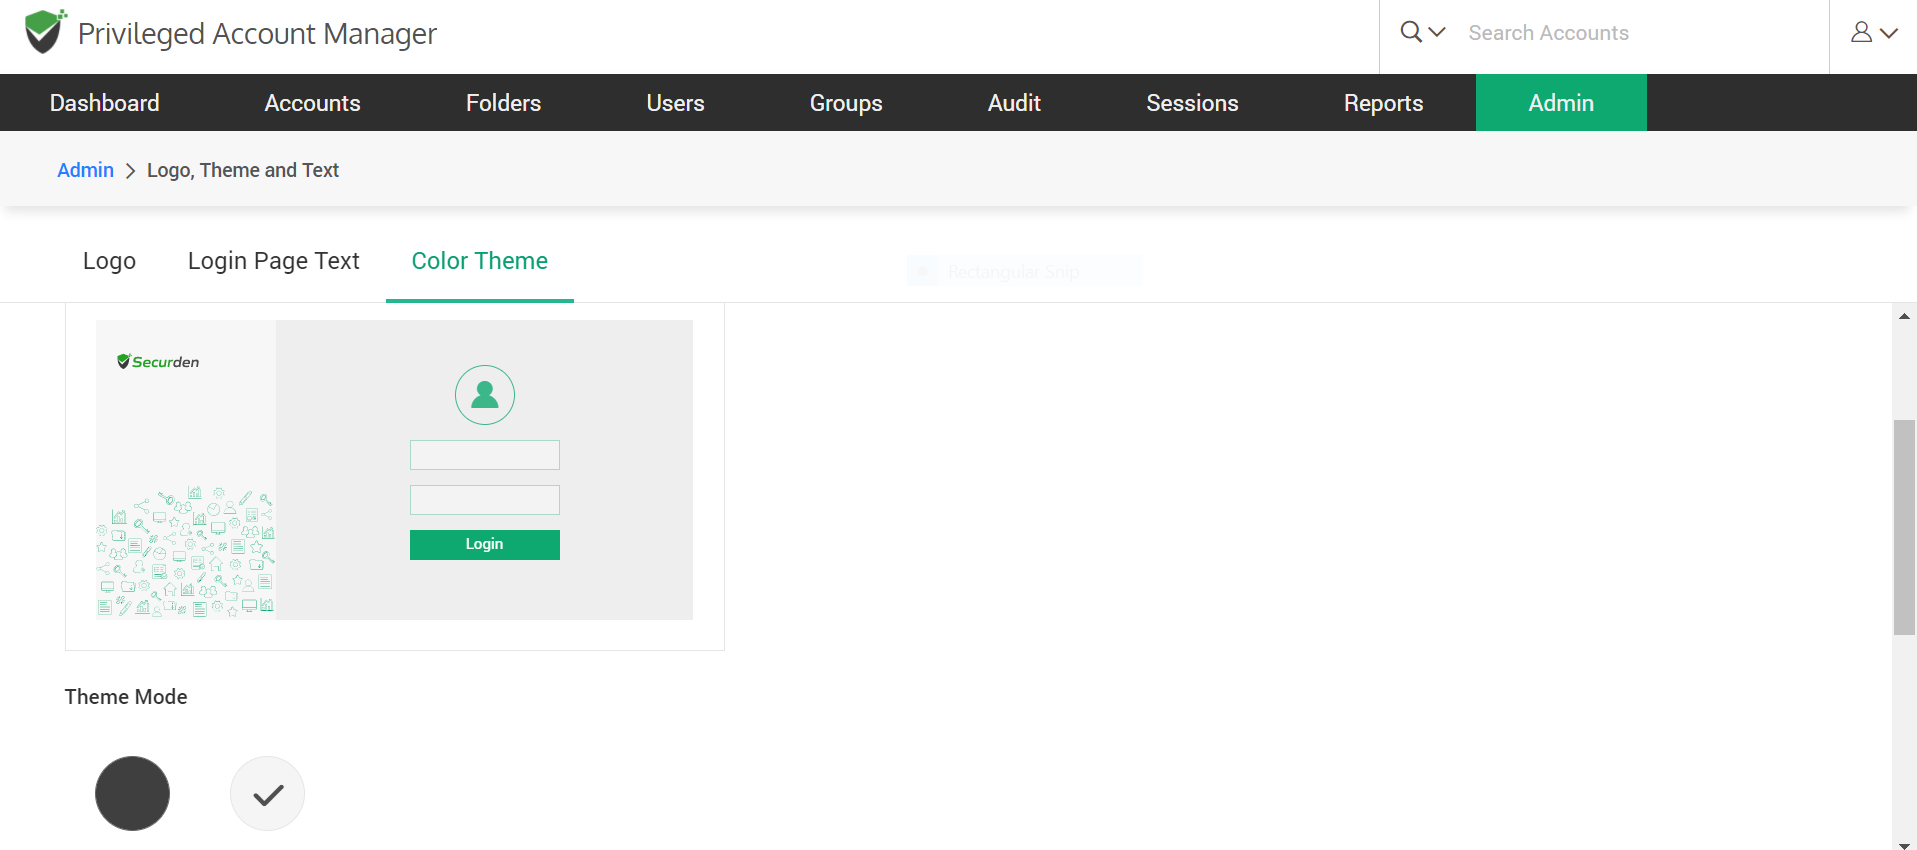
Color Theme
By default, Securden web-interface follows the green color theme. You may change it and assign a different color theme by selecting a color below. The theme you set here will be the default theme for your organization and take effect for all users. However, end users can overwrite this and can choose a theme of their choice for their own views. If any of your users have already changed their theme, the change you make here will not take effect for them.
Click on Admin >> Customization >> Logo, Theme and Text >> Color Theme.
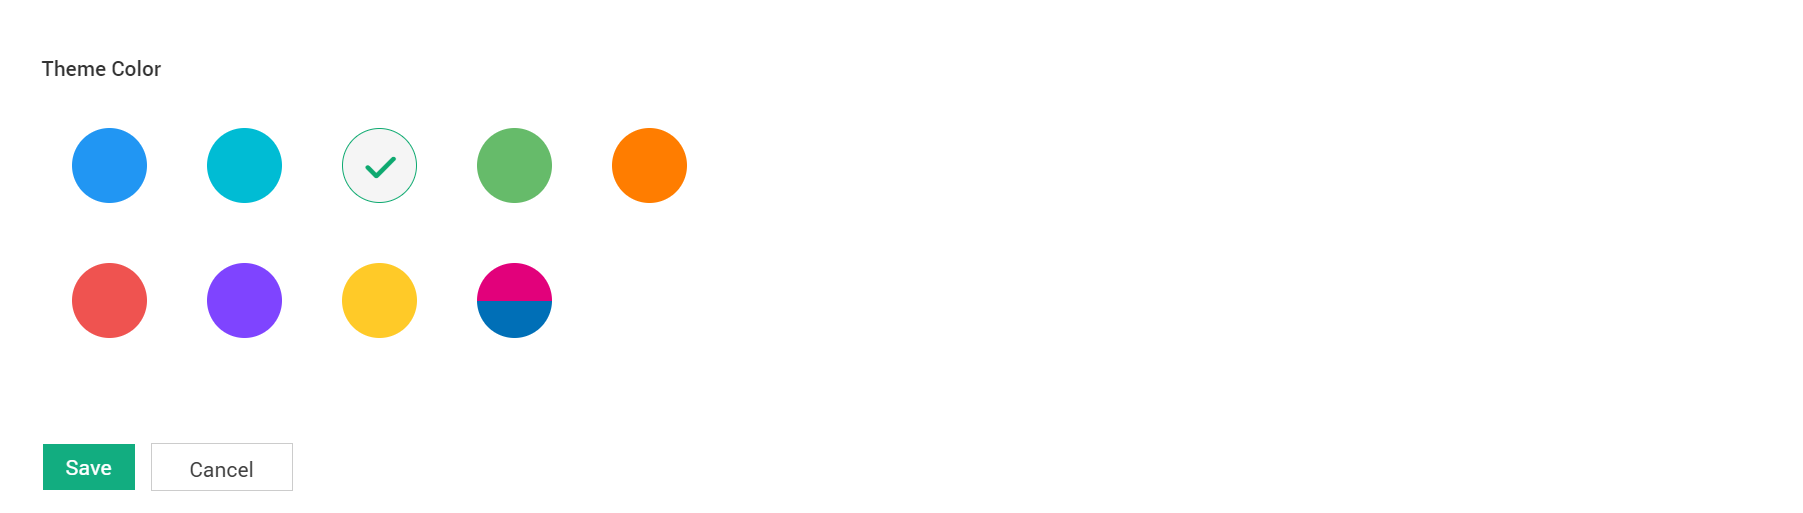
After selecting the theme mode and theme color, click on the Save button. “Product color theme changed successfully” will be displayed on top of the screen after it is saved.
Product Language Selection
Securden supports multiple languages and you can carry out the desired language selection here. The language of the machine in which Securden is installed, is taken as the system default language. From the list of supported languages, you can select the ones required for your organization. You can then select one of the languages as the 'default' selection for your organization. When you do so, all your users will see the product in that language. Individual users will have the option to select any language from the list of languages approved by you.
Navigate to Admin >> Customisations >> Product Language Selection. The screen will display the languages that are currently supported by Securden. You will have to select the language from Pick Desired Languages according to your organization’s requirements.
Once the desired language is enabled, a message “Language Activated Successfully” will be displayed on top of the screen. When you disable any language, it will display the message, “Language deactivated successfully”. End users will get the option to use one of the languages selected by you.
The languages available and supported by Securden at present are:
- English
- French
- Deutsche
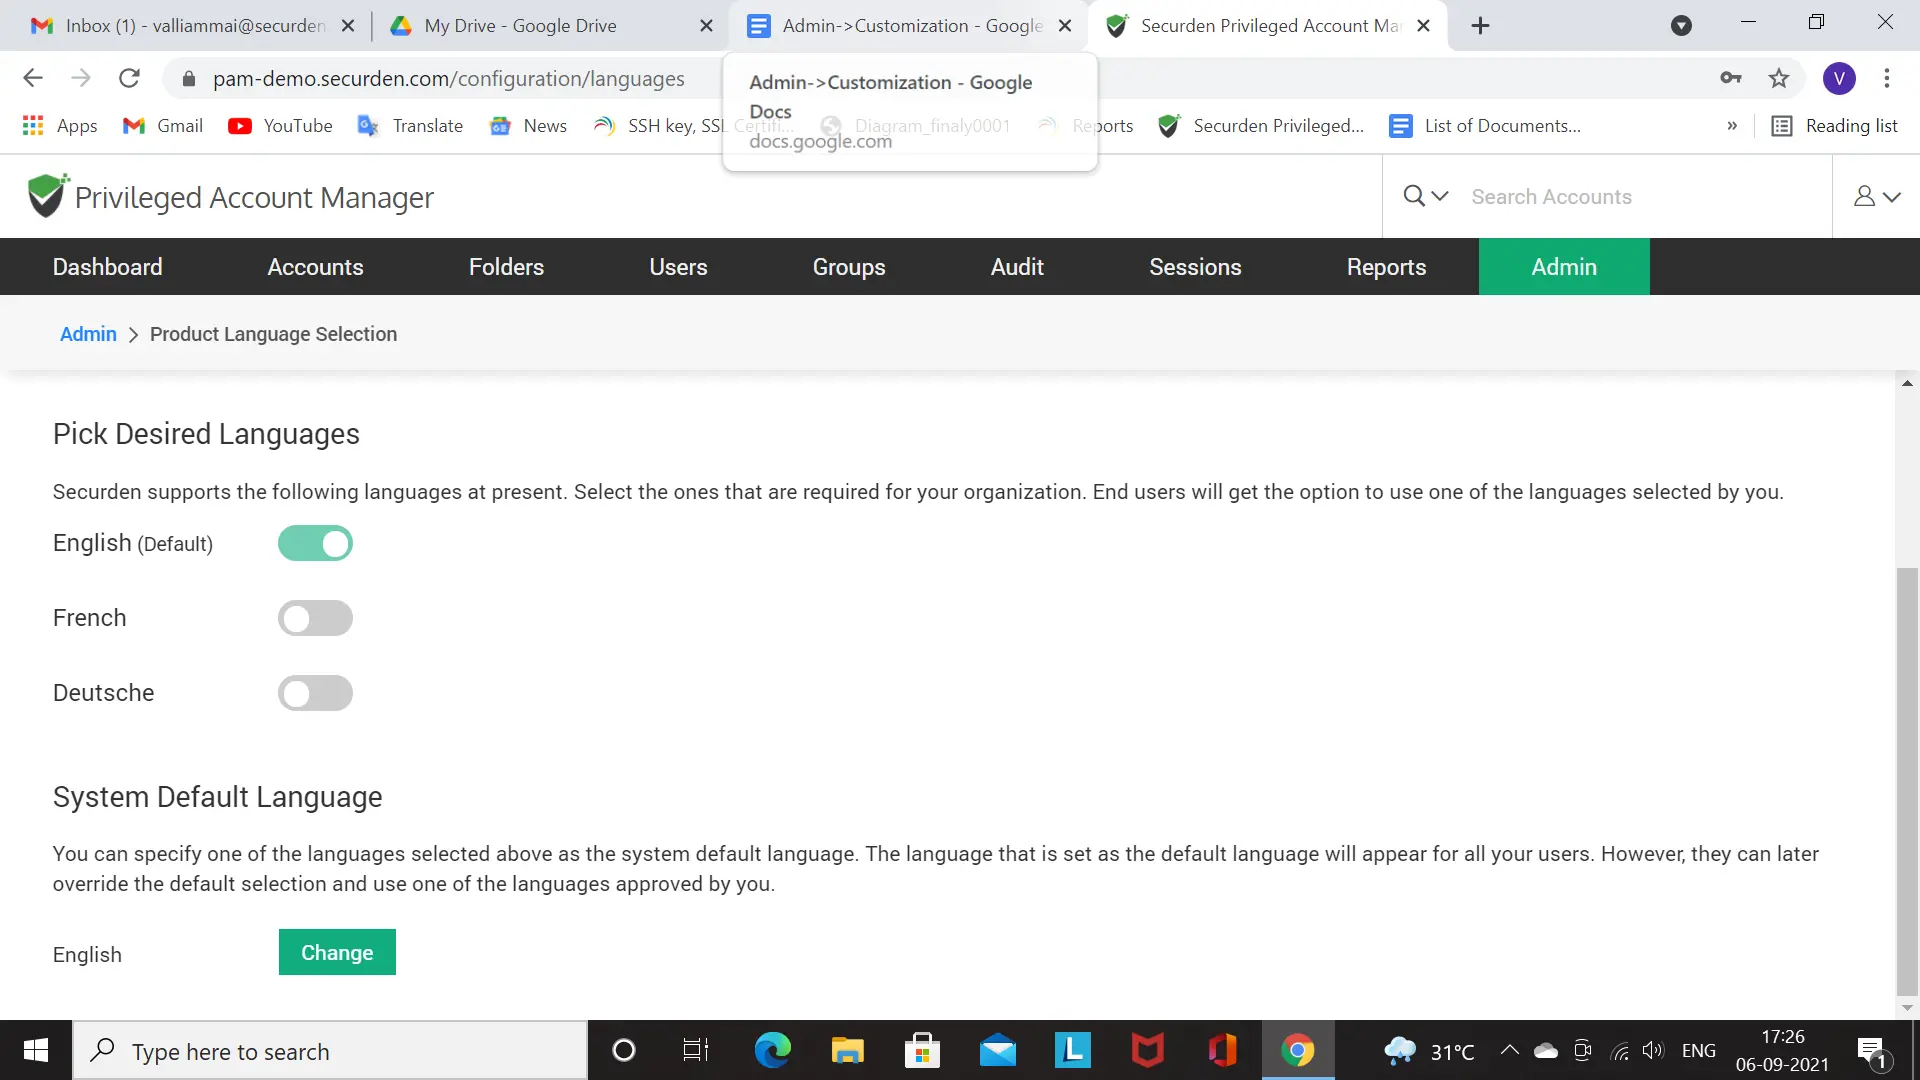
Then you can specify one of the languages selected above as the System Default Language. The language selected as default here will appear for all your users. However, they can later override the default selection and use one of the languages approved by you.
The language of the machine where Securden is installed is taken as the system default language. They can select from the approved list of languages by clicking on the Change button. A message “Language changed successfully” will be displayed on top of the screen in the language medium which you have selected.
